自定义 dom
1 说明
自定义 dom 是一种采用在线编程的方式提供使用者一种扩展现有平台组件的能力。支持 vue2, vue3, react,或者原生方式编写自定义组件能力。
- 支持 iframe,平台渲染模式 2 种模式,iframe 渲染模式是使用 iframe 为底座,独立开发的功能内容运行在 iframe 中;平台模式是基于平台暴露出来的第三方库进行开发,当前只支持 Vue3 的模版开发,当前的组件渲染和平台渲染在同一个作用域渲染,这种开发模式下要做好错误处理,不然会影响到平台。
// 第三方开放库包含以下内容,和平台保持一致
'vue': Vue, // vue版本, 3.2.21版本
'ant-design-vue': AntdVue, // ant-design-vue版本,3.2.12
'lodash-es': LoadashES, // 4.17.21版本
'lodash':  lodash, // 4.17.21版本
'dayjs':  dayjs, // 1.11.10
'axios': axios, // axios@0.26.1
'@ant-design/icons-vue': Icons, // ant-design-vue对应的平台icon信息
'ant-design-vue/es/locale/en_US': enUS, // ant-design-vue对应的组件国际化资源(英文)
'ant-design-vue/es/locale/zh_CN': zhCN // ant-design-vue对应的组件国际化资源(中文)
- 支持即时编辑即时预览
- 默认全屏展示,可编辑内容区域充足
- 支持添加多文件资源
- 支持实时编译 vue2, vue3, react 资源,渲染成 dom
- 支持基础模版快速创建初始化代码,和原生开发无异
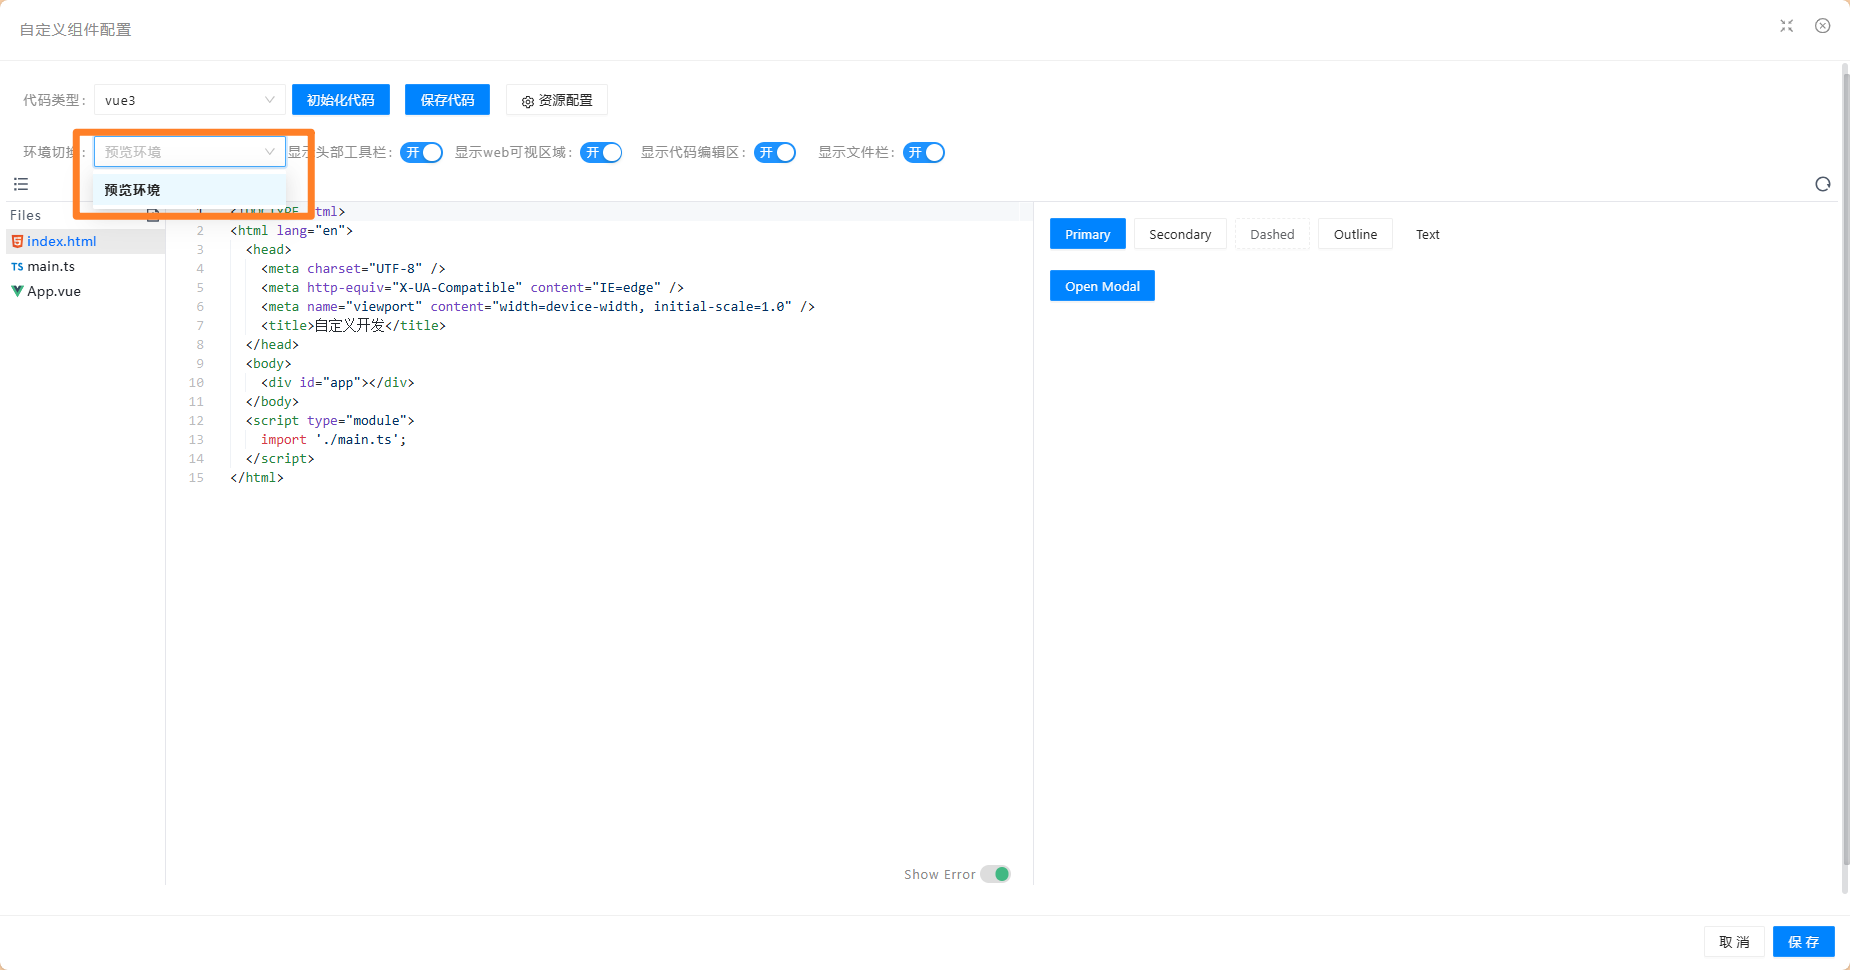
- 支持切换环境调试,发布或预览应用后,在编辑态可切换不同的环境调试 dom
2 使用说明
2.1 注意事项
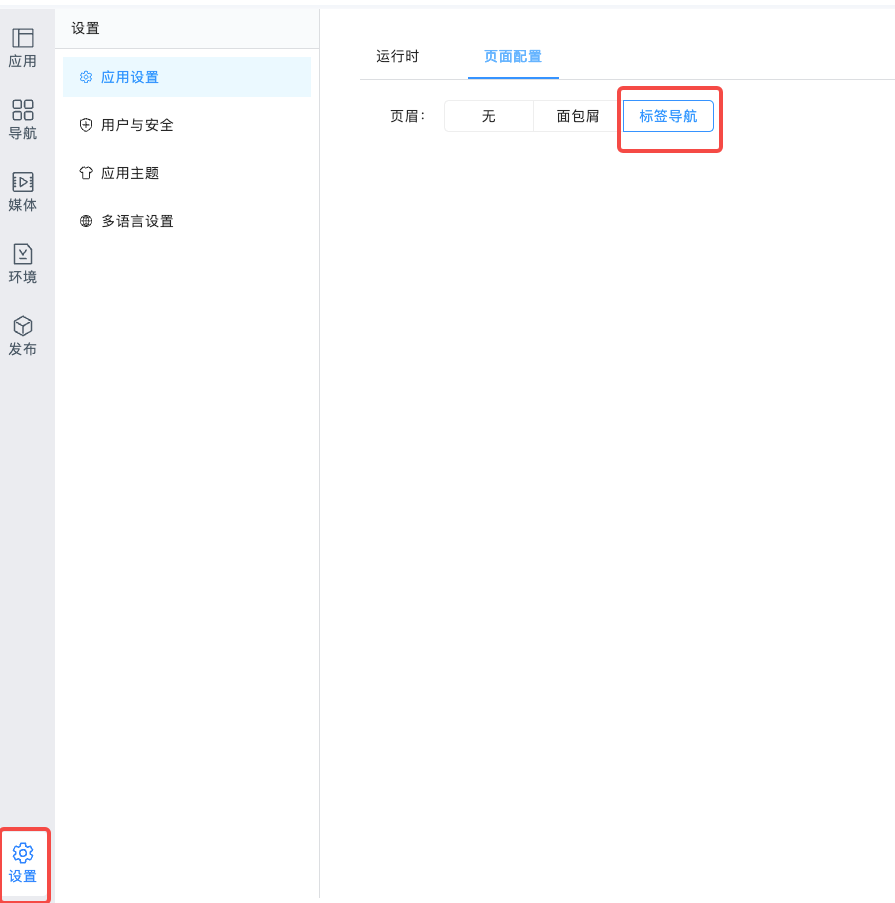
- 若平台开启的是标签导航模式,菜单页面会被 keep-alive 缓存,此时使用 iframe 渲染模式,切换菜单的时候内容会丢失
- 渲染类型配置成渲染类型为平台渲染的情况,只能选择和低码平台一样的 Vue3 模版进行开发
| 渲染模式 | 开发模版 | 引入三方资源 | 渲染内容是否支持 keep-alive 缓存 |
|---|---|---|---|
| 平台渲染 | 只支持 vue3 | 不支持注入三方资源 支持平台暴露的资源 - vue: vue@3.2.21mailto:vue@3.2.21 - ant-design-vue: ant-design-vue@3.2.12mailto:ant-design-vue@3.2.12 - lodash-es: lodash-es@4.17.12mailto:lodash-es@4.17.12 - lodash: lodash@4.17.21mailto:lodash@4.17.21 - dayjs: dayjs@1.11.10mailto:dayjs@1.11.10 - axios: axios@0.26.1mailto:axios@0.26.1 | 支持 |
| iframe | 不限制 | 支持引入 配置 import-map.json 文件,默认通过 imports map 能力注入 | 不支持 |
- 使用平台渲染模式,只能选择 vue3 模版,不支持配置 import-map.json,不支持注入三方库使用
- 使用 iframe 渲染模式, 不限制模版类型,可以动态注入其他三方库使用;iframe 渲染模式下支持配置是否展示 eruda,开启 eruda,则开启了调试工具,可以查看到代码运行的错误信息和日志输出信息
- 文件存储方式:组件配置数据存储方式,对象存储数据的类型是以对象形式存储,而字符串存储数据则以 Base64 编码的方式进行存储
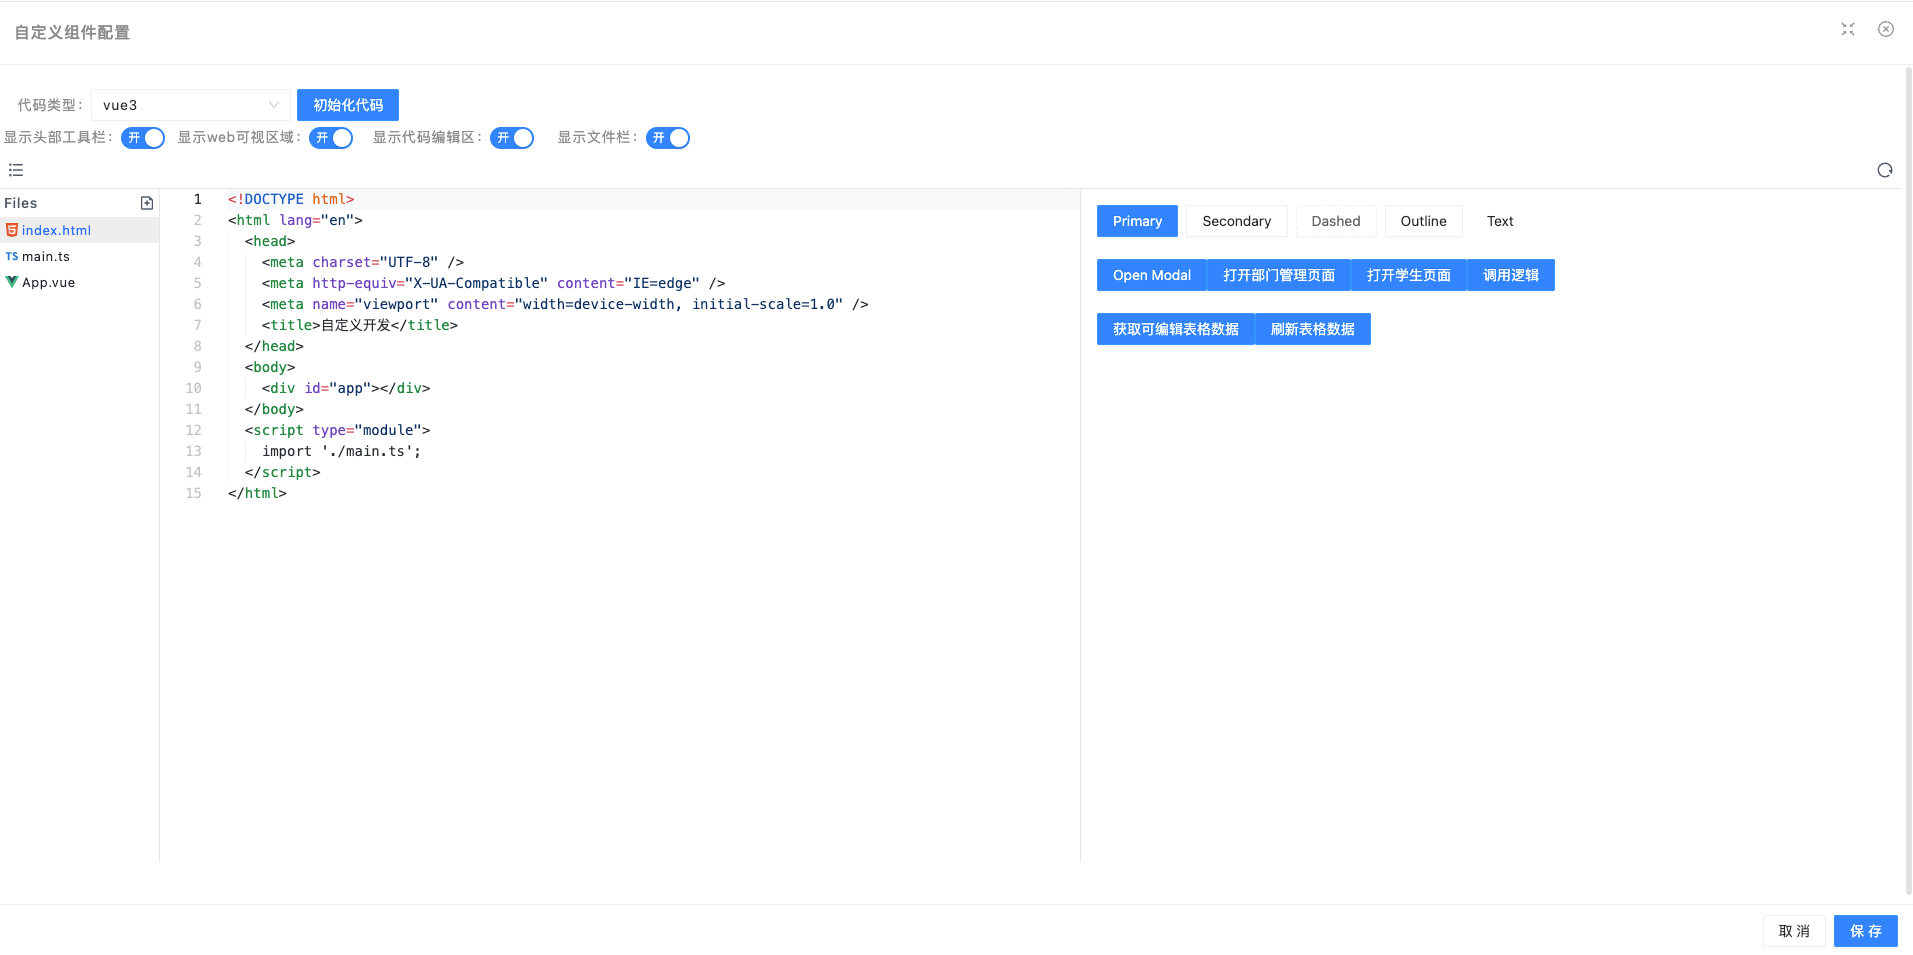
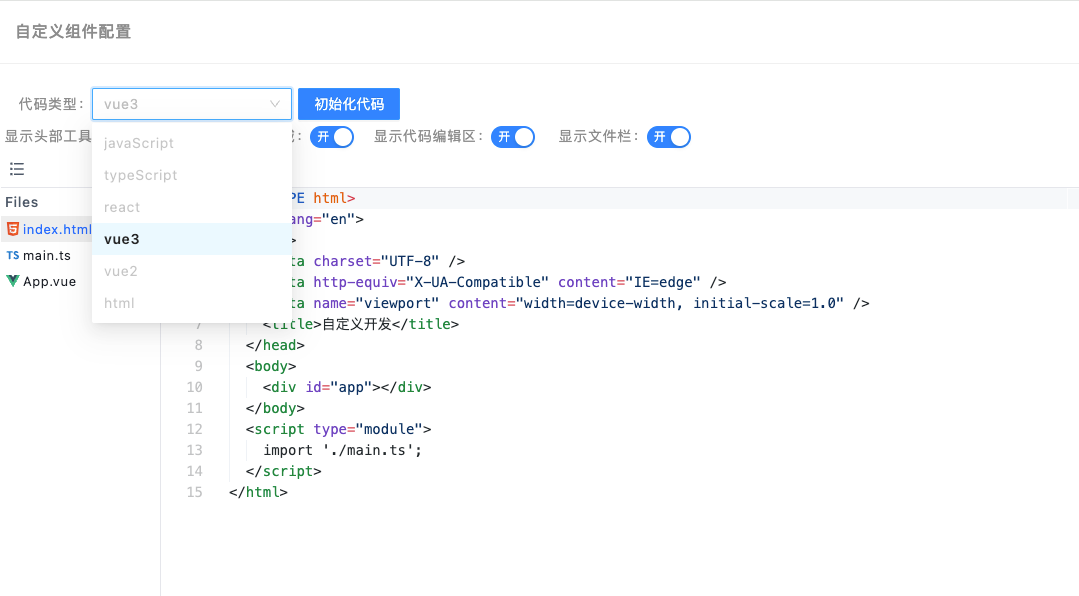
- 组件配置:组件配置初始化提供了一些通用的基础模版,包括 javaScript、 typeScript、react、vue2、vue3、html,可以根据自己喜好来选择
- 支持创建虚拟文件
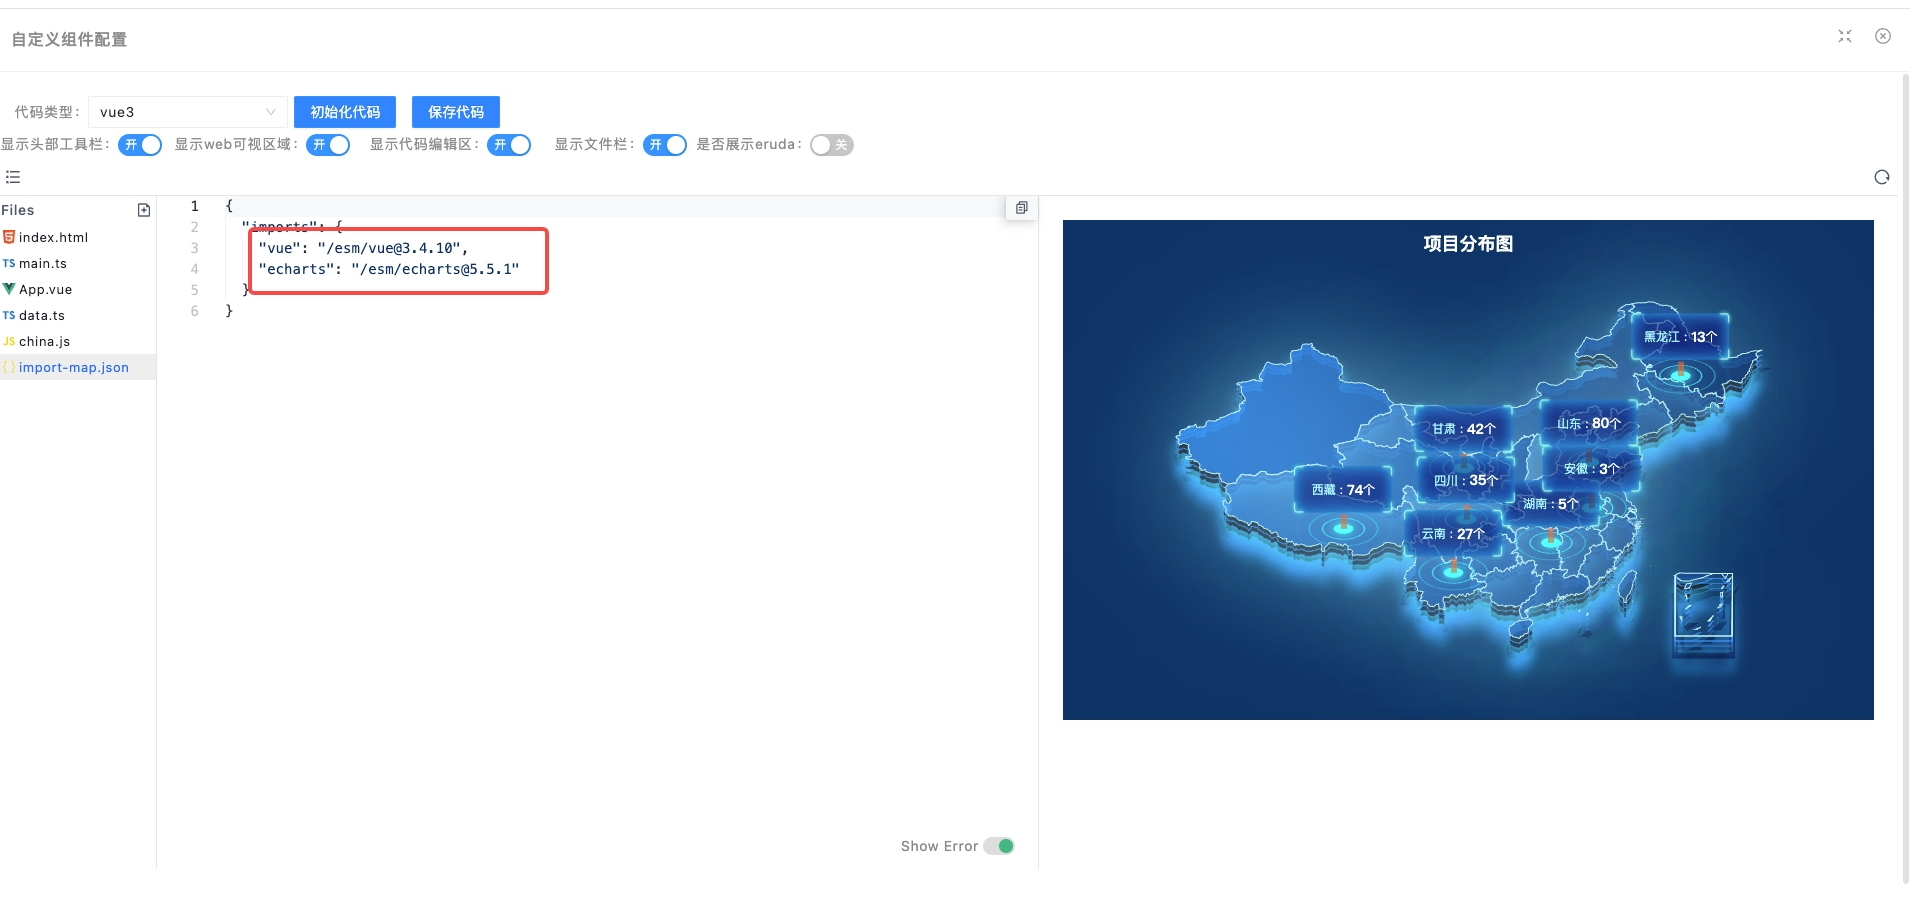
- import-map.json 文件支持引入三方的 esm 资源,并不能直接使用 umd 资源(平台渲染模式不可用)
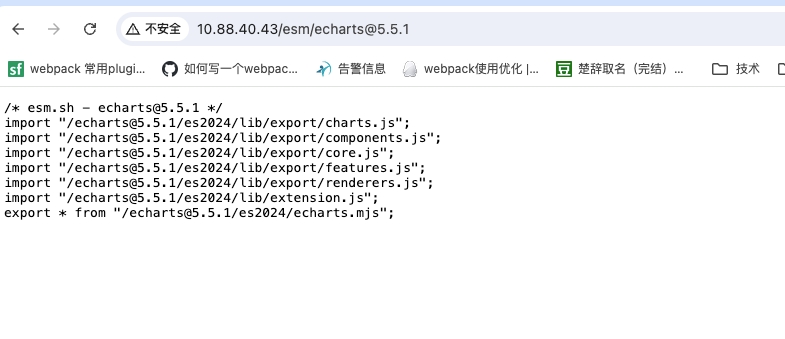
esm 三方资源可以从 https://esm.sh/ 寻找
esm 包的优势:不需要再去引入当前所依赖的资源
umd 资源引入 ant-design-vue 的时候要同步引入 dayjs 才能使用
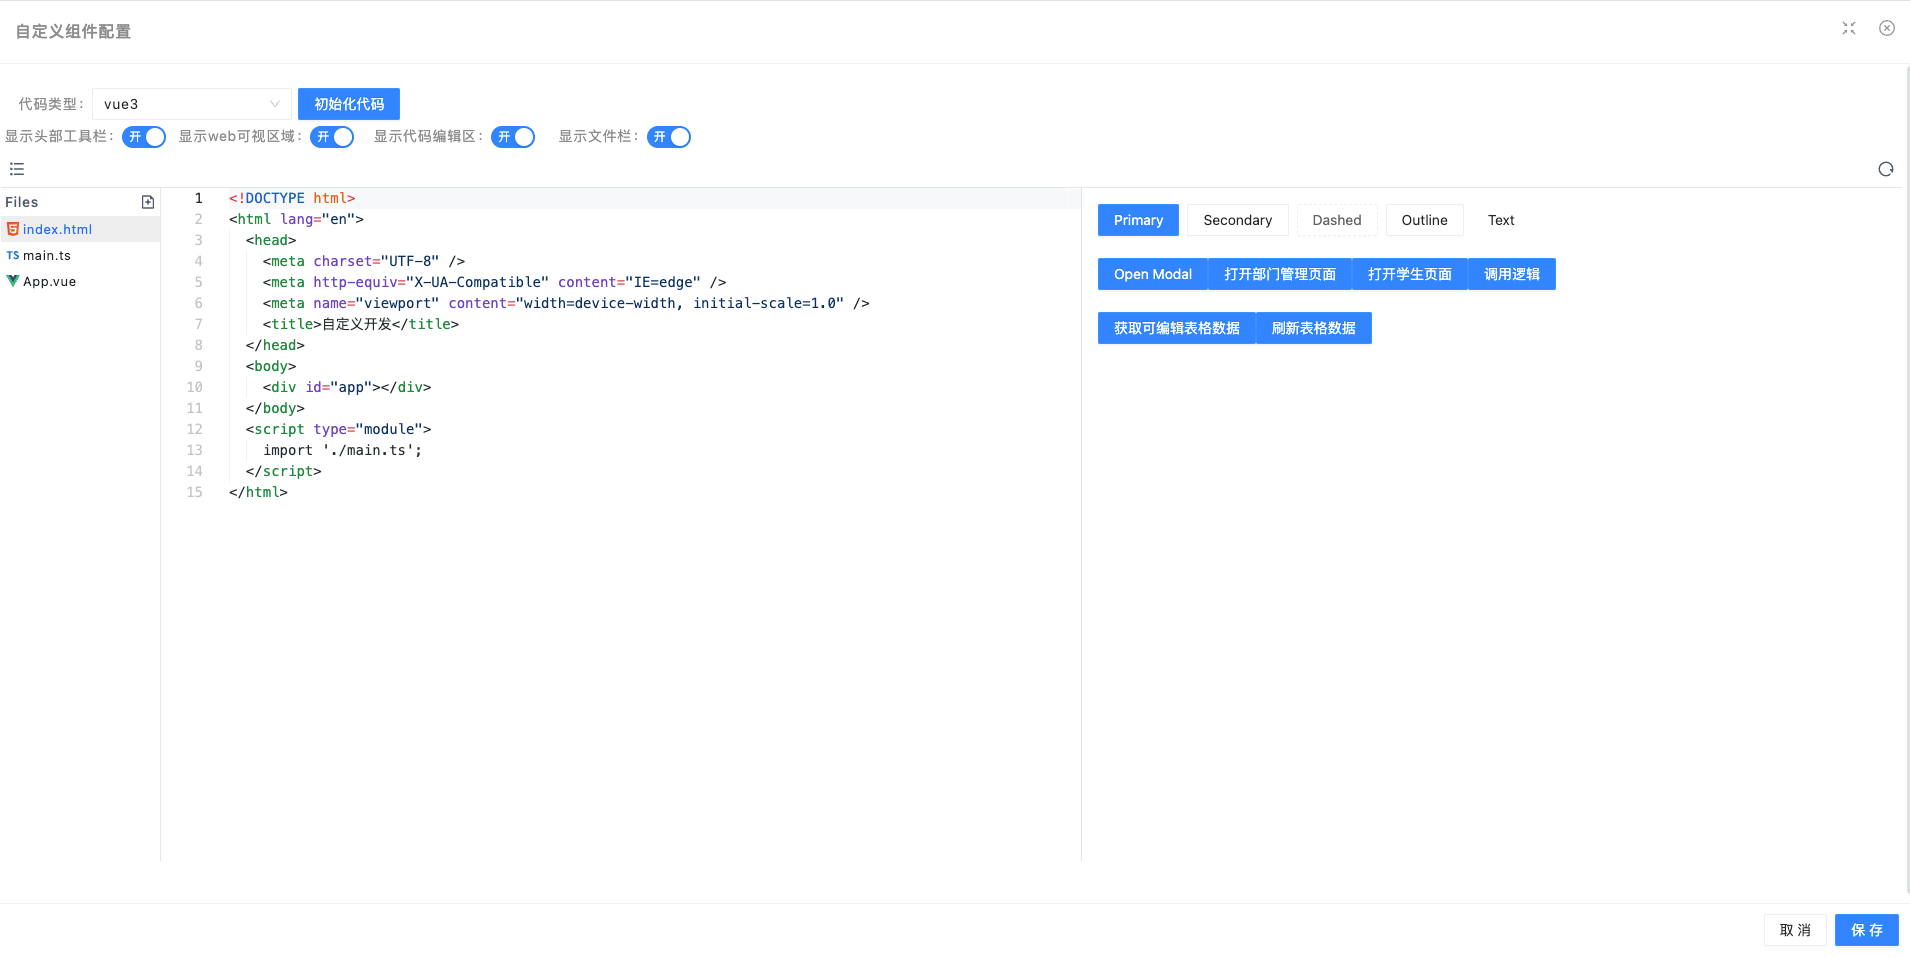
- 编辑态的展示效果可配置
- 及时编辑及时渲染
2.2 组件配置说明:
自定义 DOM 暴露了一个 $sdk 的全局属性值
{
    name: string, // dom实际名称 (dom名称_dom code)
    event: EventBus , // sdk事件处理
    getCtx: Function, // 上下文数据获取方法
    getPropsData: Function, // sdk传参
    callCmd: Function,
    onDomRender: Function // 用于dom运行态从加载资源到dom资源开始渲染为止,可以自定义一些事件处理
    extensions?: {
      fileUrlPrefix: string; // minio文件前缀
      // i18n转换函数 t('app.check'), t("app.successMsg", ['json'])
      // 如果不支持多语言环境,则直接返回多语言key值
      t: (key: string, formatValue?:string[]) => void;
      // 获取当前多语言环境切换的语言,如果不支持多语言环境,则直接中文
      getLang: () => string;
      getGlobalUserRole: Function; // 获取全局用户角色
      getGlobalUserOrg: Function; // 获取全局用户组织
      getUserInfo: Function; // 获取用户信息
      openPage: async (resourceName: string, params?: Recordable) => Promise; // callCmd openPage打开页面
      closePage: (params?: Recordable) => void;  // callCmd CLOSE_PAGE 关闭弹出框页面,传递refreshPage参数代表刷新主页面
      showMessage: (content: string, type: string = 'success') => void; // callCmd showMessage 提示消息
      updateFormData: (data: Record<string, any>) => void; // callCmd UPDATE_FORM_DATA 修改上层数据视图数据
      callHttpRequest: async (config: AxiosRequestConfig, options?: RequestOptions, cb?: (res: any) => void) => Promise; // callCmd HTTP_REQUEST 调用上层http请求
      callMicroflow: async (resourceName: string, params?: Record<string, any>, cb?: (res: any) => void) => Promise; // callCmd CALL_MICROFLOW 调用逻辑资源
      callConnector: async (resourceName: string, params?: Record<string, any>, cb?: (res: any) => void) => Promise; // callCmd CONNECTOR_REQUEST 调用自定义连接器
      uploadFile: async (params: Record<string, any>, onUploadProgress?: (progressEvent: ProgressEvent) => void) => Promise; // callCmd UPLOAD_FILE 上传文件到minio服务器
      getMediaUrl: (fileUrl: string) => string; // 获取媒体资源地址信息
      getCurrentTheme:() => object; // 获取当前正在使用的主题信息
      getAllThemeList: () => Array; // 获取所有主题列表
    }
 }
callCmd 可以调用平台现有能力,或者与平台现有能力进行交互。
主要包含以下指令:
// 指令名称
export const COMMAND_NAME = {
  OPEN_PAGE: 'OPEN_PAGE', // 打开页面
  CLOSE_PAGE: 'CLOSE_PAGE', // 关闭页面
  CALL_MICROFLOW: 'CALL_MICROFLOW', // 微流调用
  SHOW_MESSAGE: 'SHOW_MESSAGE', // 提示信息
  UPLOAD_FILE: 'UPLOAD_FILE', // 文件上传
  UPDATE_FORM_DATA: 'UPDATE_FORM_DATA', // 更新表单数据
  HTTP_REQUEST: 'HTTP_REQUEST', // 通用的接口请求
  CONNECTOR_REQUEST: 'CONNECTOR_REQUEST', // 微流调用
};
2.2.1 callCmd 指令调用
2.2.1.1 调用 SDK 提示消息
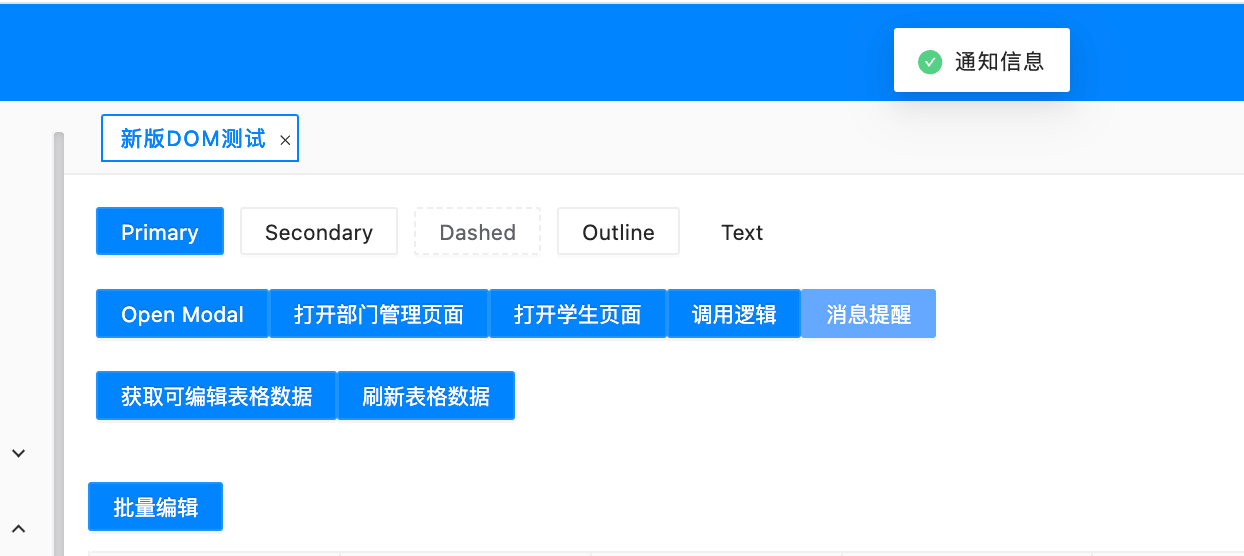
showMessage 提示信息,使用平台系统的提示信息
$sdk.callCmd('SHOW_MESSAGE',  {
   content: '通知信息', type: 'success'
})
效果:
2.2.1.2 调用 SDK 打开页面
打开页面:
// 打开页面
const openDepManagerPage = () => {
$sdk.callCmd('OPEN_PAGE', {
resourceName: 'depManager'
}, (res) => {
console.log('打开页面触发结果', res);
});
}
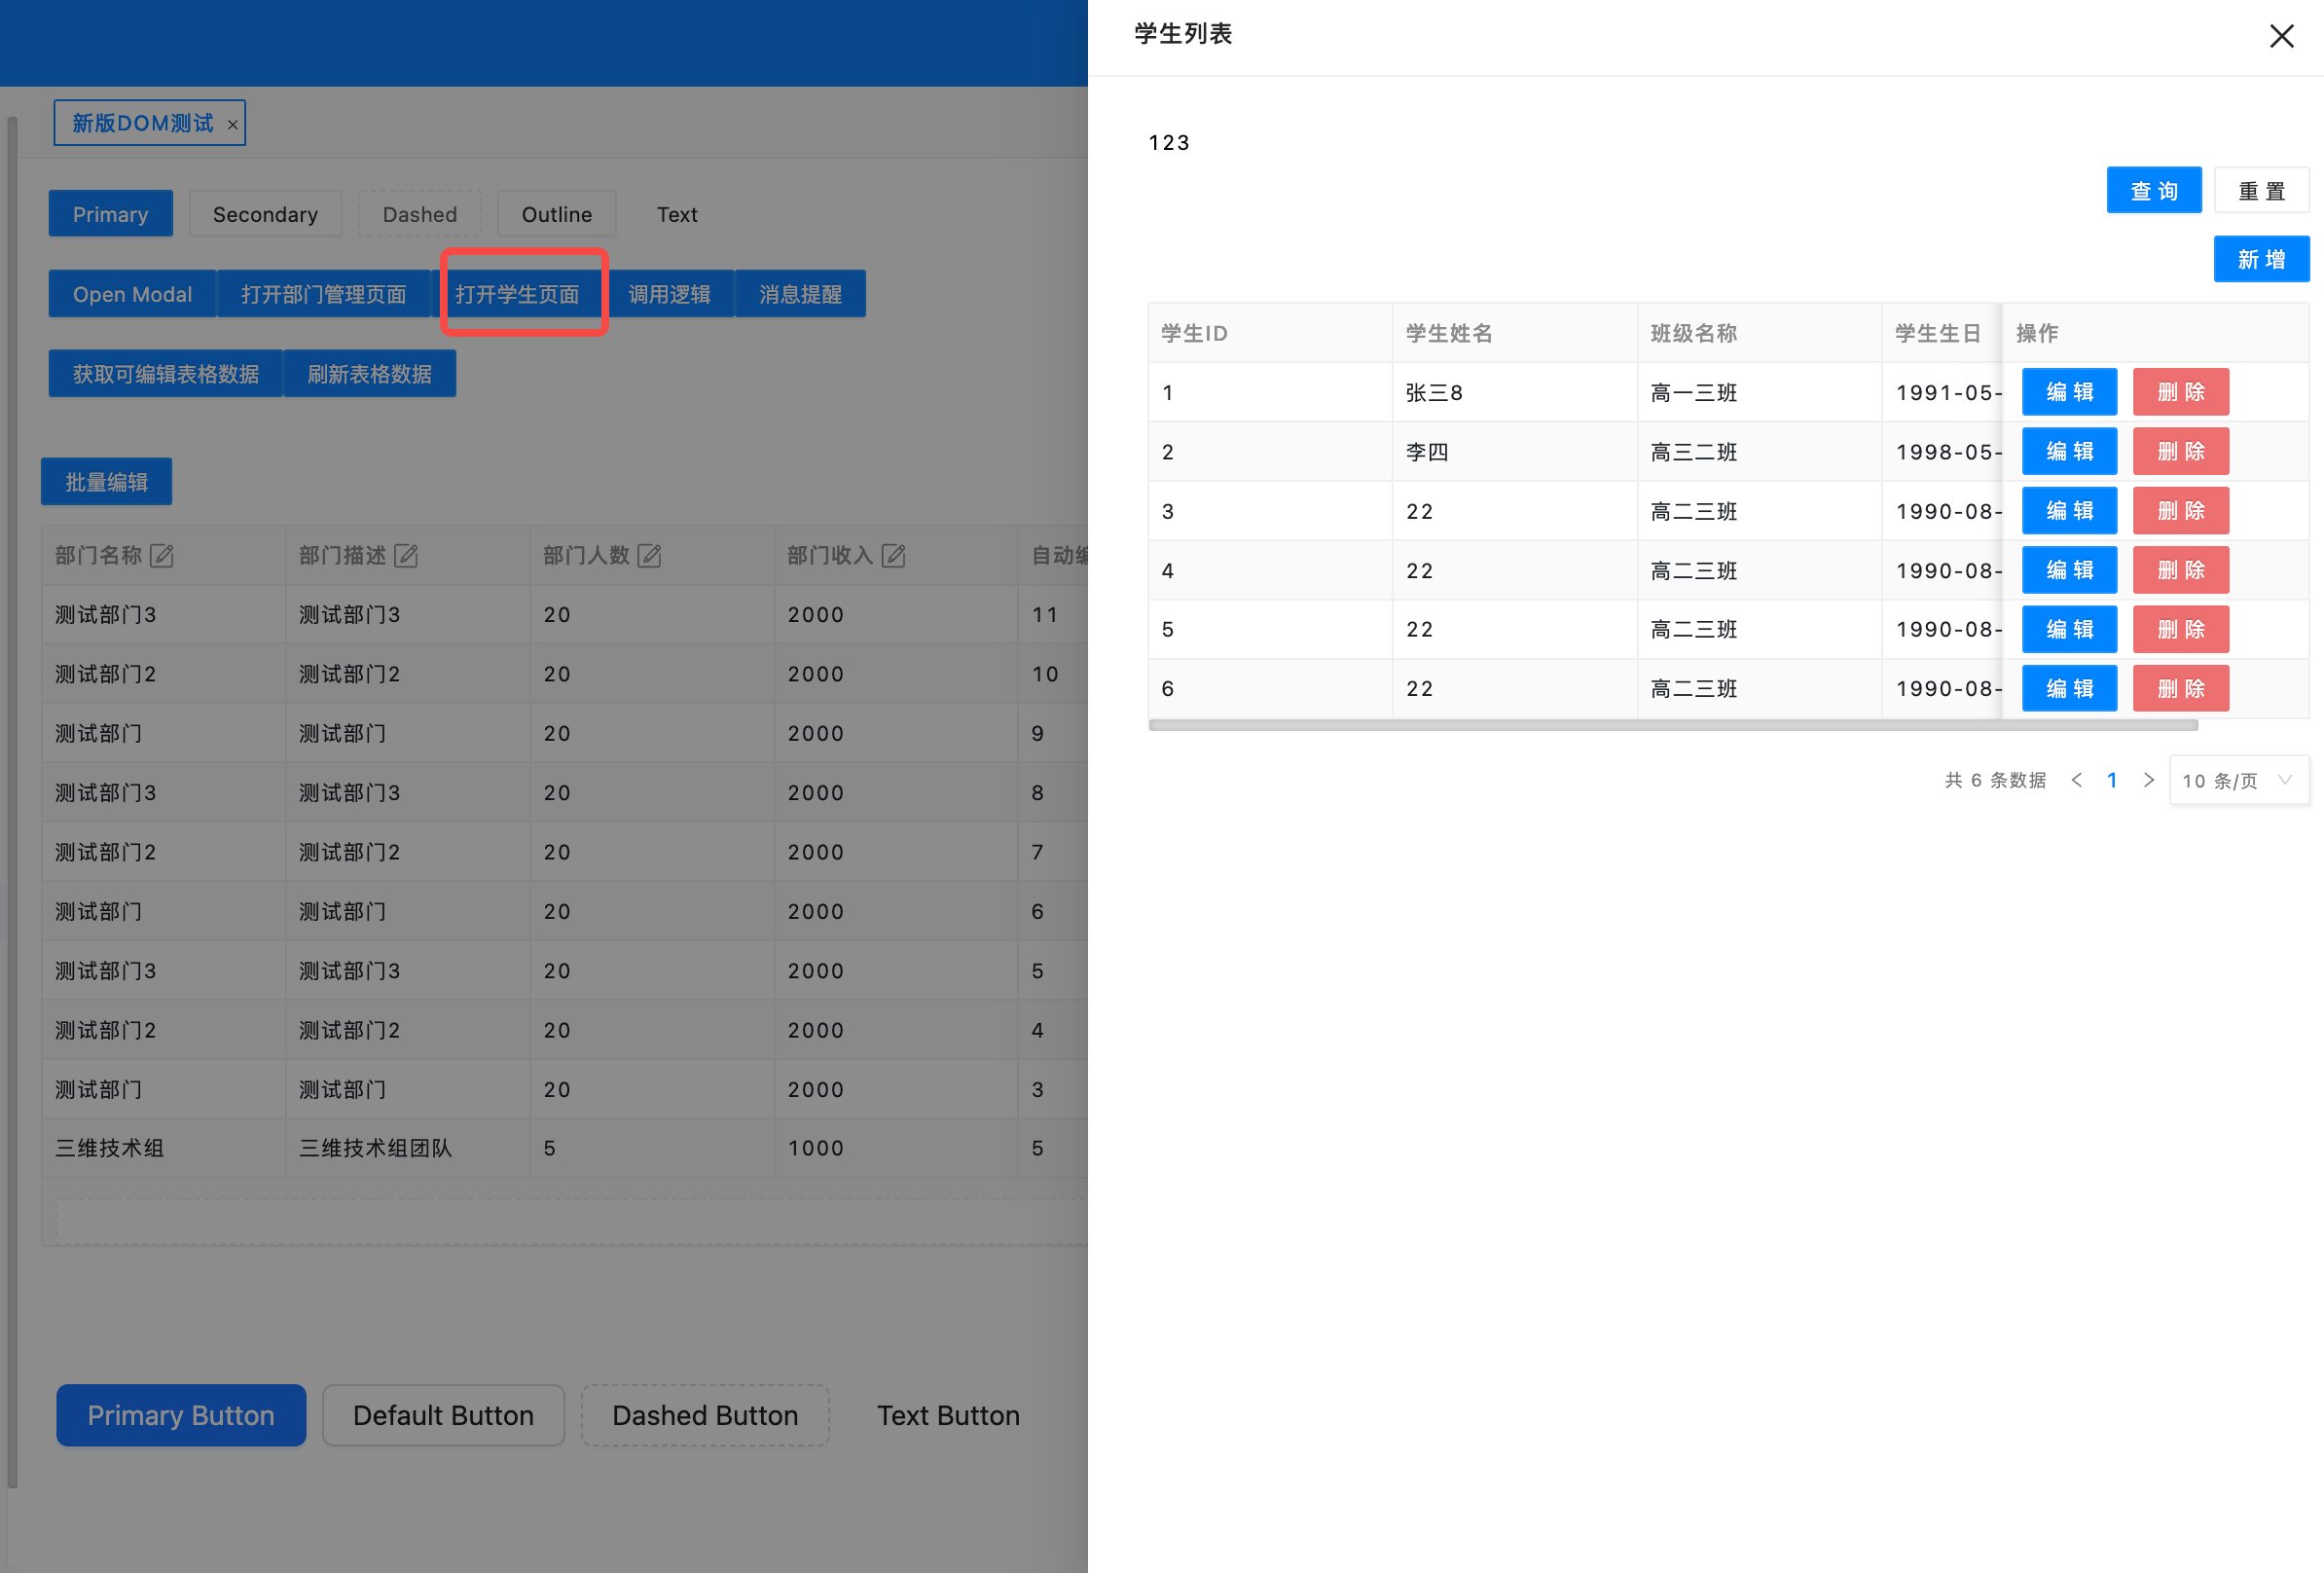
// 打开学生列表页面
const openStuListPage = () => {
$sdk.callCmd('OPEN_PAGE', {
resourceName: 'stuList'
});
}
// 页面传参
$sdk.callCmd('OPEN_PAGE', {
resourceName: 'depManager',
params: {
test: 1
},
}, (res) => {
console.log('打开页面触发结果', res);
});
前提:需要配置页面资源
2.2.1.3 调用 SDK 请求平台逻辑
调用逻辑资源之前,需要先确保资源已经配置,别名已经配置
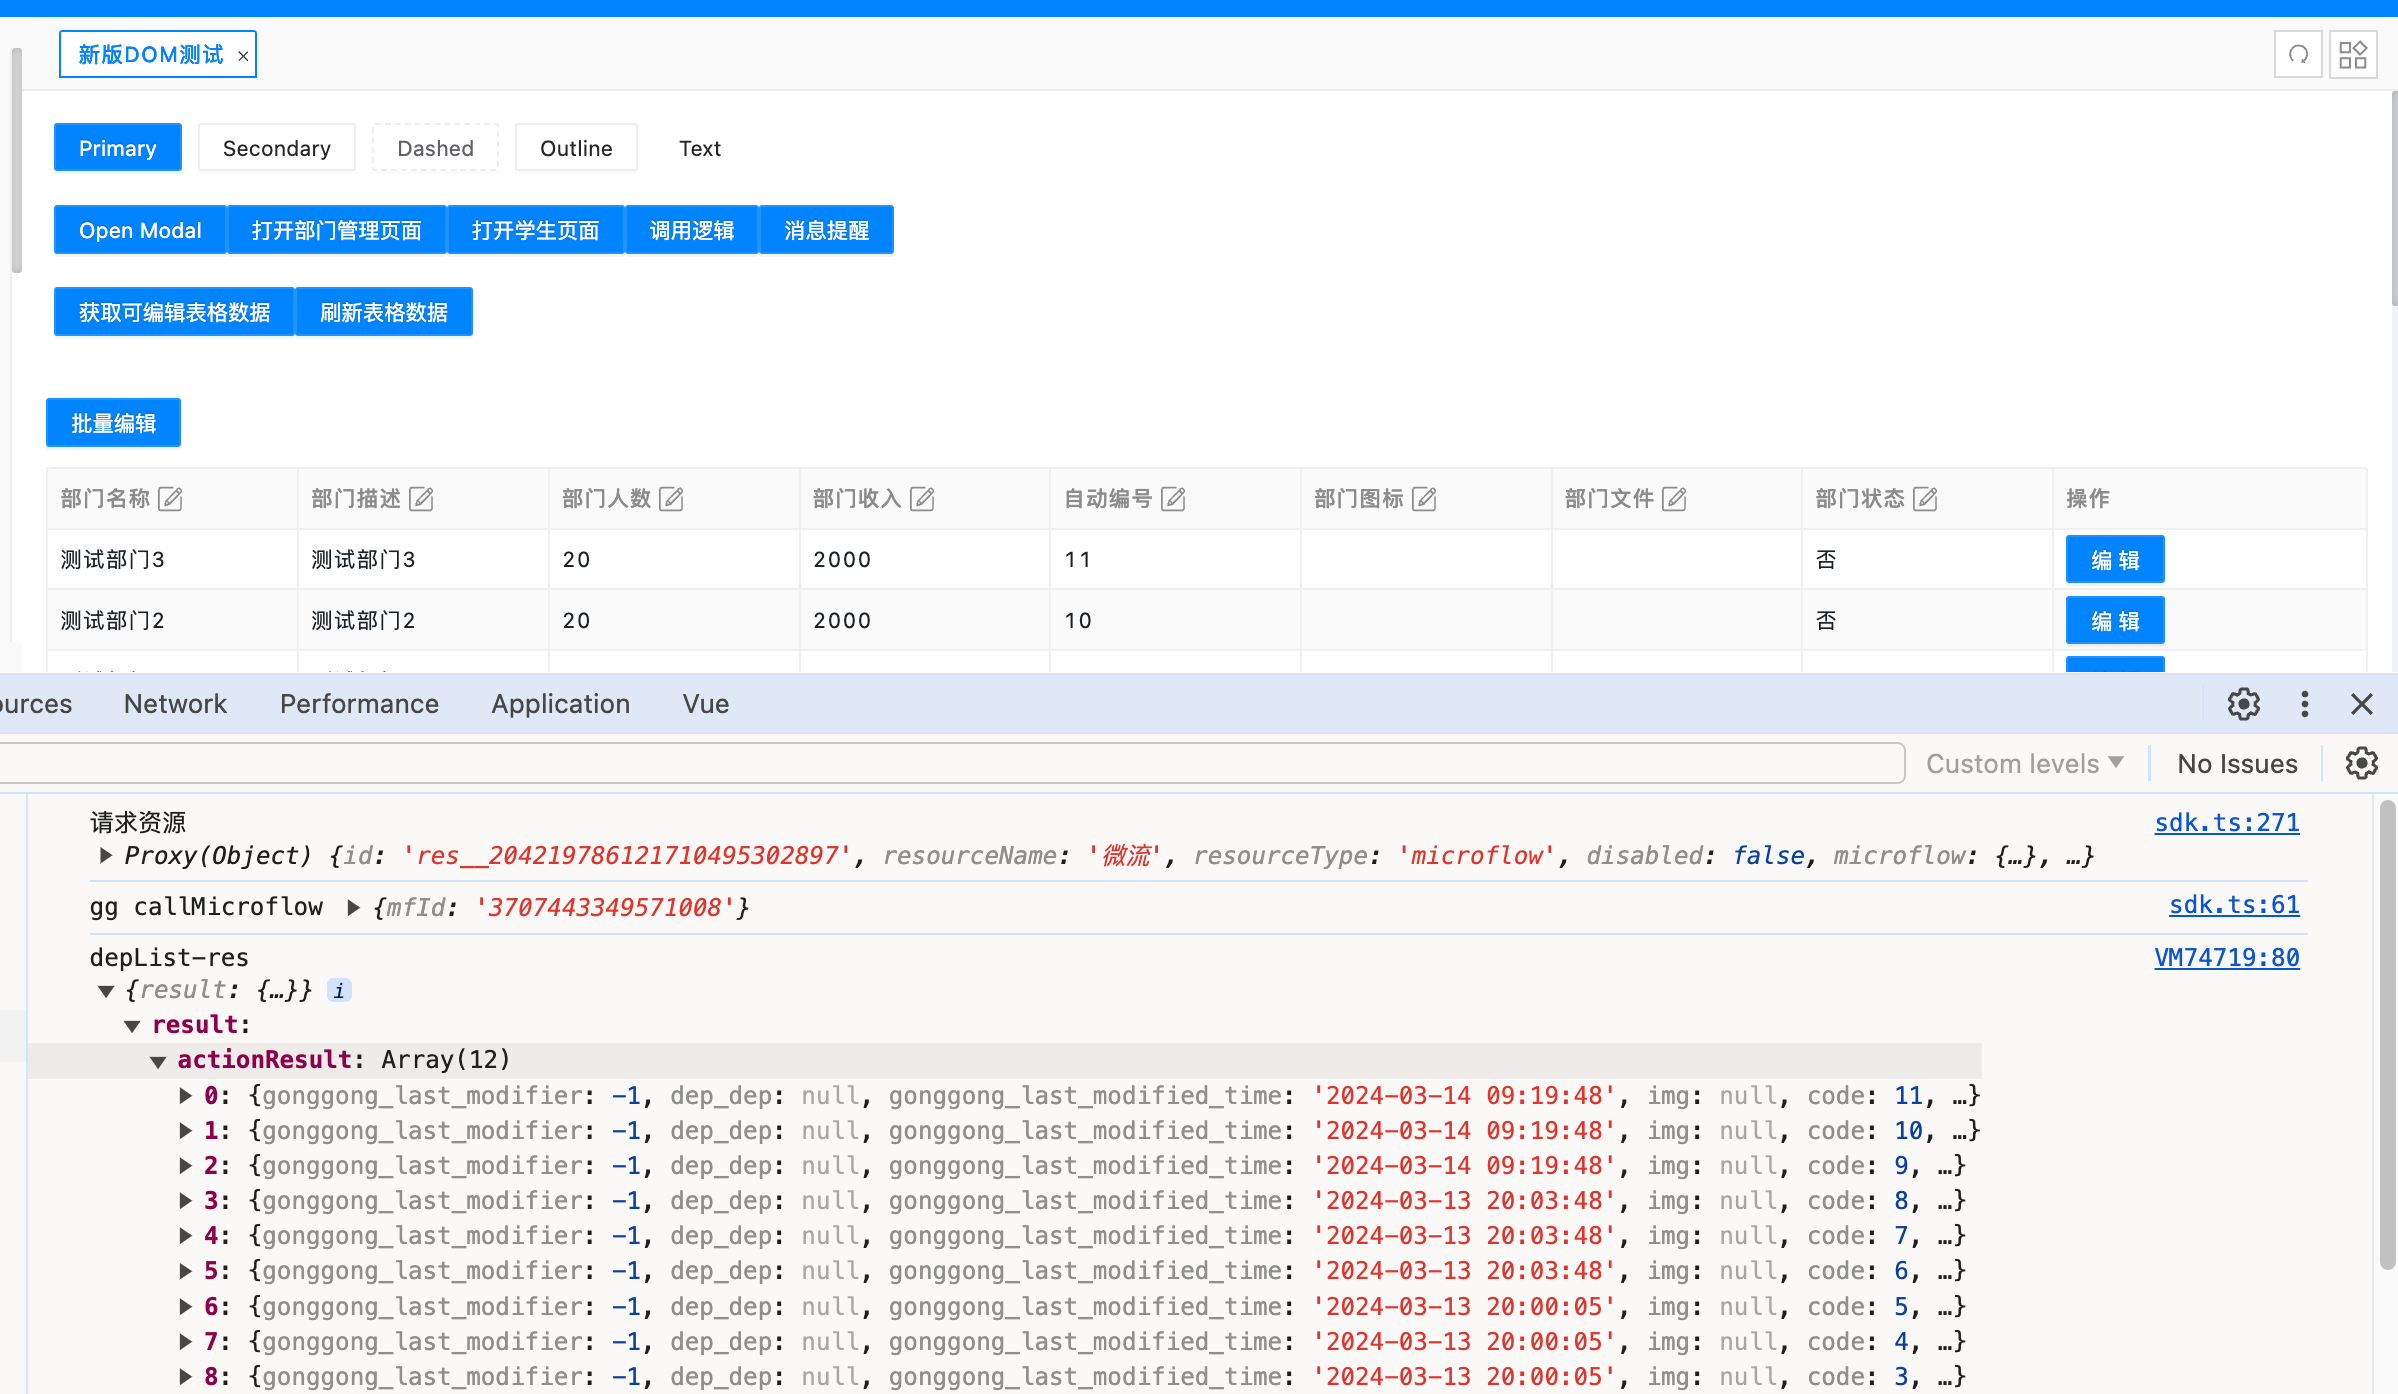
2.2.1.3.1 逻辑调用无传参
$sdk.callCmd('CALL_MICROFLOW', {
    resourceName: 'depList'
  },
  (res) => {
    console.log('depList-res', res);
  });
效果:
2.2.1.3.2 逻辑调用传递数据
示例:
调用逻辑入参 params 属性,可以传递 paramKeyMap 参数,或者 paramList 参数, 这里的处理方式和外部页面一致
2 者的区别可以参考外部页面组件,paramKeyMap 可以以 <key,value> 的方式传递 map 数据;paramList 是传递函数传参的方式传值,不知道入参名称,只知道入参类型和入参顺序。
逻辑配置:

代码调用:
// 查询列表数据
    const queryDataList = (params) => {
      loading.value = true;
      return new Promise((resolve) => {
         $sdk.callCmd('CALL_MICROFLOW', {
          resourceName: 'searchDeps',
          ...params && {
            params: {
              paramKeyMap: {
                // 配置paramKeyMap参数,传递的数据只需要知道传参的key值和value值
                search: params
              }
            }
          }
        },
        (res) => {
          console.log('depList-res', res);
          loading.value = false;
          if(!res.err) {
            data.value = res.result?.actionResult;
            return resolve([undefined, res.result?.actionResult]);
          } else {
            return resolve([res.err, undefined]);
          }
        });
      });
    }
页面效果:
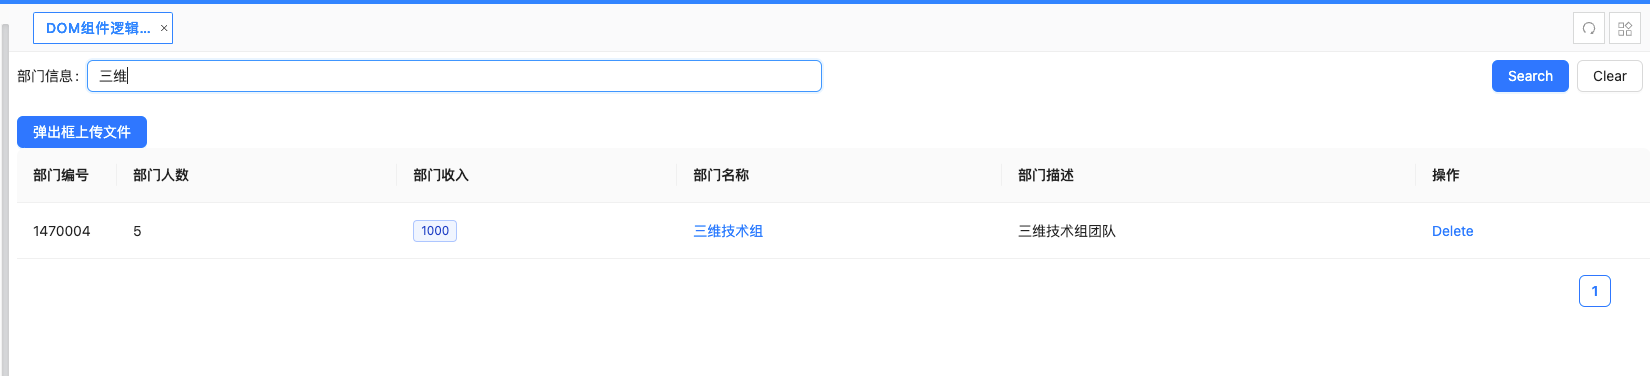
2.2.1.3.3 逻辑调用传递文件数据
示例:
文件上传的时候需要直接在 params 里面直接传递字段信息,以 <key, value> map 数据方式配置入参。(注意: 传递文件的方式不需要再配置 paramKeyMap 或者 paramList)
逻辑配置:
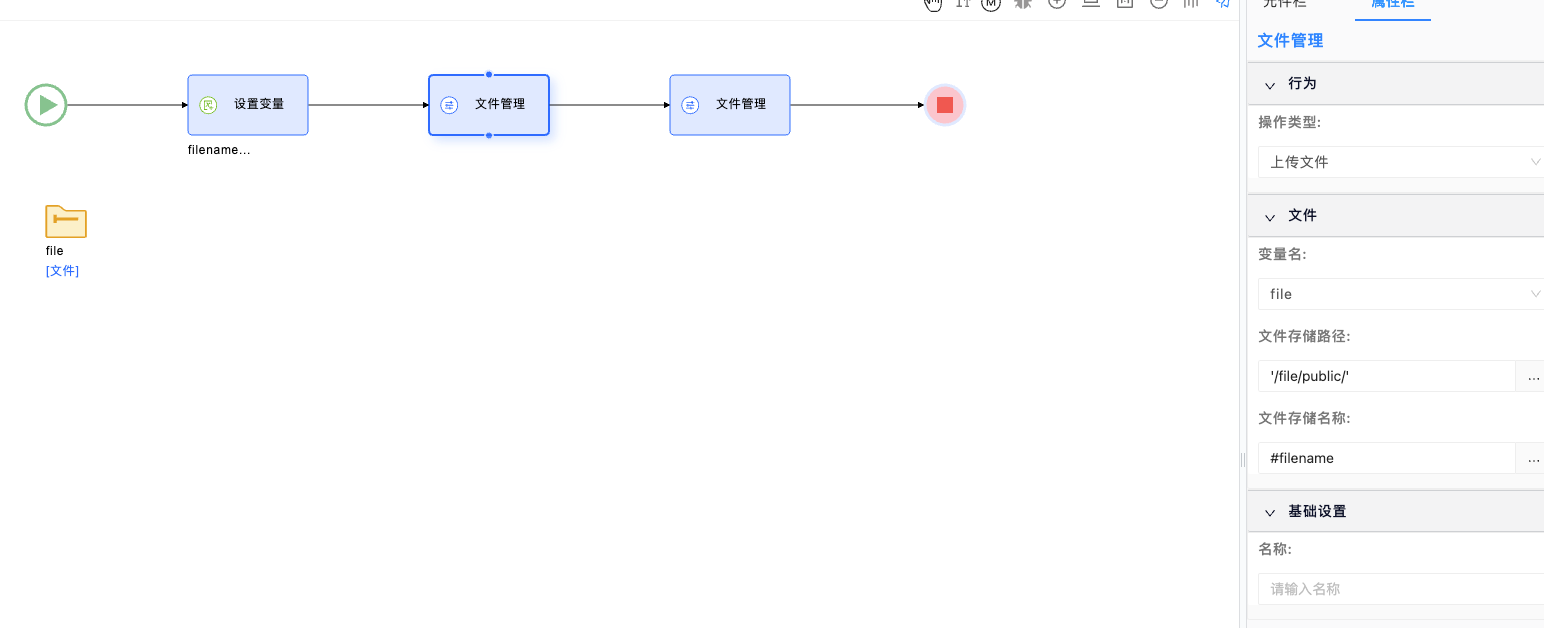
接口调用:
// 文件上传
    const uploadFile = (file) => {
      console.log('file', file);
      $sdk.callCmd('CALL_MICROFLOW', {
          resourceName: 'uploadFile',
          params: {
            name:  file.name,
            file:  file
          }
        },
        (res) => {
          console.log('文件上传结果', res);
          fileList.value = [
            ...fileList.value,
            {...file, url: res.result.actionResult, thumbUrl: res.result.actionResult}
          ]
        });
    }
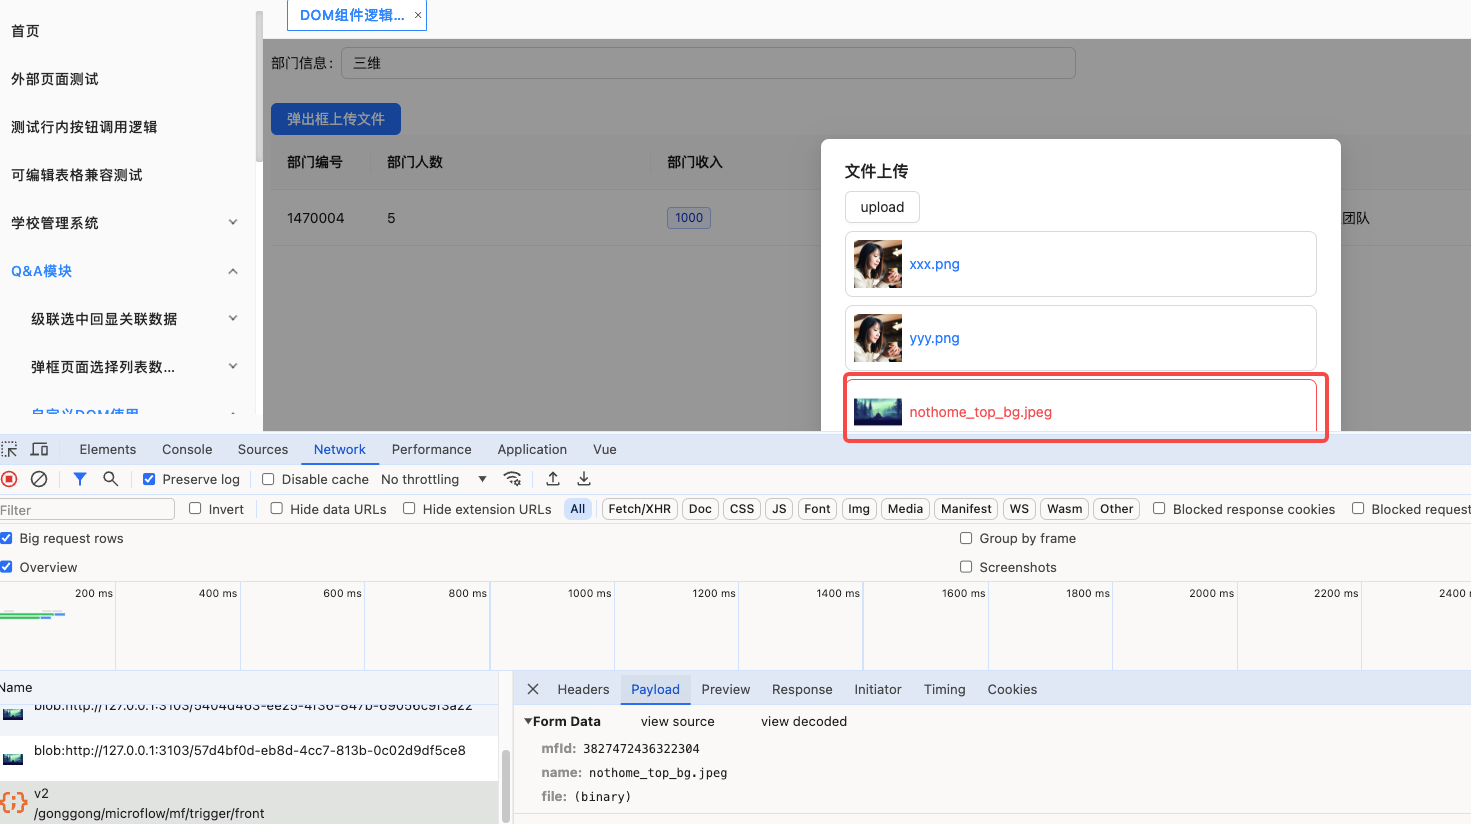
逻辑调用效果:
2.2.1.4 调用 SDK 请求平台连接器能力
需要关注 callCmd 暴露出来的 CONNECTOR_REQUEST 命令
先在资源模块创建连接器资源,连接器会配置连接器以及接口信息
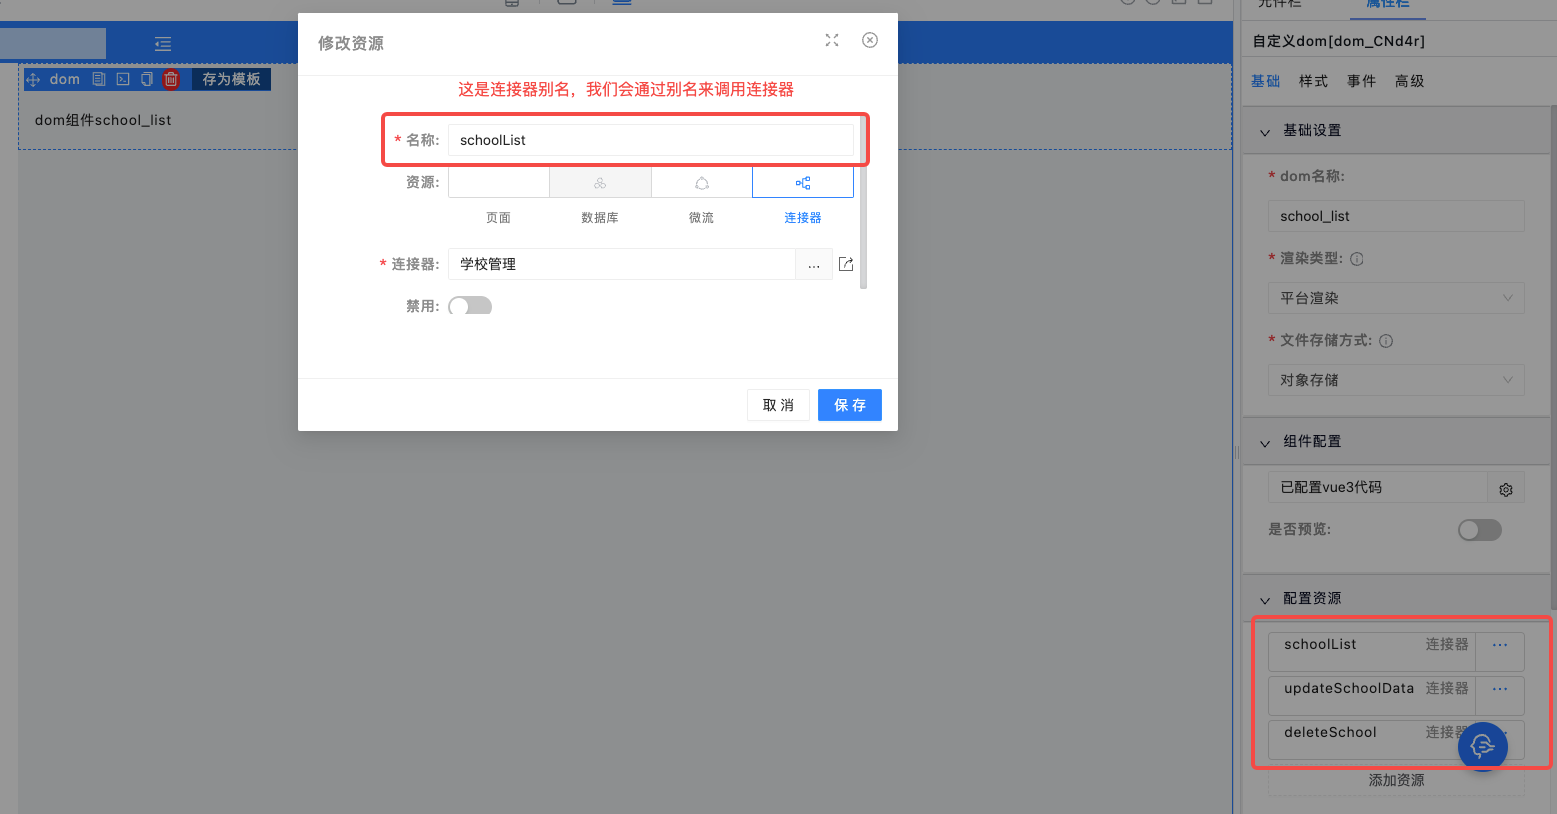
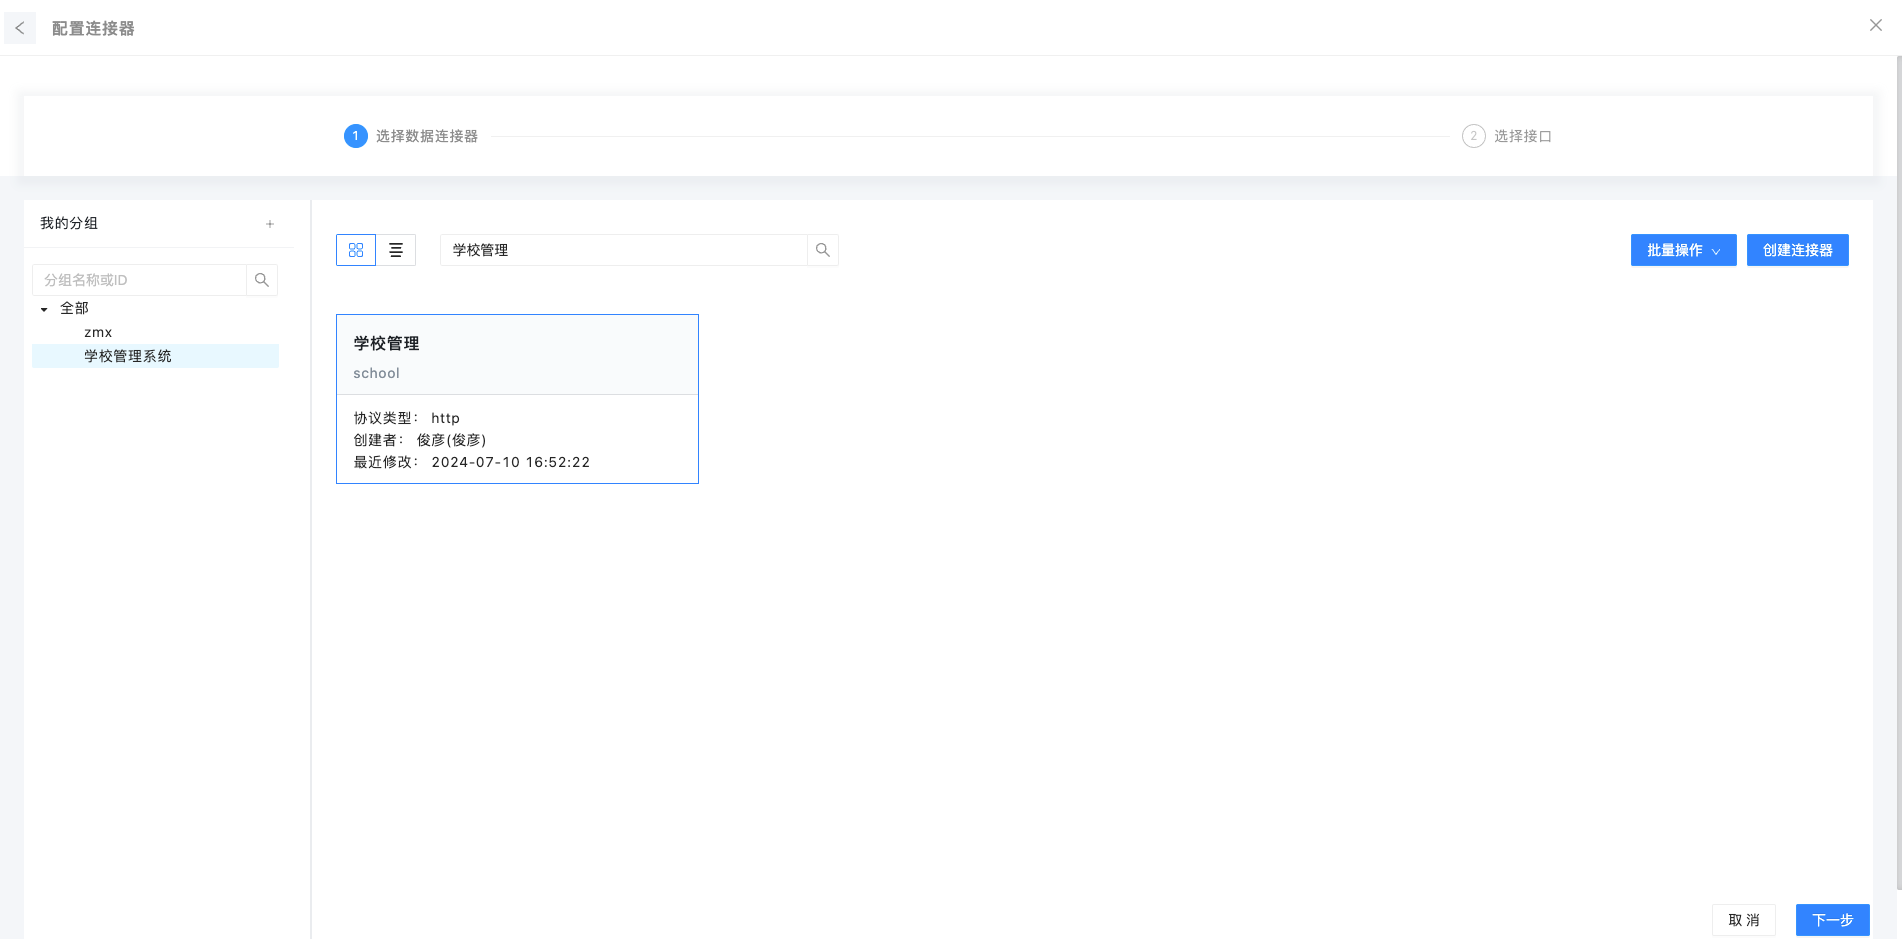
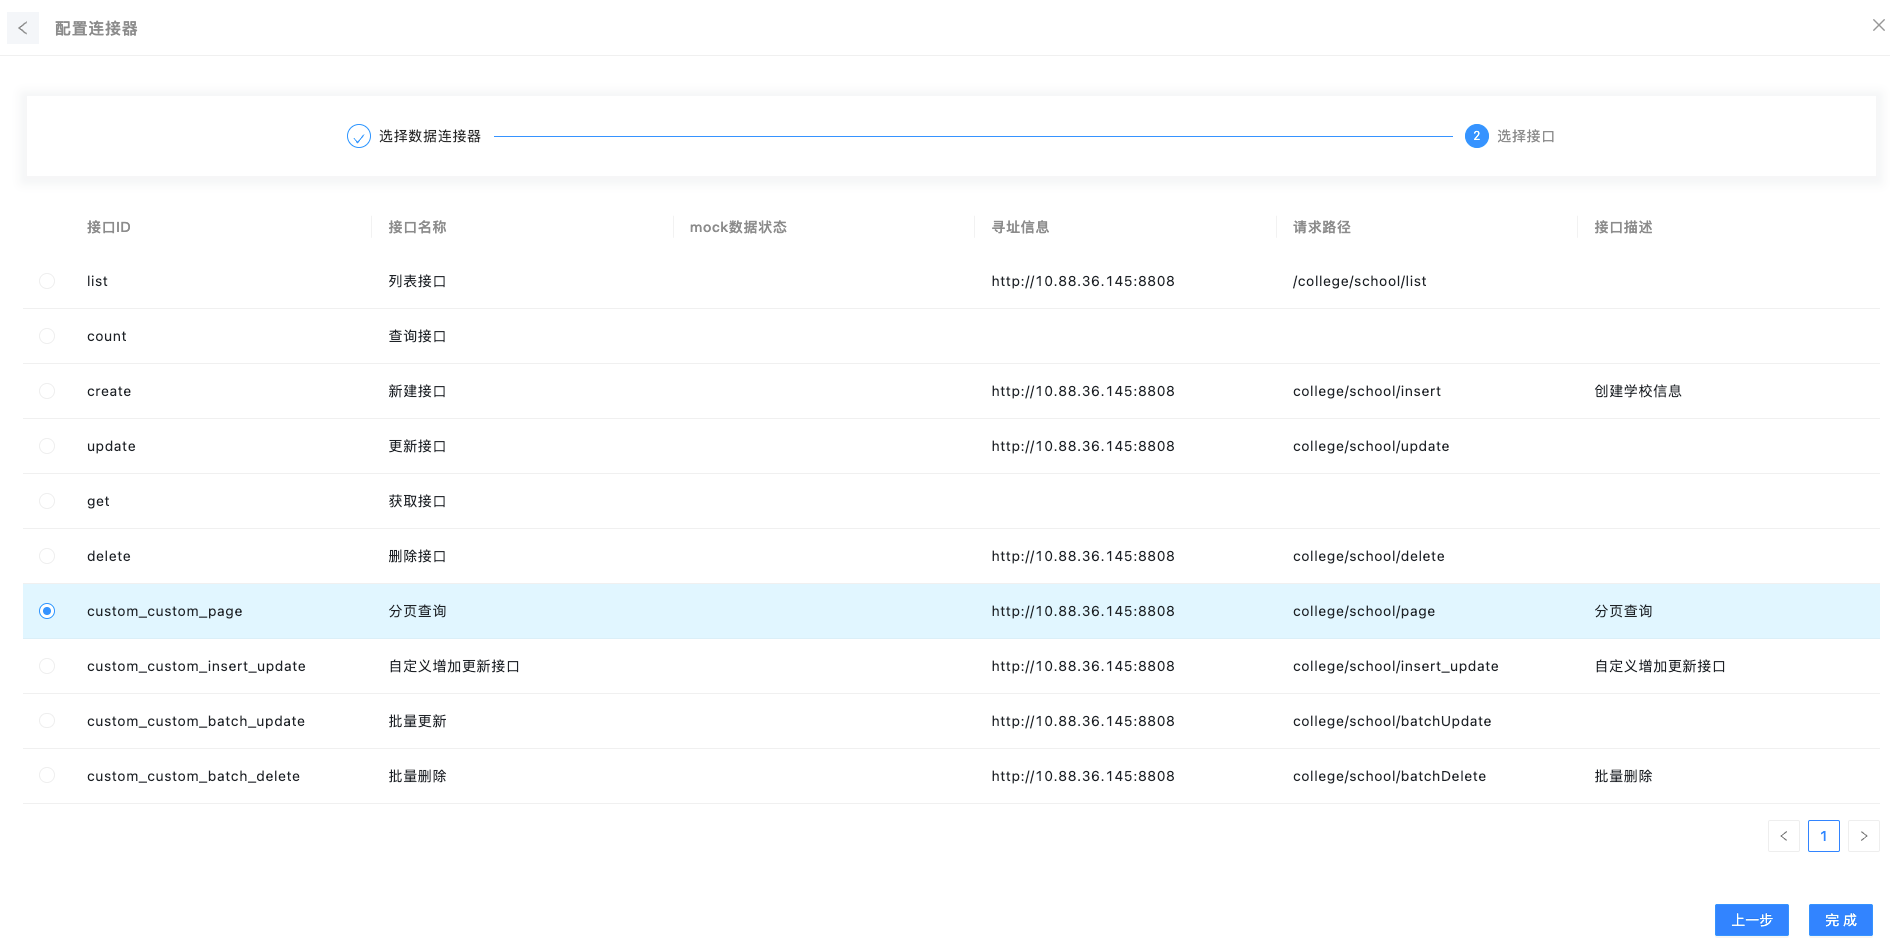
配置完资源之后就可以在自定义代码里面调用了,下面是根据上面配置的连接器别名调用了, params 是作为当前连接器调用的传参
// 查询列表数据
const queryDataList = (params) => {
  loading.value = true;
  return new Promise((resolve) => {
     $sdk.callCmd('CONNECTOR_REQUEST', {
      resourceName: 'schoolList',
      params: {
        pageSize: pagination.pageSize,
        pageNumber: pagination.current,
        ...params
      }
    },
    (res) => {
      loading.value = false;
      if(!res.err) {
        data.value = res.result?.actionResult;
        pagination.total = res.result?.total;
        return resolve([undefined, res.result?.actionResult]);
      } else {
        return resolve([res.err, undefined]);
      }
    });
  });
}
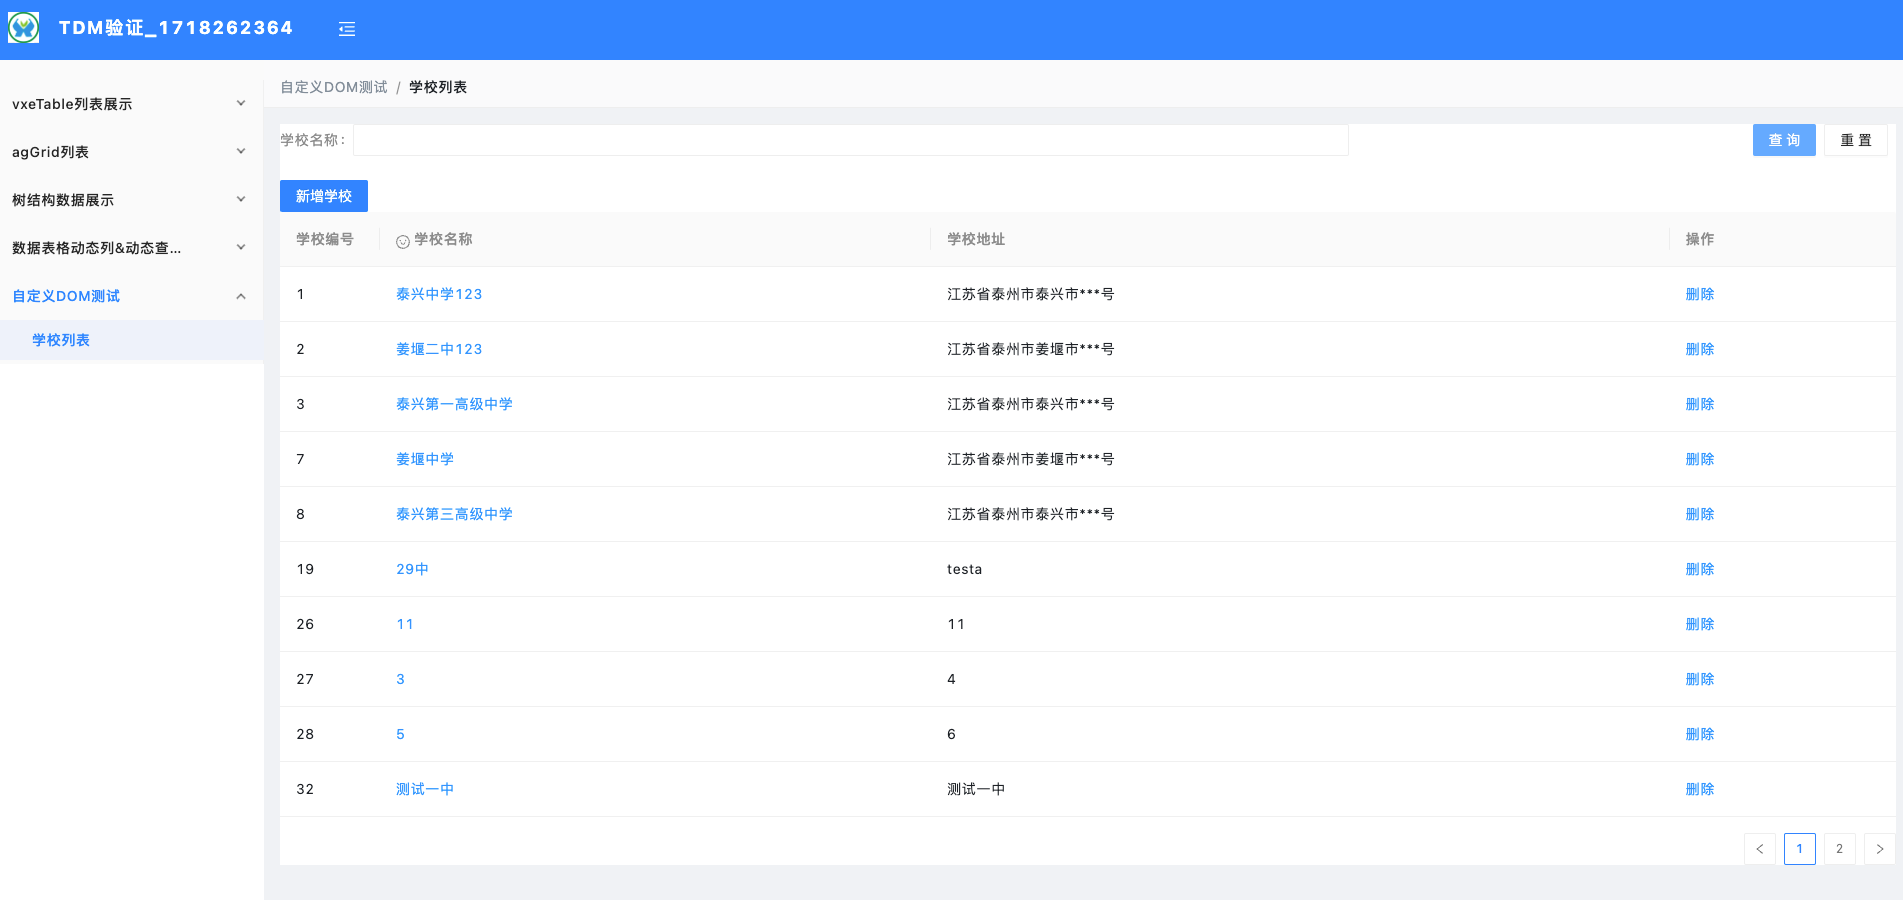
效果展示
2.2.1.5 调用 SDK 请求平台接口能力
callCmd 里面的 HTTP_REQUEST 指令
这里以调用平台 minio file 前缀地址接口为例,使用下面指令调用
// 获取file domain信息
    const queryFileDomain = () => {
      $sdk.callCmd('HTTP_REQUEST', {
          config: {
            url: 'file/info/domain',
            method: 'get',
            params: {},
          },
        },
        (res) => {
          console.log('file-domain', res);
        }
      );
    }
接口返回值是平台的接口返回信息[err, res]结构数据
调用结果返回:

2.2.1.6 调用 SDK 更新上层容器数据
可以通过 UPDATE_FORM_DATA 指令来触发改变上层数据容器的数据
要修改的数据需要放置到 data 对象里面
function mergeFormData(data) {
    $sdk.callCmd('UPDATE_FORM_DATA', {
        data: {
          projectName: '测试项目1',
          projectDesc: '测试项目1'
        }
      });
  }
效果展示:
2.2.2 平台组件资源调用:
$sdk 暴露了 getCtx 函数,支持自定义 DOM 组件内部获取到平台的组件资源
调用案例:
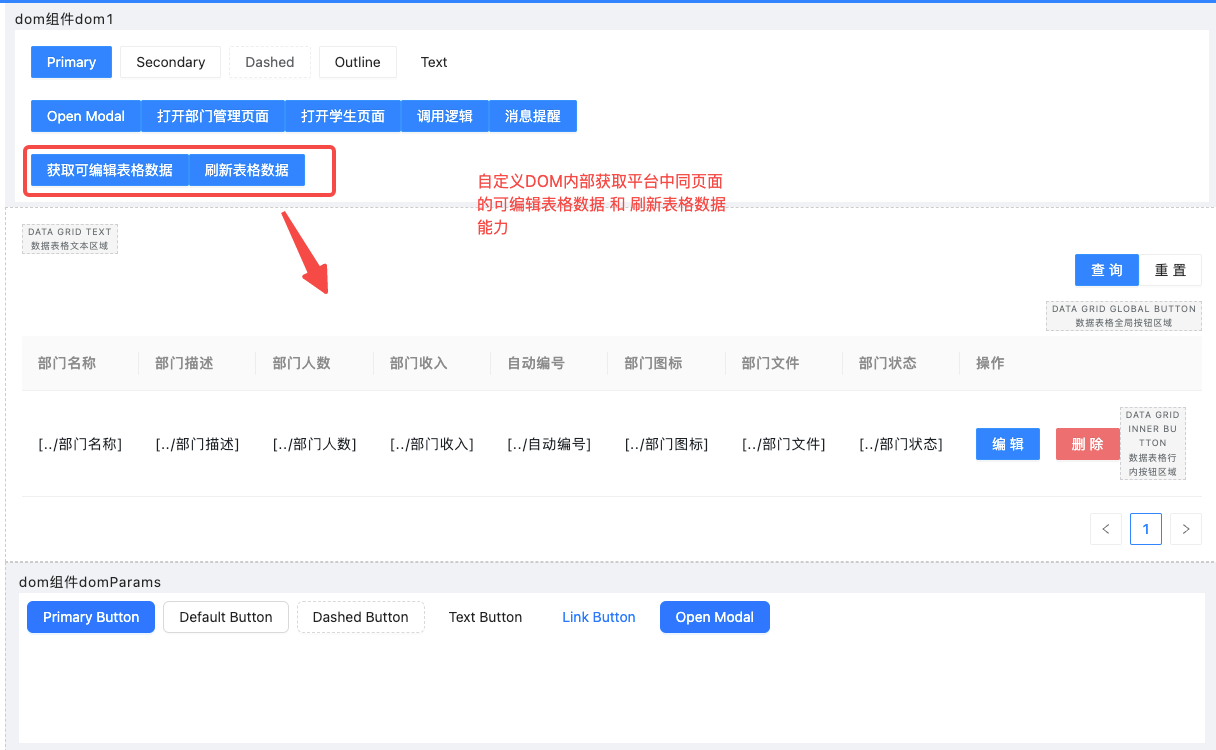
参考代码:
// 获取可编辑表格数据
const getTableData = () => {
  console.log('==init-grid-data==', $sdk.getCtx()?.DataGridEdit_LYTJe?.tableData())
};

// 刷新表格数据
const refershTableData = () => {
  $sdk.getCtx()?.DataGridEdit_LYTJe?.reload()
}
效果展示:(只能在预览或者运行时看,实时调试渲染预览页面不支持访问到,因为编辑态拿不到预览、运行时实际数据)
2.2.3 动态加载资源(iframe 渲染模式)
可以基于选择喜欢的三方的资源库,帮助完成一部分功能
尽量使用内网搭建的 esm 平台仓库,线上的 esm.sh 有时因网络问题不好访问,容易访问超时
当前平台如果是安装了私有 esm 库,可以尝试下根目录/esm 访问资源是否可以访问,可以访问代表 ngnix 做了代理,可以配置相对地址访问


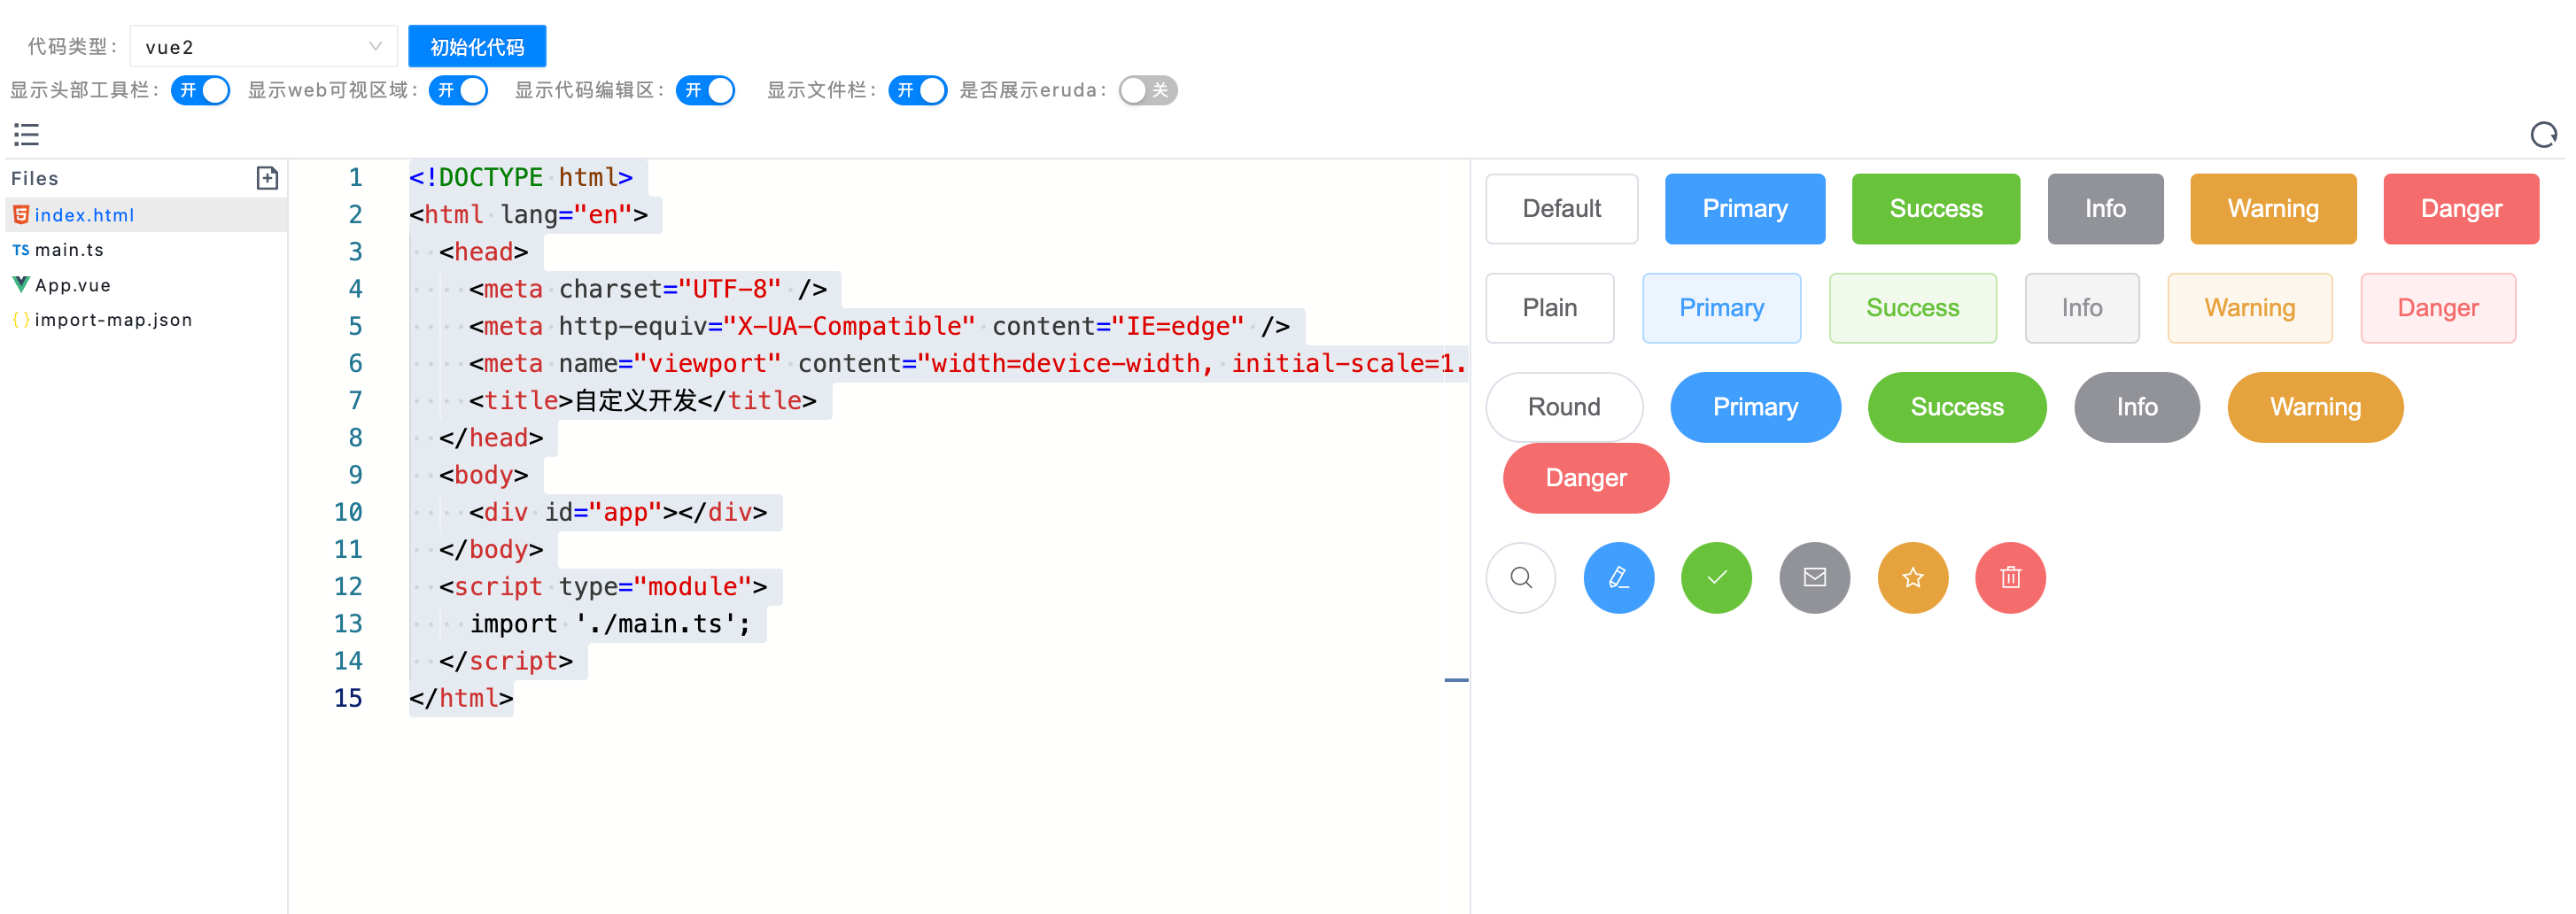
2.2.3.1 用 vue2 模版库代码:
引入 vue2, element-plus, 使用 vue2 的开发方式实现业务功能
import-map.json:
{
  "imports": {
    "vue": "https://esm.sh/vue@2.7.15",
    "element-ui": "https://esm.sh/element-ui@2.5.0",
    "element-ui/": "https://esm.sh/element-ui@2.5.0/"
  }
}
APP.vue
<template>
  <div>
    <el-row class="mb-4">
      <el-button>{{ buttonText }}</el-button>
      <el-button type="primary">Primary</el-button>
      <el-button type="success">Success</el-button>
      <el-button type="info">Info</el-button>
      <el-button type="warning">Warning</el-button>
      <el-button type="danger">Danger</el-button>
    </el-row>

    <el-row class="mb-4">
      <el-button plain>Plain</el-button>
      <el-button type="primary" plain>Primary</el-button>
      <el-button type="success" plain>Success</el-button>
      <el-button type="info" plain>Info</el-button>
      <el-button type="warning" plain>Warning</el-button>
      <el-button type="danger" plain>Danger</el-button>
    </el-row>

    <el-row class="mb-4">
      <el-button round>Round</el-button>
      <el-button type="primary" round>Primary</el-button>
      <el-button type="success" round>Success</el-button>
      <el-button type="info" round>Info</el-button>
      <el-button type="warning" round>Warning</el-button>
      <el-button type="danger" round>Danger</el-button>
    </el-row>

    <el-row class="mb-4">
      <el-button icon="el-icon-search" circle></el-button>
      <el-button type="primary" icon="el-icon-edit" circle></el-button>
      <el-button type="success" icon="el-icon-check" circle></el-button>
      <el-button type="info" icon="el-icon-message" circle></el-button>
      <el-button type="warning" icon="el-icon-star-off" circle></el-button>
      <el-button type="danger" icon="el-icon-delete" circle></el-button>
    </el-row>
  </div>
</template>

<script>
export default {
  data() {
    return {
      buttonText: 'Default'
    }
  }
}
</script>

<style scoped>
.mb-4 {
  margin-bottom: 16px;
}
</style>
main.ts
import Vue from 'vue';
import ElementUI from 'element-ui';
import 'element-ui/lib/theme-chalk/index.css';
import App from './App.vue';

Vue.use(ElementUI);

new Vue({
  el: document.querySelector('#app'),
  render: h => h(App)
});
index.html
<!DOCTYPE html>
<html lang="en">
  <head>
    <meta charset="UTF-8" />
    <meta http-equiv="X-UA-Compatible" content="IE=edge" />
    <meta name="viewport" content="width=device-width, initial-scale=1.0" />
    <title>自定义开发</title>
  </head>
  <body>
    <div id="app"></div>
  </body>
  <script type="module">
    import './main.ts';
  </script>
</html>
效果展示:
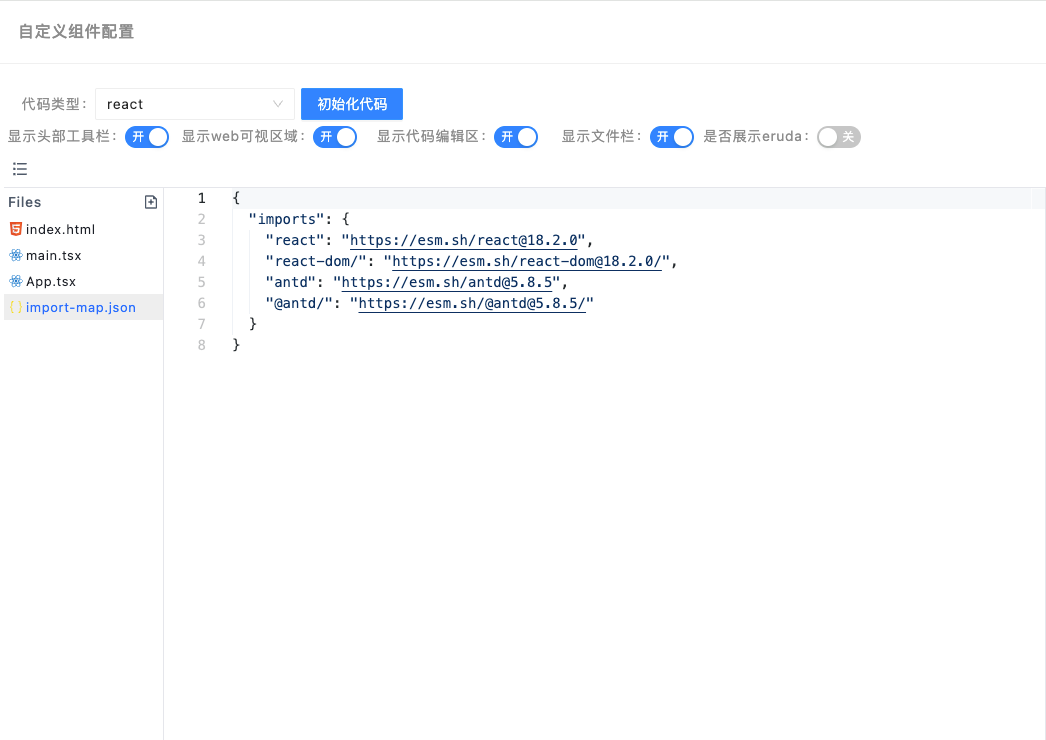
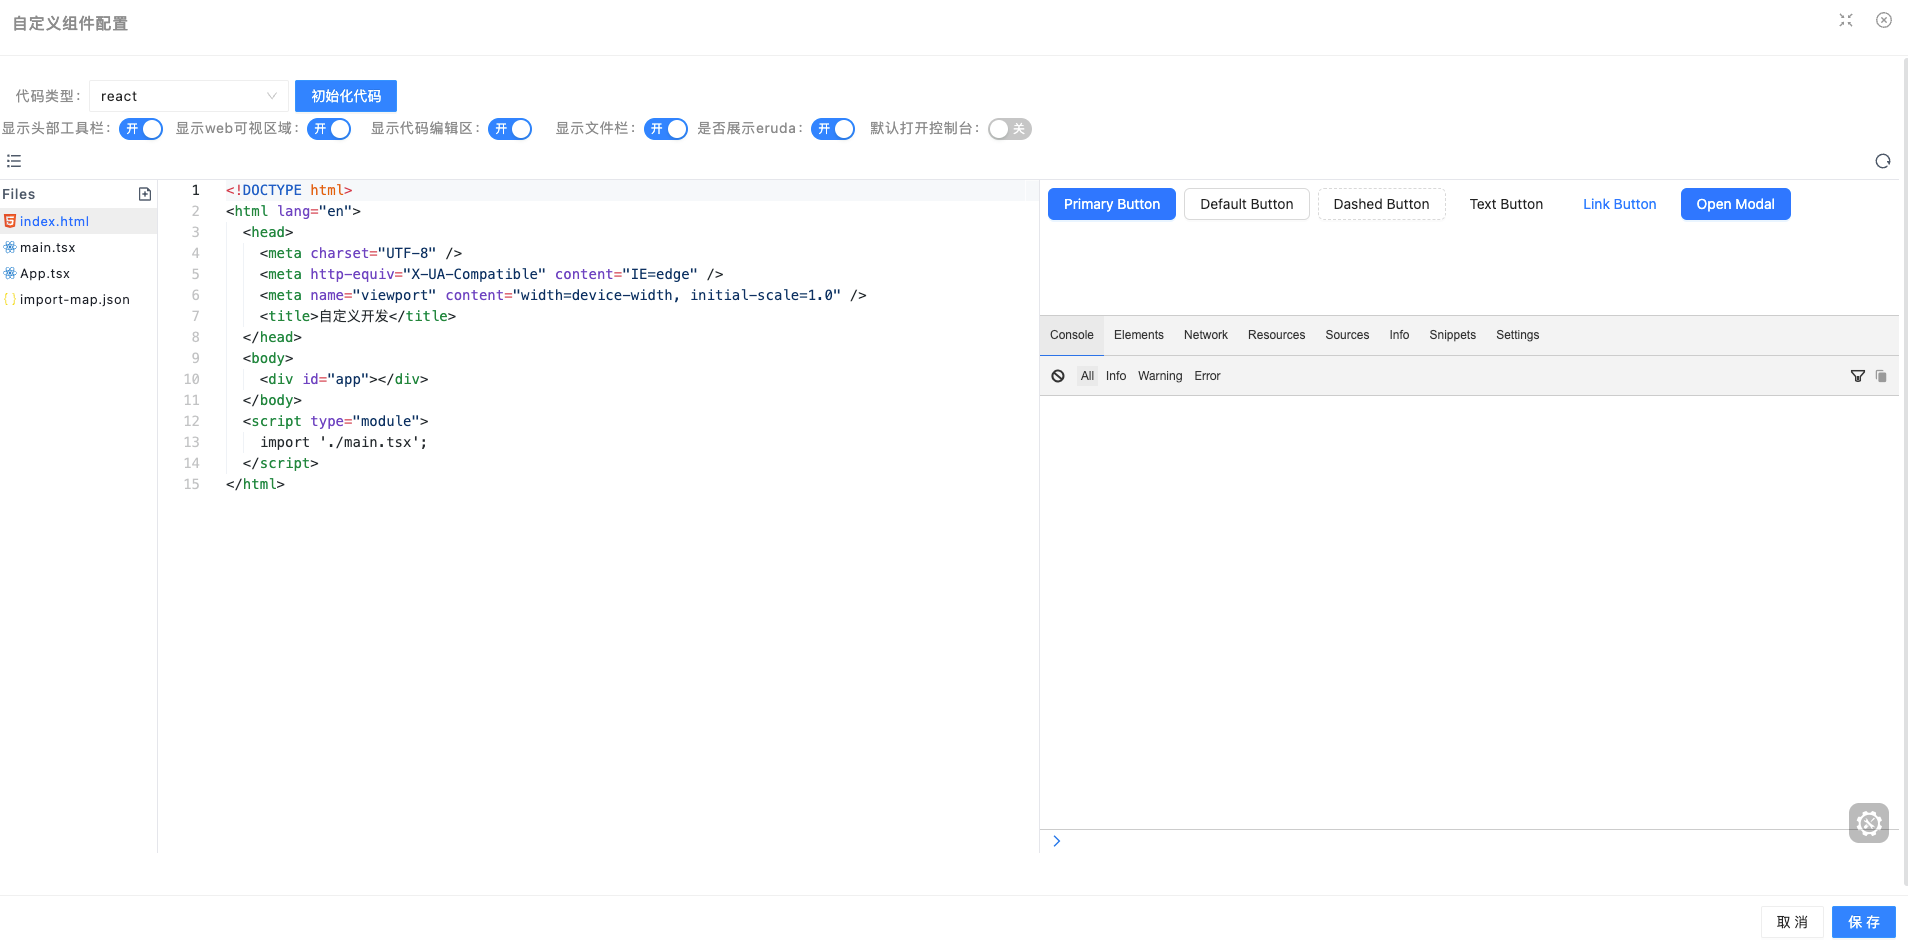
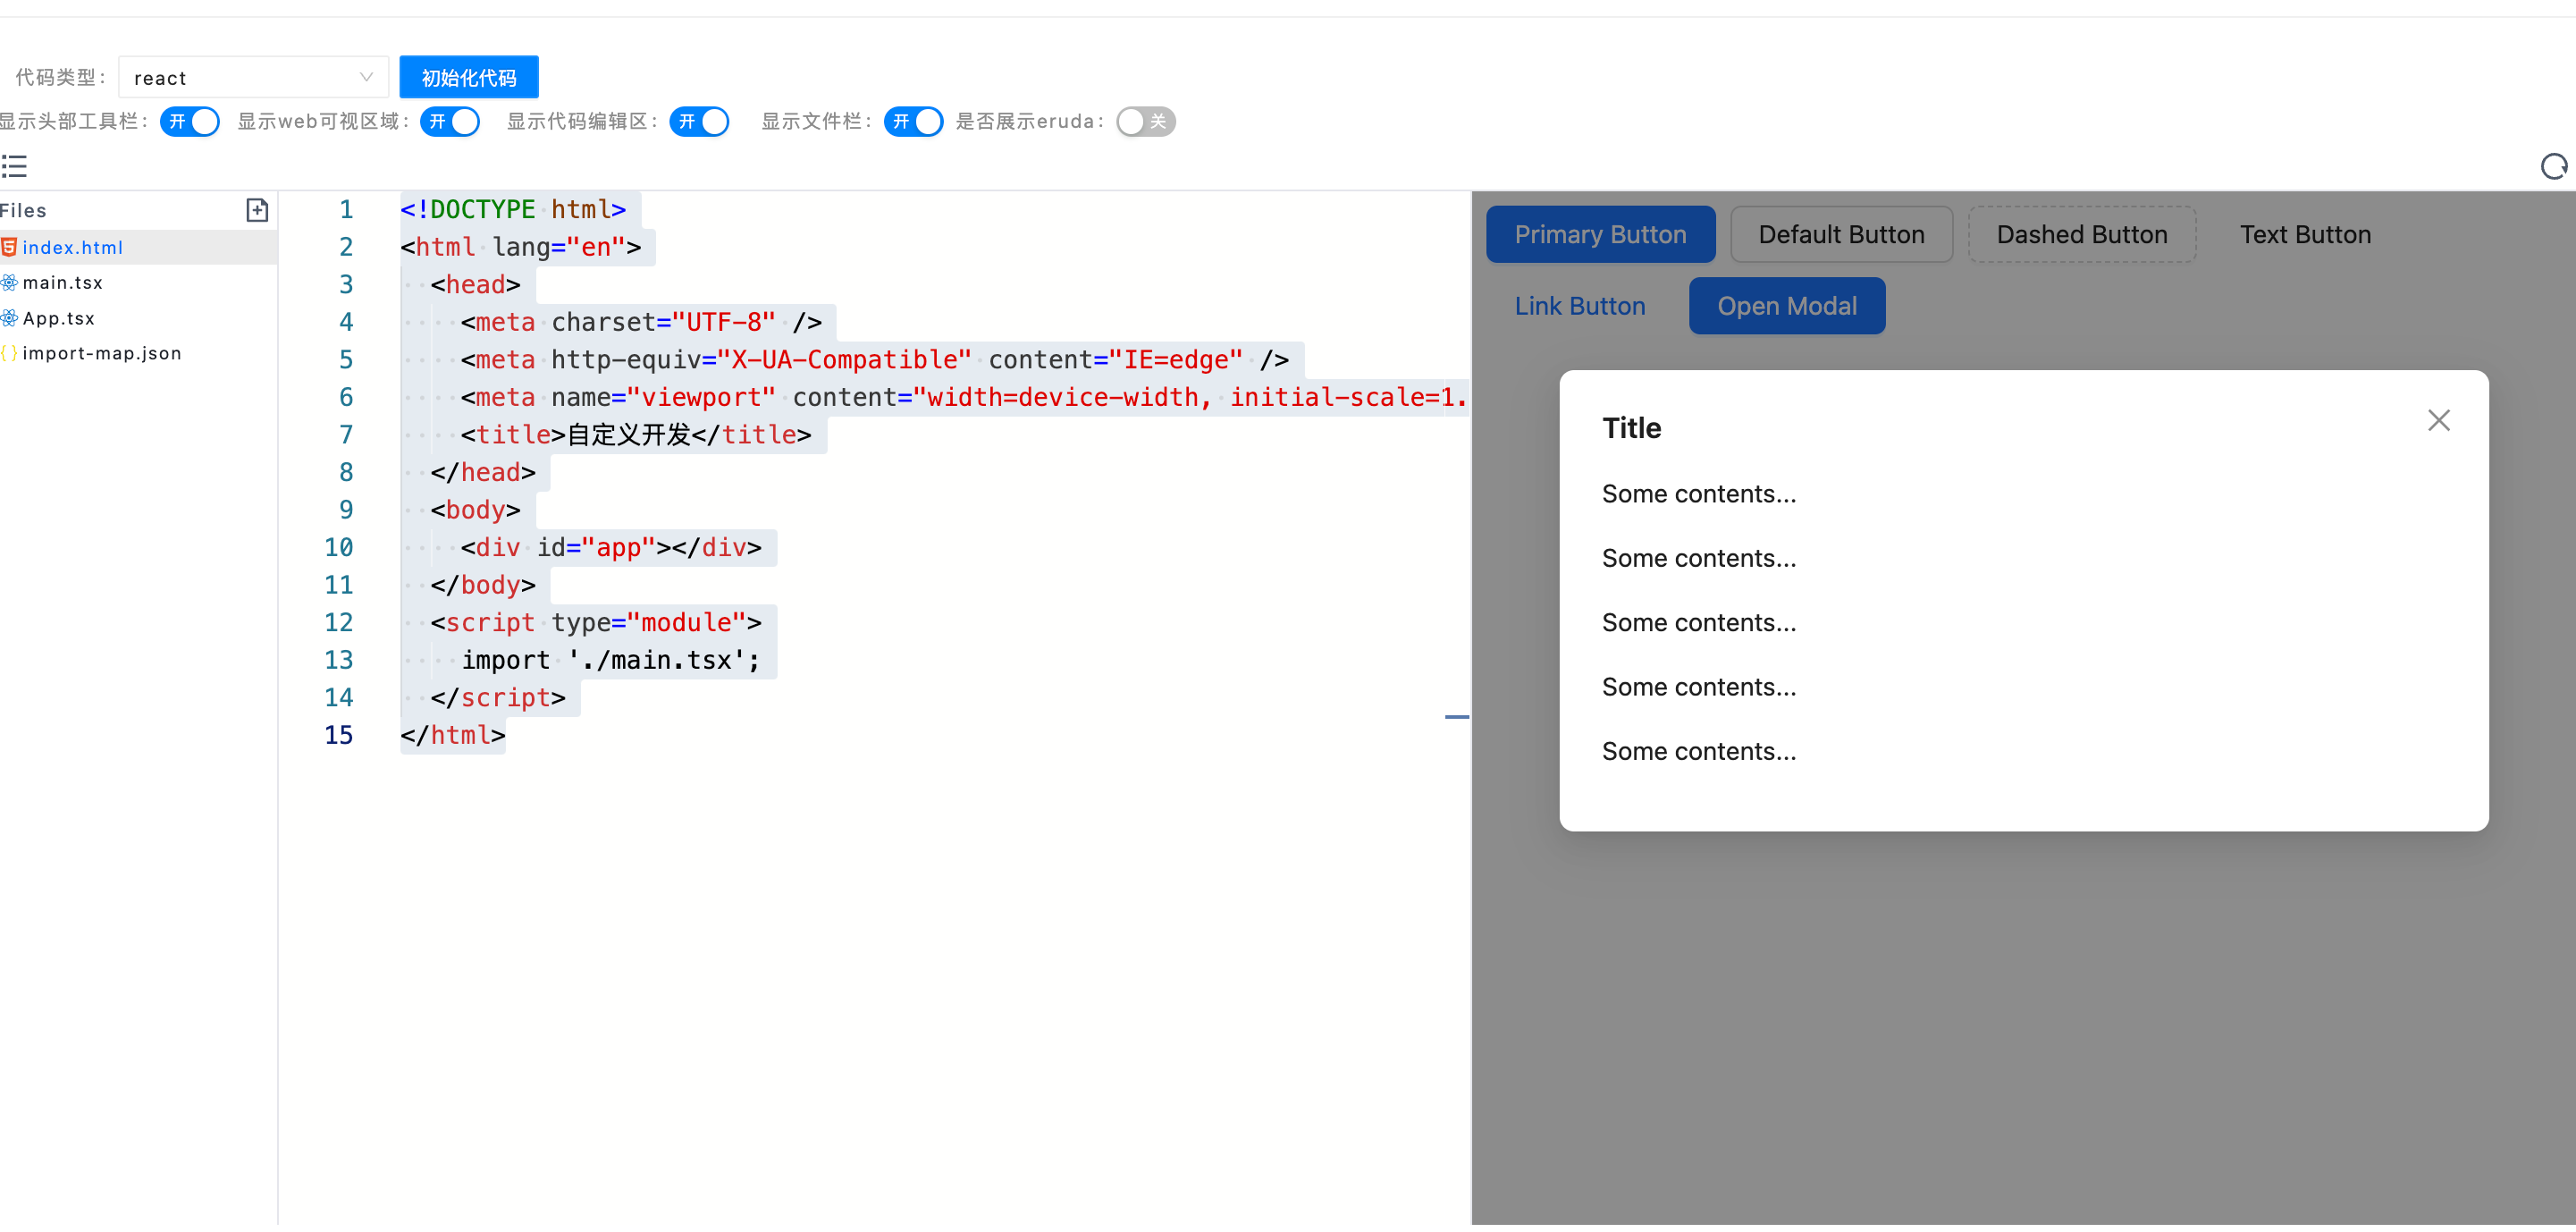
2.2.3.2 通用 react 模版库代码:
引入 react18, antd 三方资源库, 使用 react 技术栈实现组件能力
import-map.json:
{
  "imports": {
    "react": "https://esm.sh/react@18.2.0",
    "react-dom/": "https://esm.sh/react-dom@18.2.0/",
    "antd": "https://esm.sh/antd@5.8.5",
    "@antd/": "https://esm.sh/@antd@5.8.5/"
  }
}
App.tsx
import React, {useState} from 'react';
import { Button, Space, Modal } from 'antd';

const App: React.FC = () => {
const [open, setOpen] = useState(false);

  const showModal = () => {
    setOpen(true);
  };
  const handleOk = () => {
    setOpen(false);
  };

  const handleCancel = () => {
    setOpen(false);
  };
  return (
  <Space wrap>
    <Button type="primary">Primary Button</Button>
    <Button>Default Button</Button>
    <Button type="dashed">Dashed Button</Button>
    <Button type="text">Text Button</Button>
    <Button type="link">Link Button</Button>
     <Button type="primary" onClick={showModal}>
          Open Modal
        </Button>
    <Modal
        open={open}
        title="Title"
        onOk={handleOk}
        onCancel={handleCancel}
        footer={(_, { OkBtn, CancelBtn }) => (
          <>
            <Button>Custom Button</Button>
            <CancelBtn />
            <OkBtn />
          </>
        )}
      >
        <p>Some contents...</p>
        <p>Some contents...</p>
        <p>Some contents...</p>
        <p>Some contents...</p>
        <p>Some contents...</p>
      </Modal>
  </Space>
)
};

export default App;
main.tsx
import React from "react";
import { createRoot } from "react-dom/client";
import App from './App.tsx';

const root = createRoot(document.getElementById('app'));
root.render(<App />)
index.html
<!DOCTYPE html>
<html lang="en">
  <head>
    <meta charset="UTF-8" />
    <meta http-equiv="X-UA-Compatible" content="IE=edge" />
    <meta name="viewport" content="width=device-width, initial-scale=1.0" />
    <title>自定义开发</title>
  </head>
  <body>
    <div id="app"></div>
  </body>
  <script type="module">
    import './main.tsx';
  </script>
</html>
展示效果:
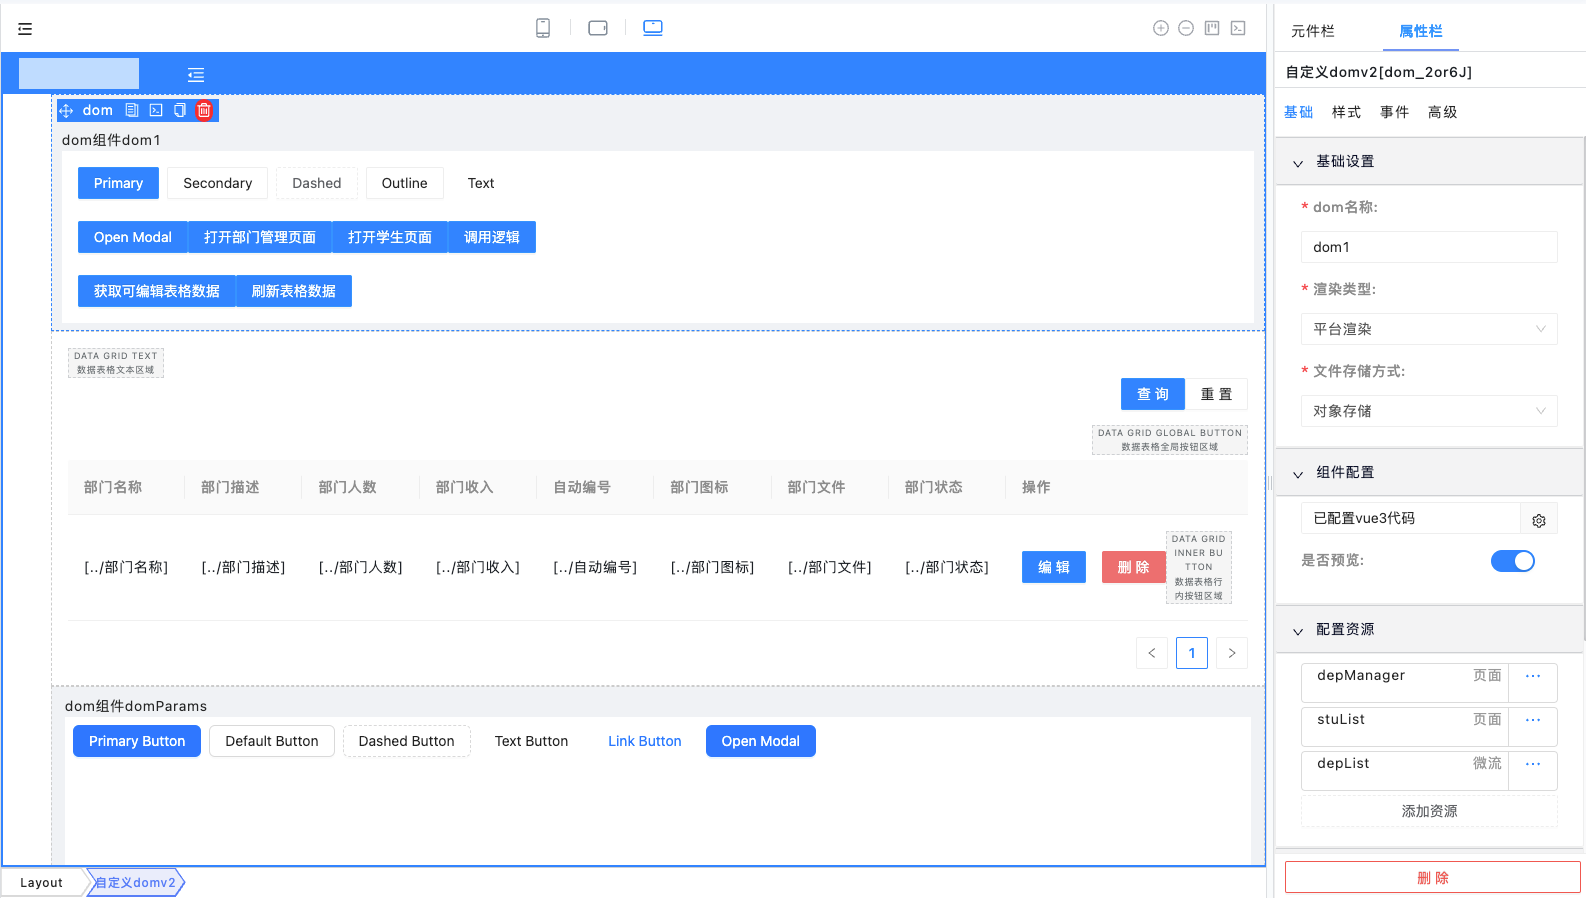
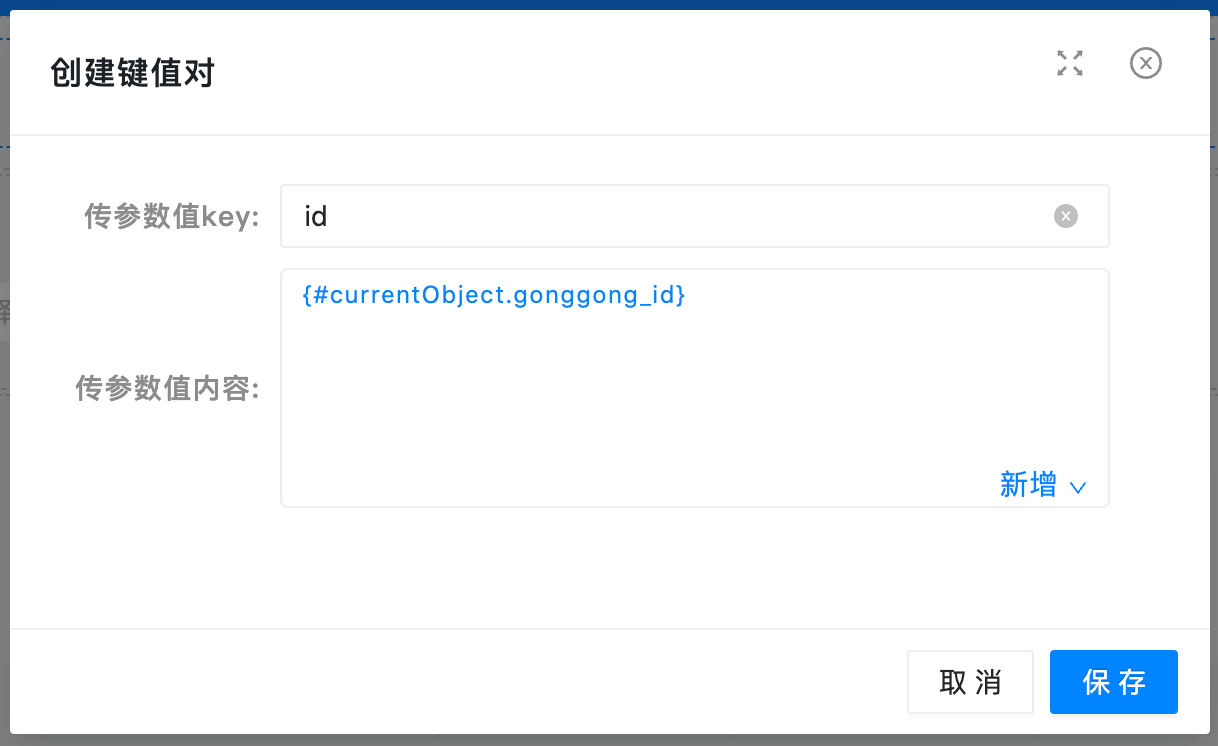
2.2.4 属性配置说明
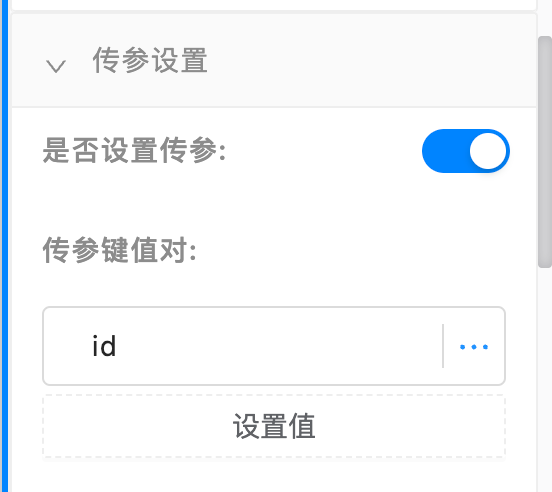
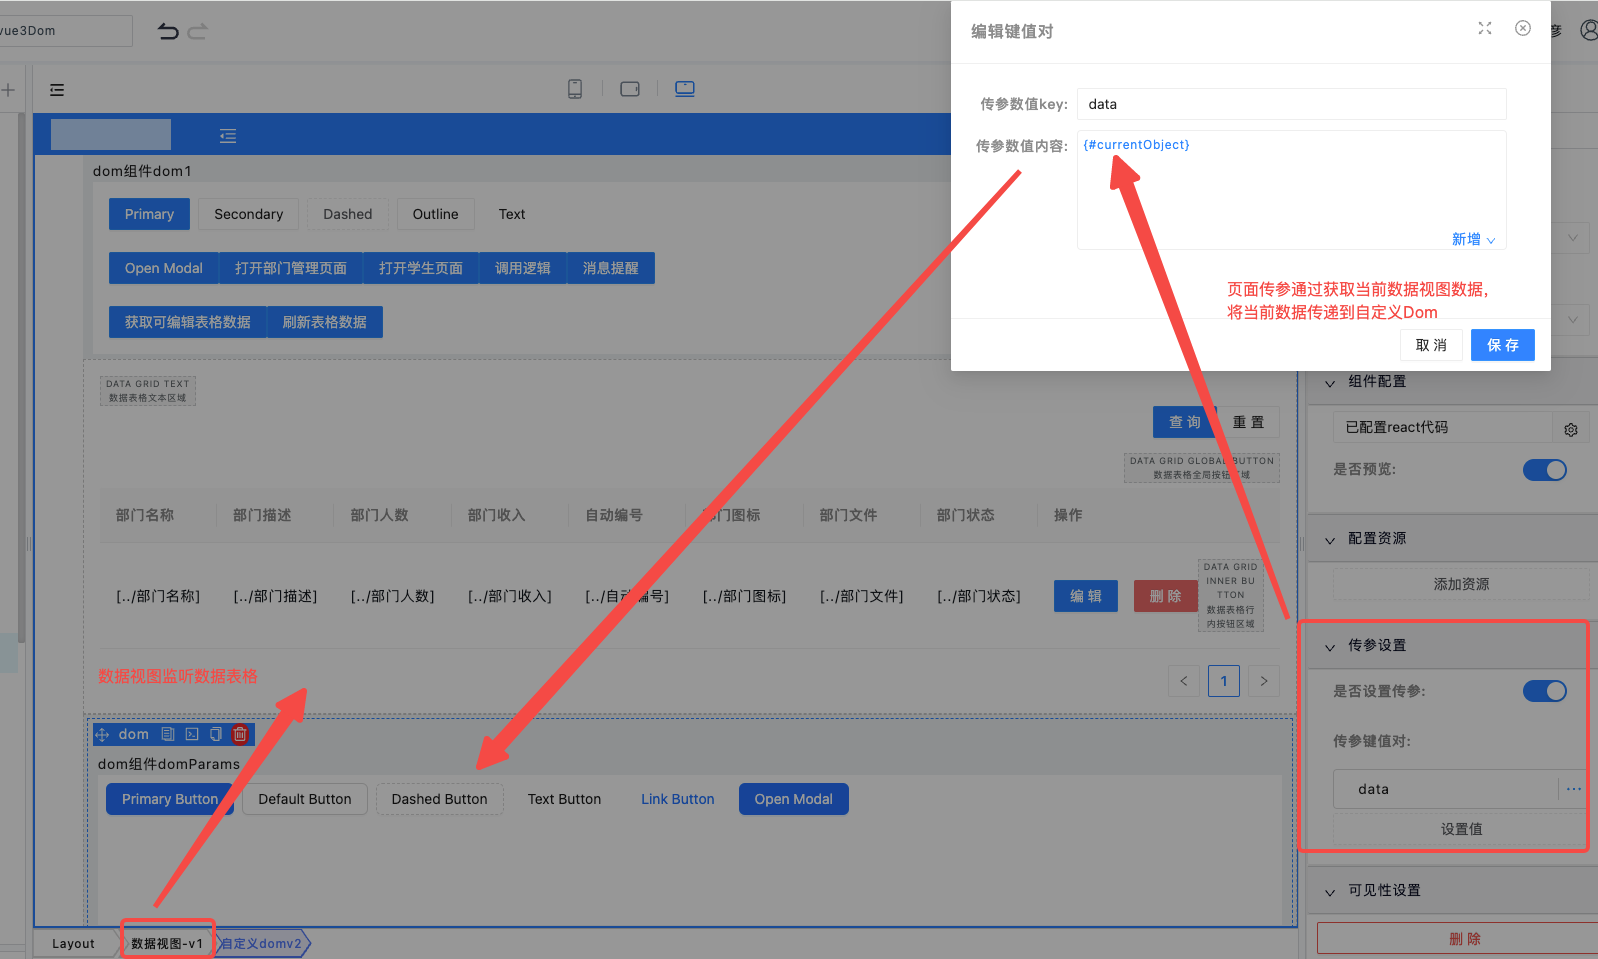
是否预览: 支持在编辑态画布中预览组件的效果配置参数:可以配置逻辑,页面,若未配置,则无权限调用。传参配置:用户可以设置给当前组件设置传参,传参获取方式可在下面介绍。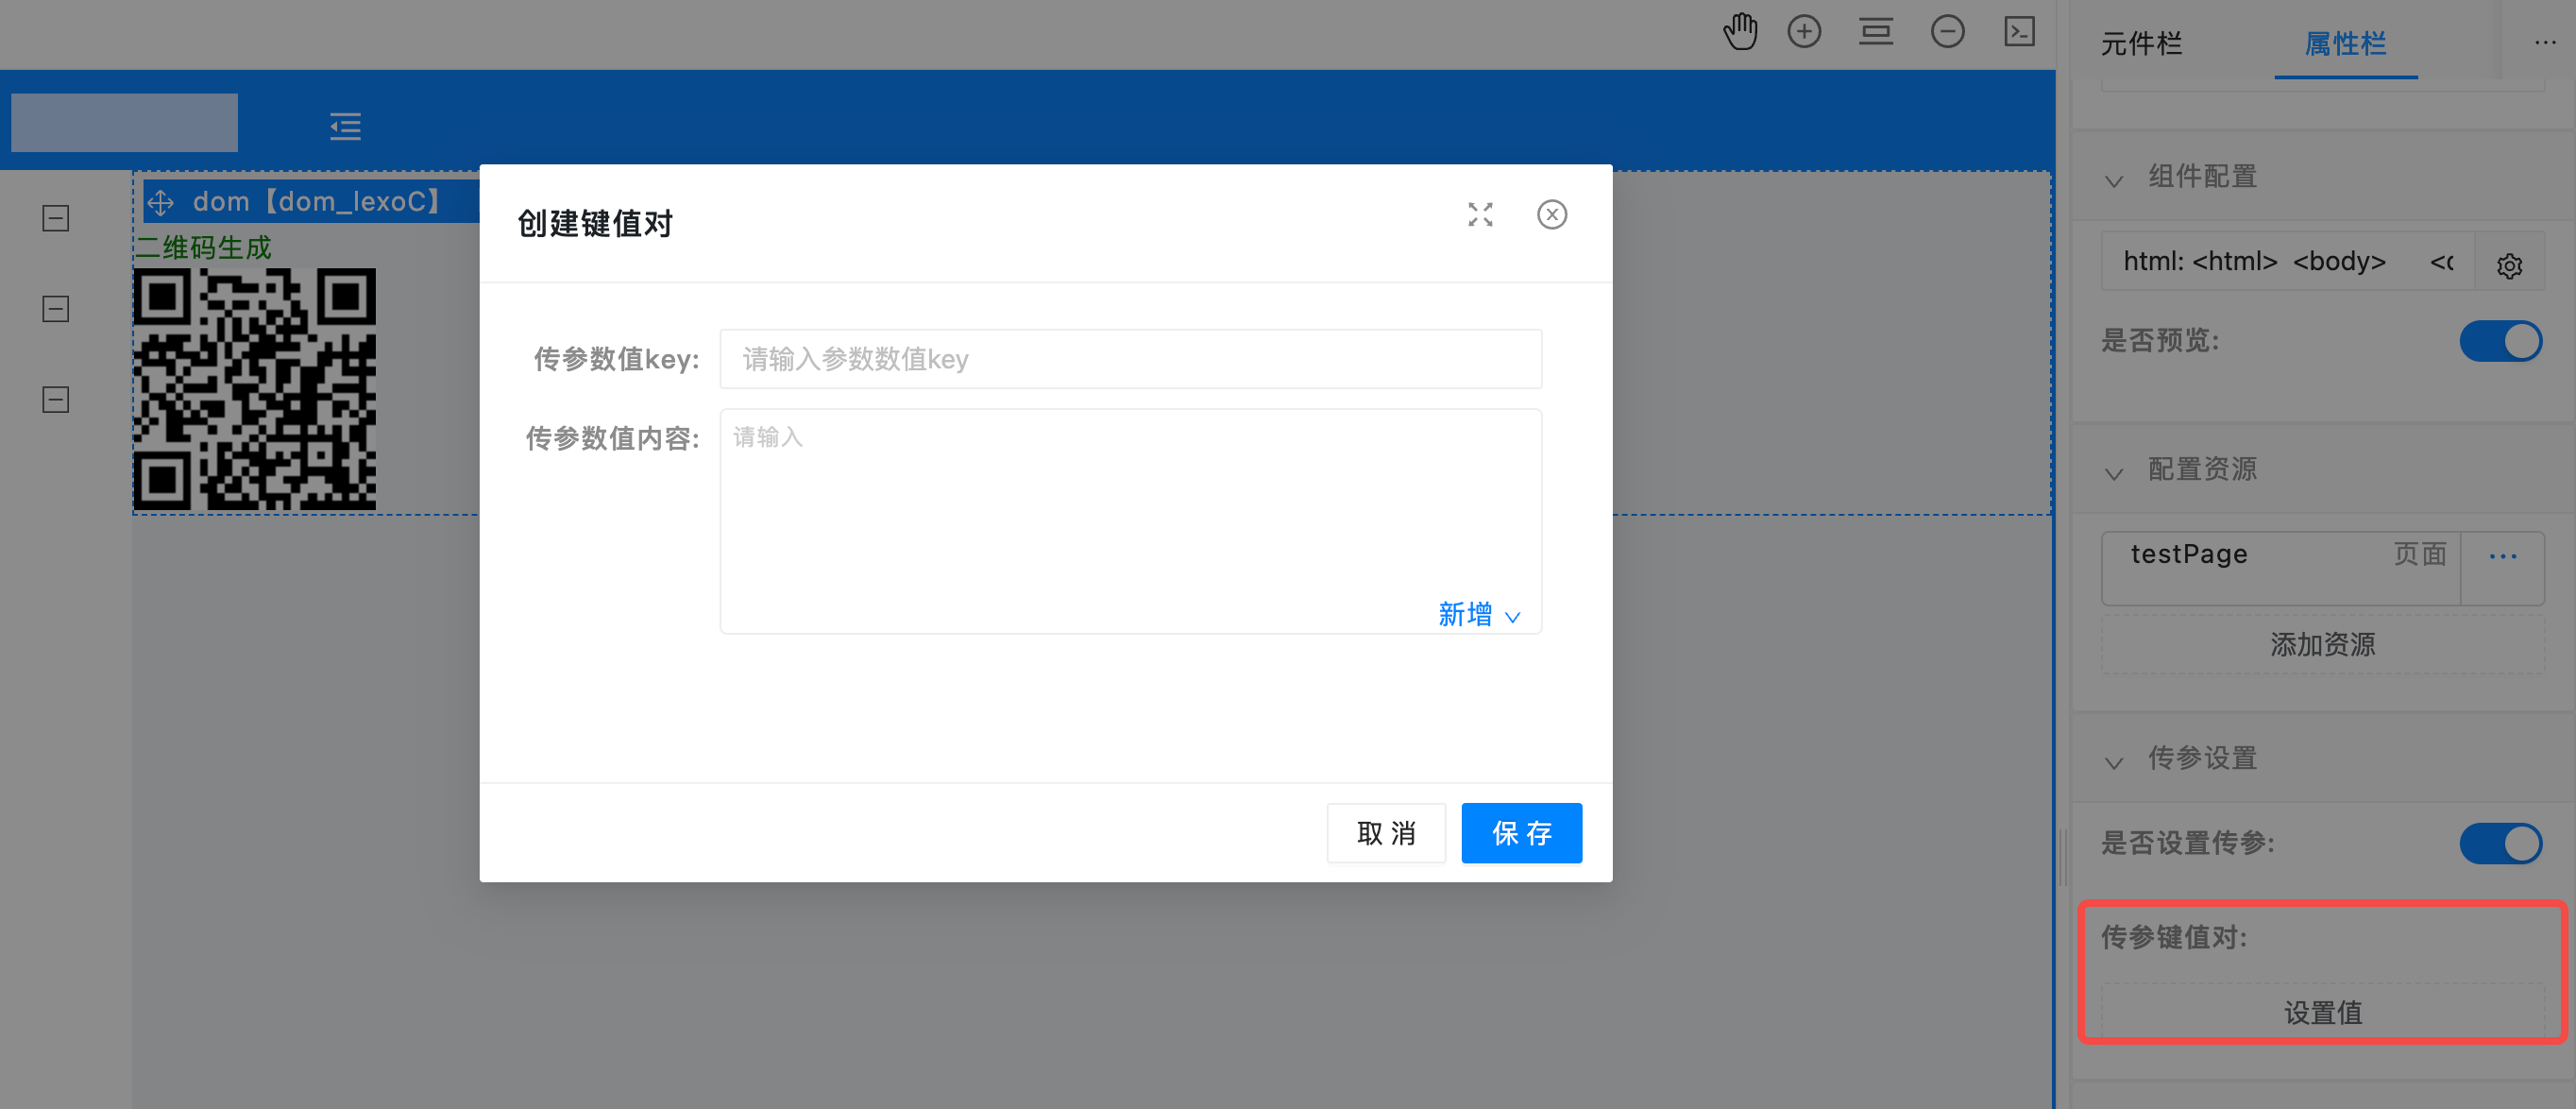
2.2.4 dom 交互事件
updateProps 事件说明:动态数据配置的依赖数据发生变化,会触发当前事件的执行,只有自定义 dom 组件内部监听了当前事件,才能处理到对应的事件
参考事例:
const updateProps = (data) => {
    console.log('===数据更新===', data);
  }

  useEffect(() => {
    // 初始化获取组件数据
    const applicationName = $sdk.name || 'test';
    console.log('===初始化获取数据===', $sdk?.getPropsData());
    $sdk.event?.$on(`${applicationName}:updateProps`, updateProps);
    return () => {
      $sdk.event?.$off(`${applicationName}:updateProps`, updateProps);
    }
  }, []);
效果展示:
2.3 依赖资源
依赖库源码:https://gitlab.xuelangyun.com/cli-manage/code-player
私有仓库 npm 包:http://10.88.36.120/package/@gonggong/codeplayer
其他项目想要对接也可以直接使用,参考下面使用
组件入参定义:
export interface CodePlayerOptions {
    /**
     * @description_en Whether to display the side file column, default value is true
     * @description_zh 是否展示侧文件栏,默认为 true
     */
    showFileBar?: boolean;
    /**
     * @description_en Whether to display the code editor, default value is true
     * @description_zh 是否展示代码编辑区,默认为 true
     */
    showCode?: boolean;
    /**
     * @description_en Whether to display the web preview, default value is true
     * @description_zh 是否展示 web 可视区,默认为 true
     */
    showPreview?: boolean;
    /**
     * @description_en Whether to display the toolbar, default value is true
     * @description_zh 是否展示工具栏,默认为 true
     */
    showToolBar?: boolean;
    /**
     * @description_en Entry file name
     * @description_zh 入口文件的文件名,若不设置,默认将第一个文件作为入口文件
     */
    entry?: string;
    /**
     * @description_en Entry file name
     * @description_zh 初始化展示代码的文件的文件名
     */
    activeFile?: string;
    /**
     * @description_en Initialization files JSON string, format: Record<filename, code>
     * @description_zh 初始化文件 map,格式为:Record<filename, code>
     */
    initFiles?: Record<string, string>;
    /**
     * @description_en Application type. If initFiles is not configured, the initial file will be automatically generated according to the appType; If initFiles is configured, this item is invalid
     * @description_zh 应用类型。若未配置 initFiles,会根据 appType 自动生成初始文件;若配置了 initFiles,此项失效
     */
    appType?: 'vue' | 'vue2' | 'vue3' | 'react' | 'html' | 'javascript' | 'js' | 'typescript' | 'ts';
    /**
     * @description_en Control buttons to be removed from the toolbar
     * @description_zh 工具栏要移除的工具按钮
     */
    excludeTools?: Control[];
    /**
     * @description_en The initial font-size of code
     * @description_zh 初始的代码字号
     */
    codeSize?: number;
    /**
     * @description_en The version of vue compiler
     * @description_zh vue 解析器的版本
     */
    vueVersion?: 2 | 3;
    /**
     * @description_en The theme
     * @description_zh 主题
     */
    theme?: 'light' | 'dark';
    /**
     * @description_en Whether to open the console
     * @description_zh 是否默认打开控制台
     */
    openConsole?: boolean;
    /**
     * @description_en Whether to show the eruda
     * @description_zh 是否展示 eruda
     */
    showEruda?: boolean;
    /**
     * @description_en The link of document
     * @description_zh 文档链接地址
     */
    document?: string;
    /**
     * @description_en The link of github
     * @description_zh github 地址
     */
    github?: boolean;
    /**
     * @description_en component render type
     * @description_zh 组件渲染类型 iframe | shadowDom模式 | platform 平台渲染方式
     */
    renderType?: 'iframe' | 'shadowDom' | 'platform';
    /**
     * @description_en component renderMode
     * @description_zh 组件展示类型 editor | preview模式
     */
    renderMode?: 'editor' | 'preview';
    /**
     * @description_en component sdk
     * @description_zh 通用sdk
     */
    sdk?: {
        [key: string]: any;
    };
    /**
     * @description_en app name
     * @description_zh 应用名称
     */
    app?: string;
    fileType: 'object' | 'string';
    fileList?: Record<string, string>;
    fileStr?: string;
    className?: string;
}
使用案例:
const options:CodePlayerOptions = reactive({
 className: 'dom-code-container',
 appType: 'vue3',
 excludeTools: ['share'],
 renderMode: 'editor',
 renderType: 'iframe',
 showEruda: false,
 app: 'dom1',
 fileType: 'object',
 fileList: {}, // 如果fileType为对象数据,则采用files数据
 fileStr: '',  // fileType为string数据,则采用fileStr数据
 entry: 'index.html',// 默认入口是html文件
 showToolBar: true,
 showCode: true,
 showFileBar: true,
 showPreview: true,
 onCodeChange: (params: Record<string, any>) => {
  // files默认是fileList, 根据当前数据类型
  console.log('change数据:', params);
  const activeFile = Object.keys(params)?.[0] || 'index.html';
  options.activeFile = activeFile;
  options.fileList = {
    ...options.fileList,
    ...params
  };
  options.fileStr = utoa(JSON.stringify(options.fileList));
 },
 sdk: {
   // 提示信息
   showMessage: (msg: string, type:string='info') => {
     if(msg) {
       message[type](msg);
     }
   }
 }
});

<CodePlayer :options="options" class="codeplayer-container"></CodePlayer>
3 扩展能力
加载外部资源
平台渲染模式扩展三方库资源能力参考应用设置加载外部资源能力。
应用内资源
自定义 DOM 资源配置支持添加应用内的页面、逻辑、连接器,以及媒体资源里的图片、音频、视频资源。
在配置资源模块添加资源到自定义 dom,如下图所示
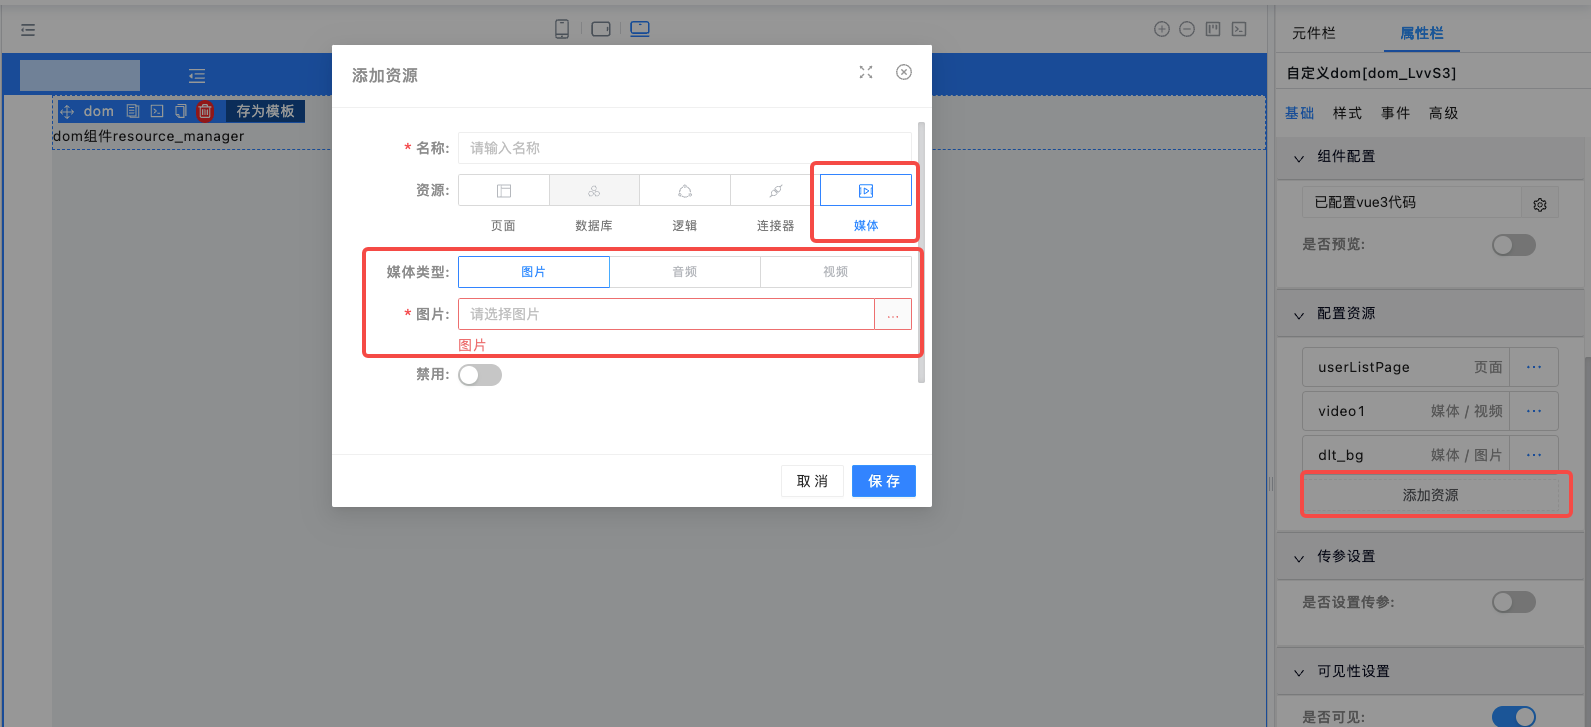
自定义 DOM 配置页面里面可统一管理本组件添加的所有资源,并支持修改、启用禁用、删除,以及复制代码,将拷贝的内容复制到代码里使用
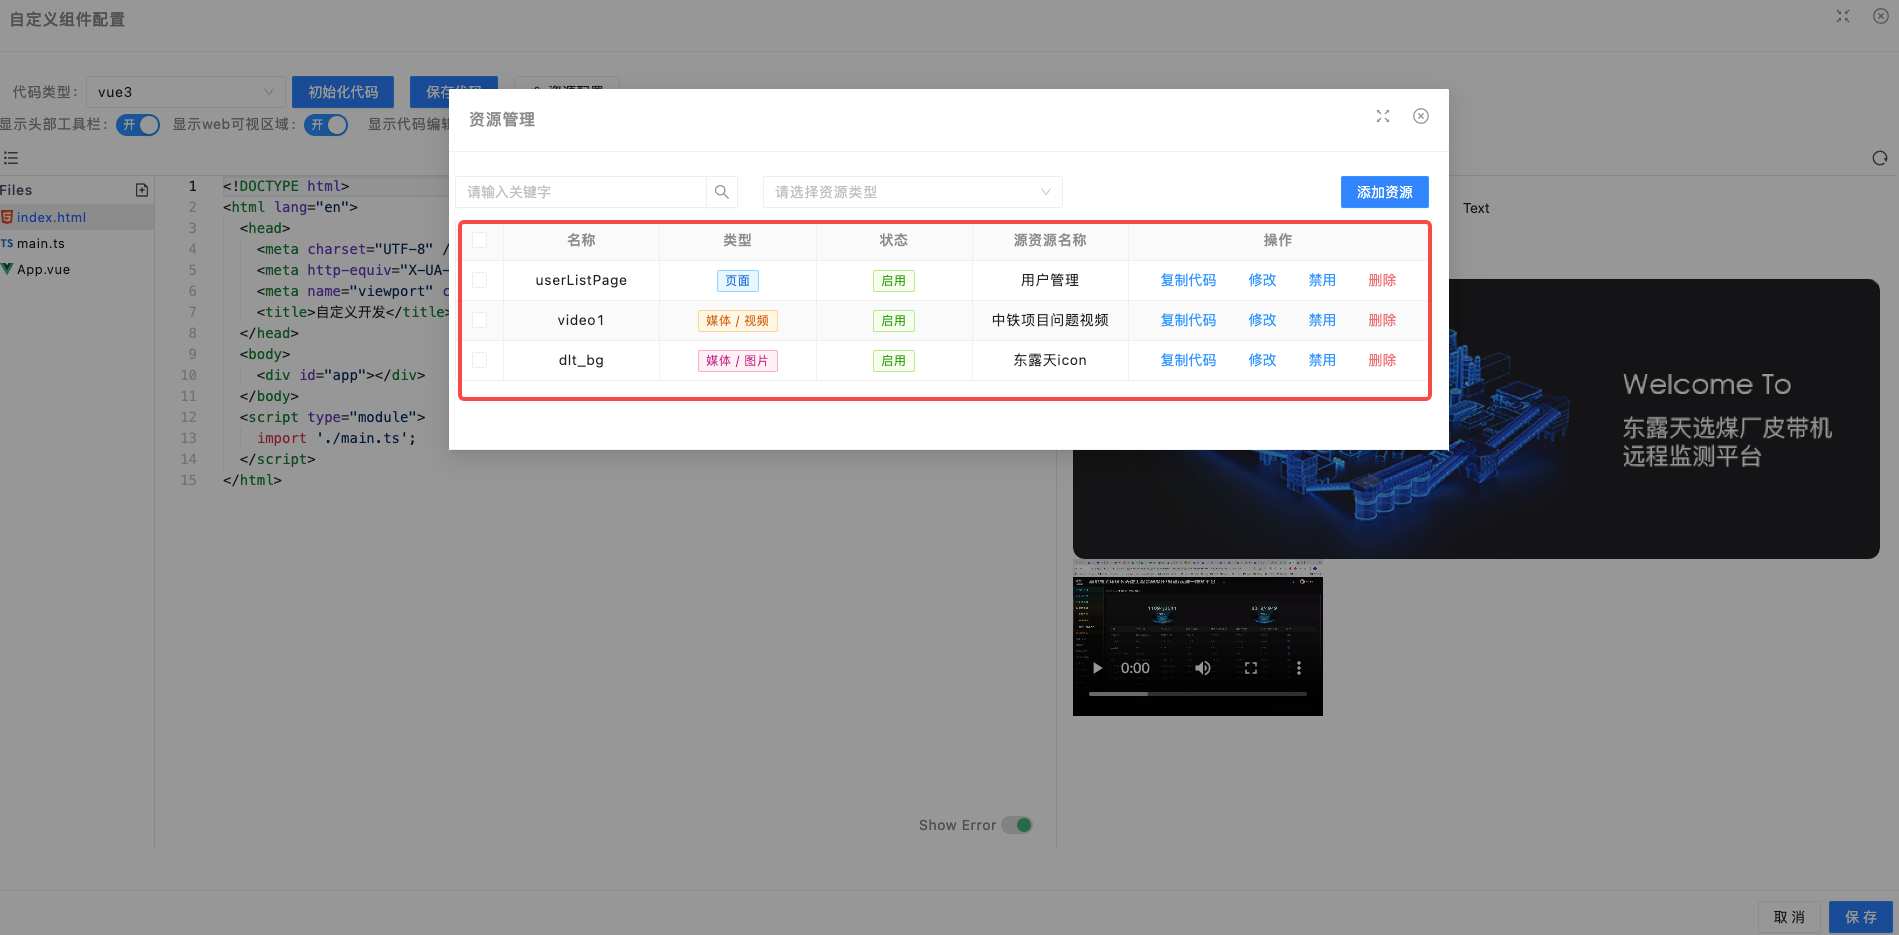
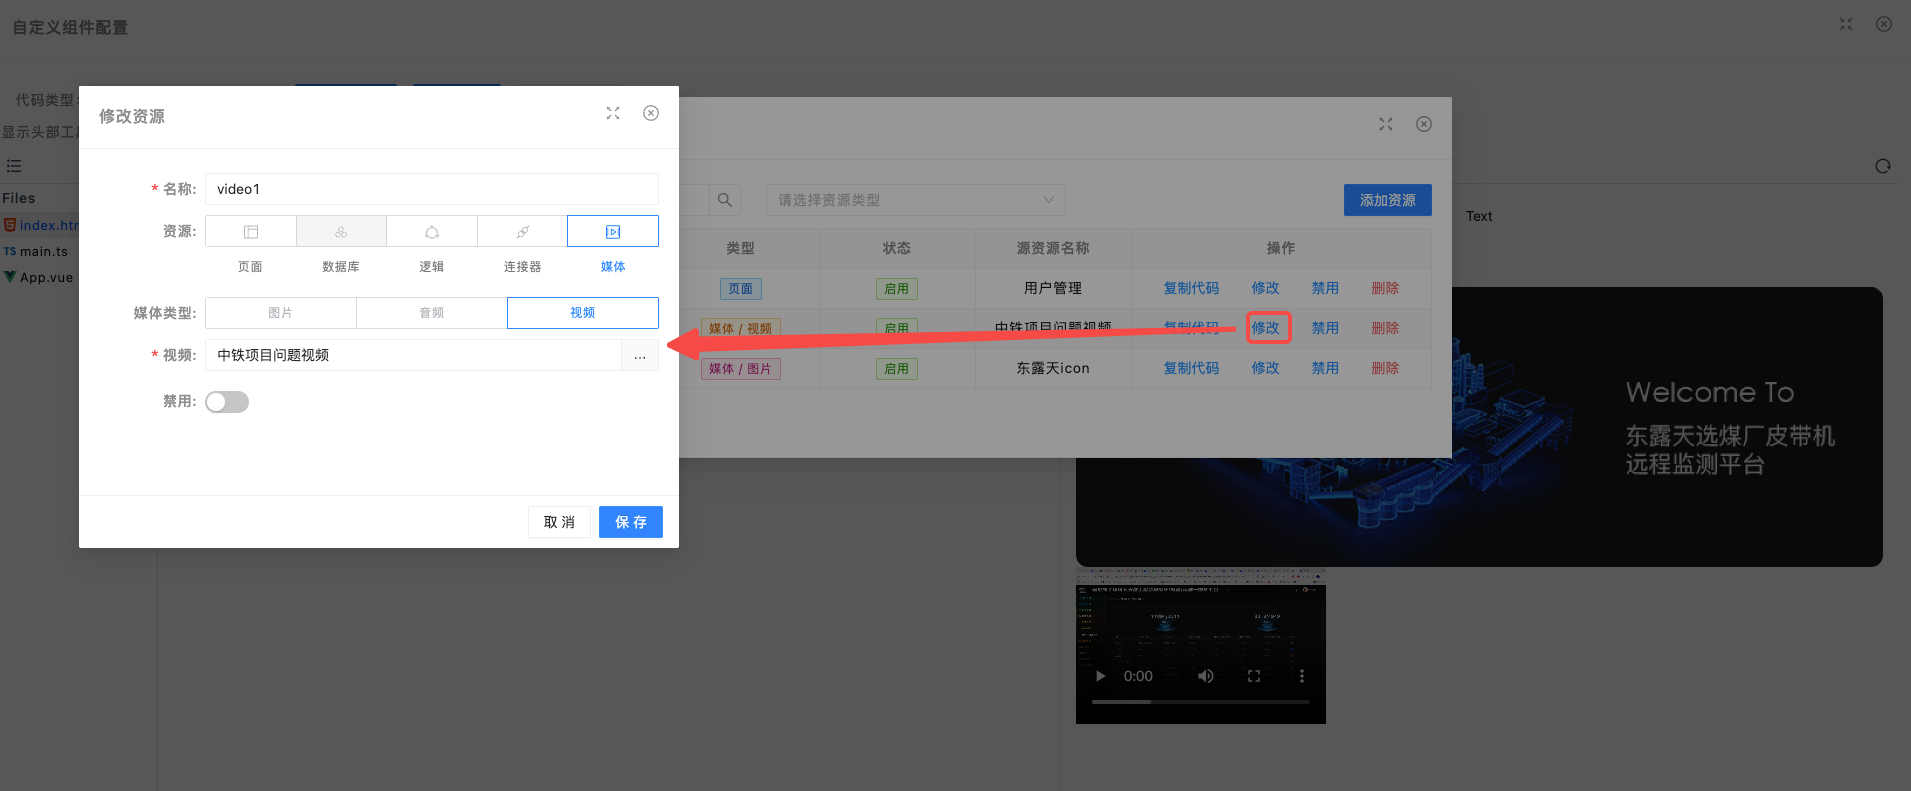
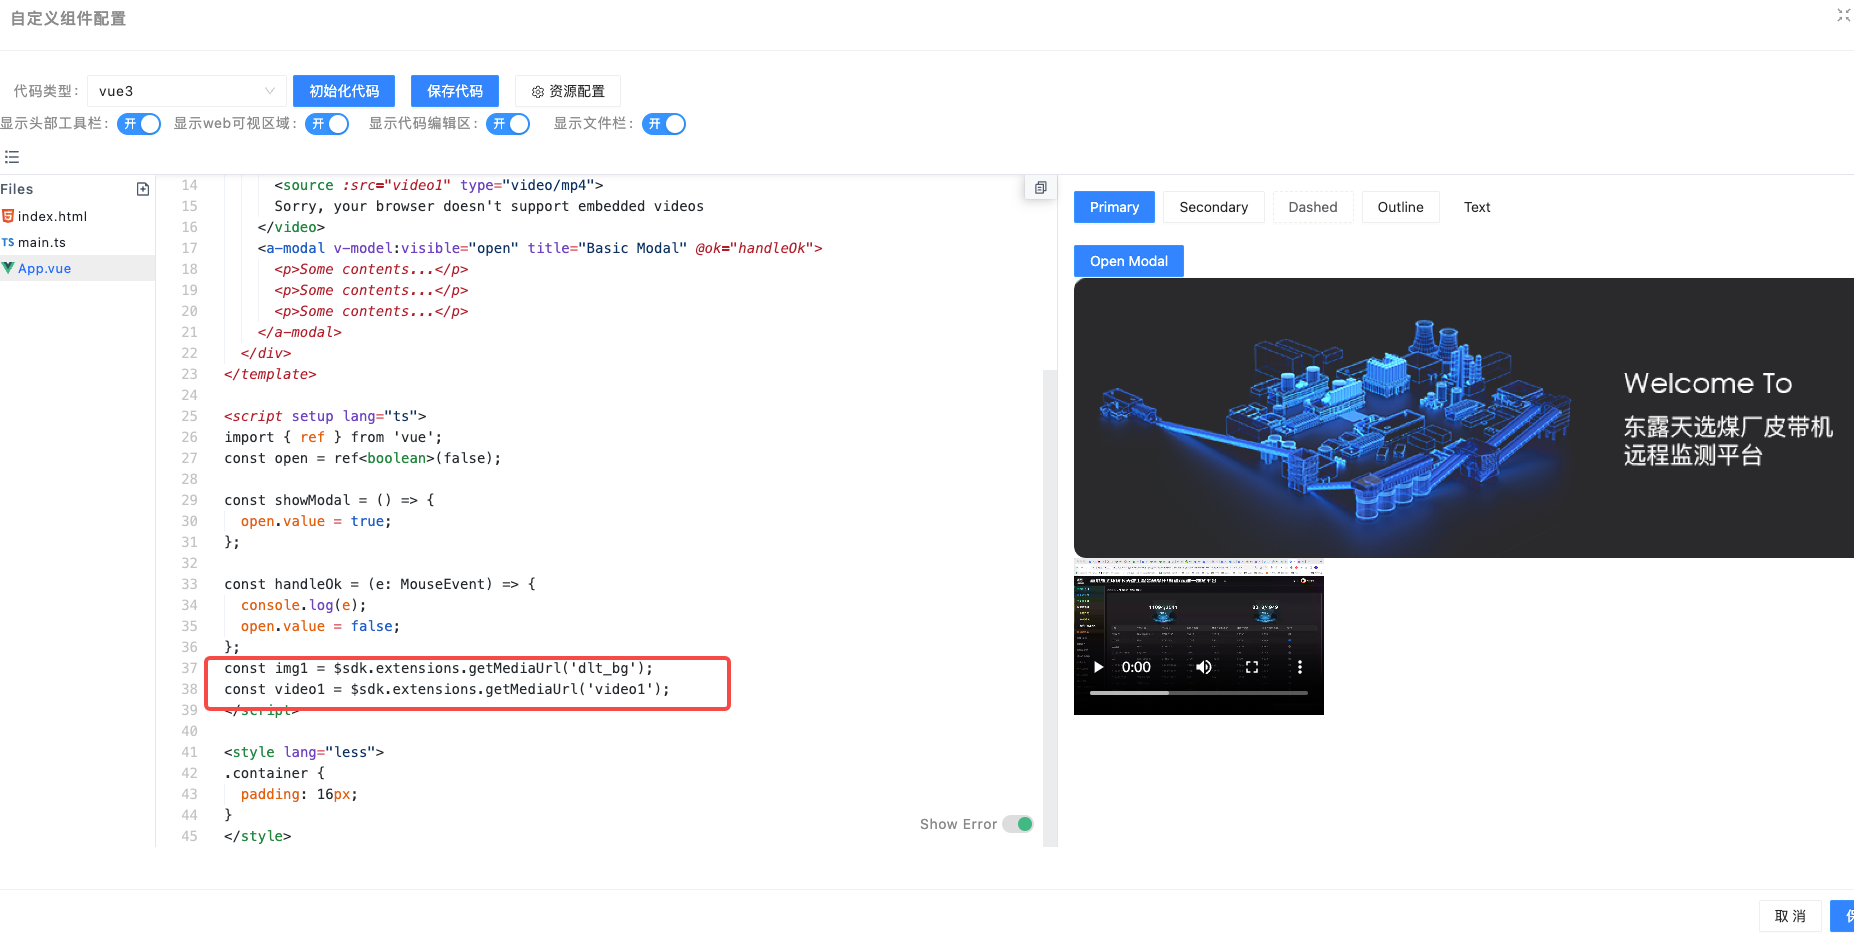
在资源管理中复制代码,将拷贝的内容复制到代码里使用,例如下图,通过 sdk 方法获取到媒体资源地址,使用媒体资源
获取应用多语言资源
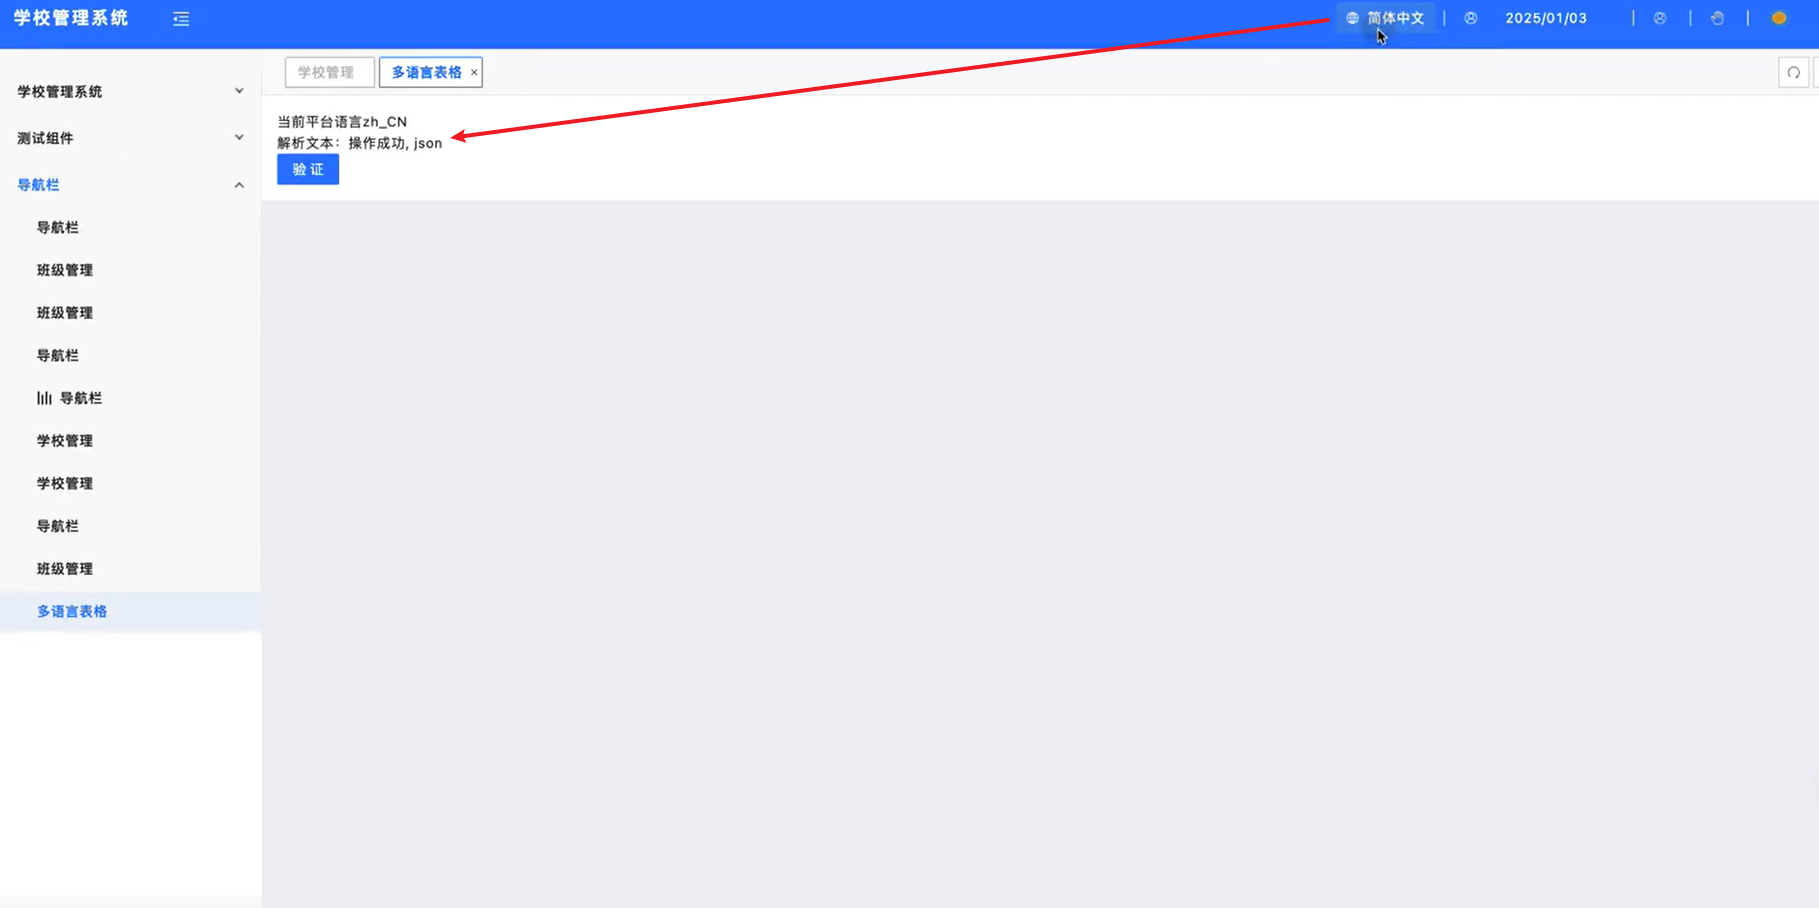
应用开启多语言模式时,可以在自定义 dom 中使用 extensions 暴露出来的 t 函数和 getLang 函数,配置多语言相关的功能,参考写法如下(在 vue 代码中写):
<template>
  <div class="container">
   当前平台语言{{getLang()}}<br/>
   解析文本:{{t("app.successMsg", ['json'])}}<br/>
    <a-button type="primary" <em>@click="showModal">{{t('app.check')}}</a-button></em>
    <em><a-modal</em> v-model:visible="open" title="Basic Modal" <em>@ok="handleOk"></em>
      <em><p>Some</em> <em>contents...</p></em>
      <em><p>Some</em> <em>contents...</p></em>
      <em><p>Some</em> <em>contents...</p></em>
    <em></a-modal></em>
  <em></div></em>
<em></template></em>
<em><script</em> setup lang="ts">
const t = $sdk.extensions.t;
const getLang = $sdk.extensions.getLang;
</script>
该模式在编辑态无法调试,需要在预览态 or 运行时调试
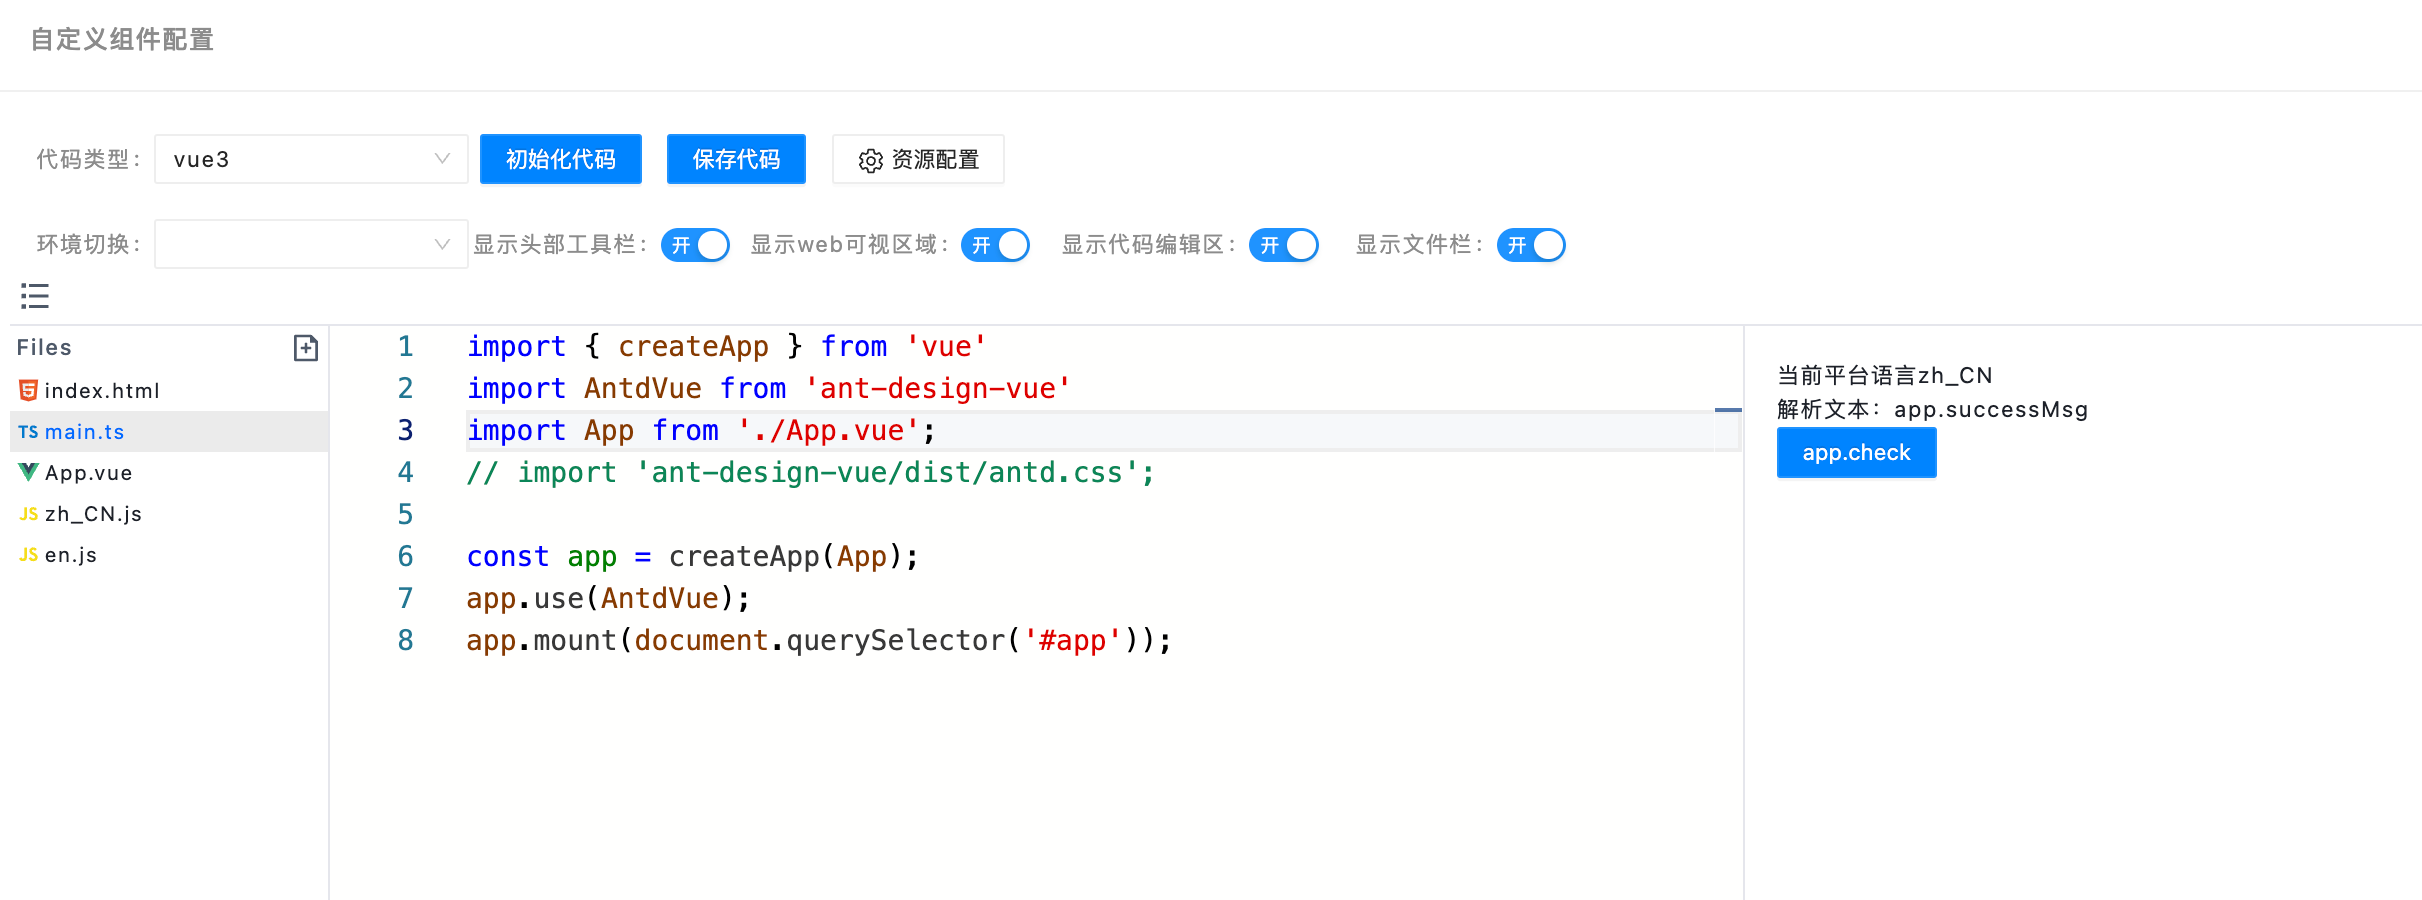
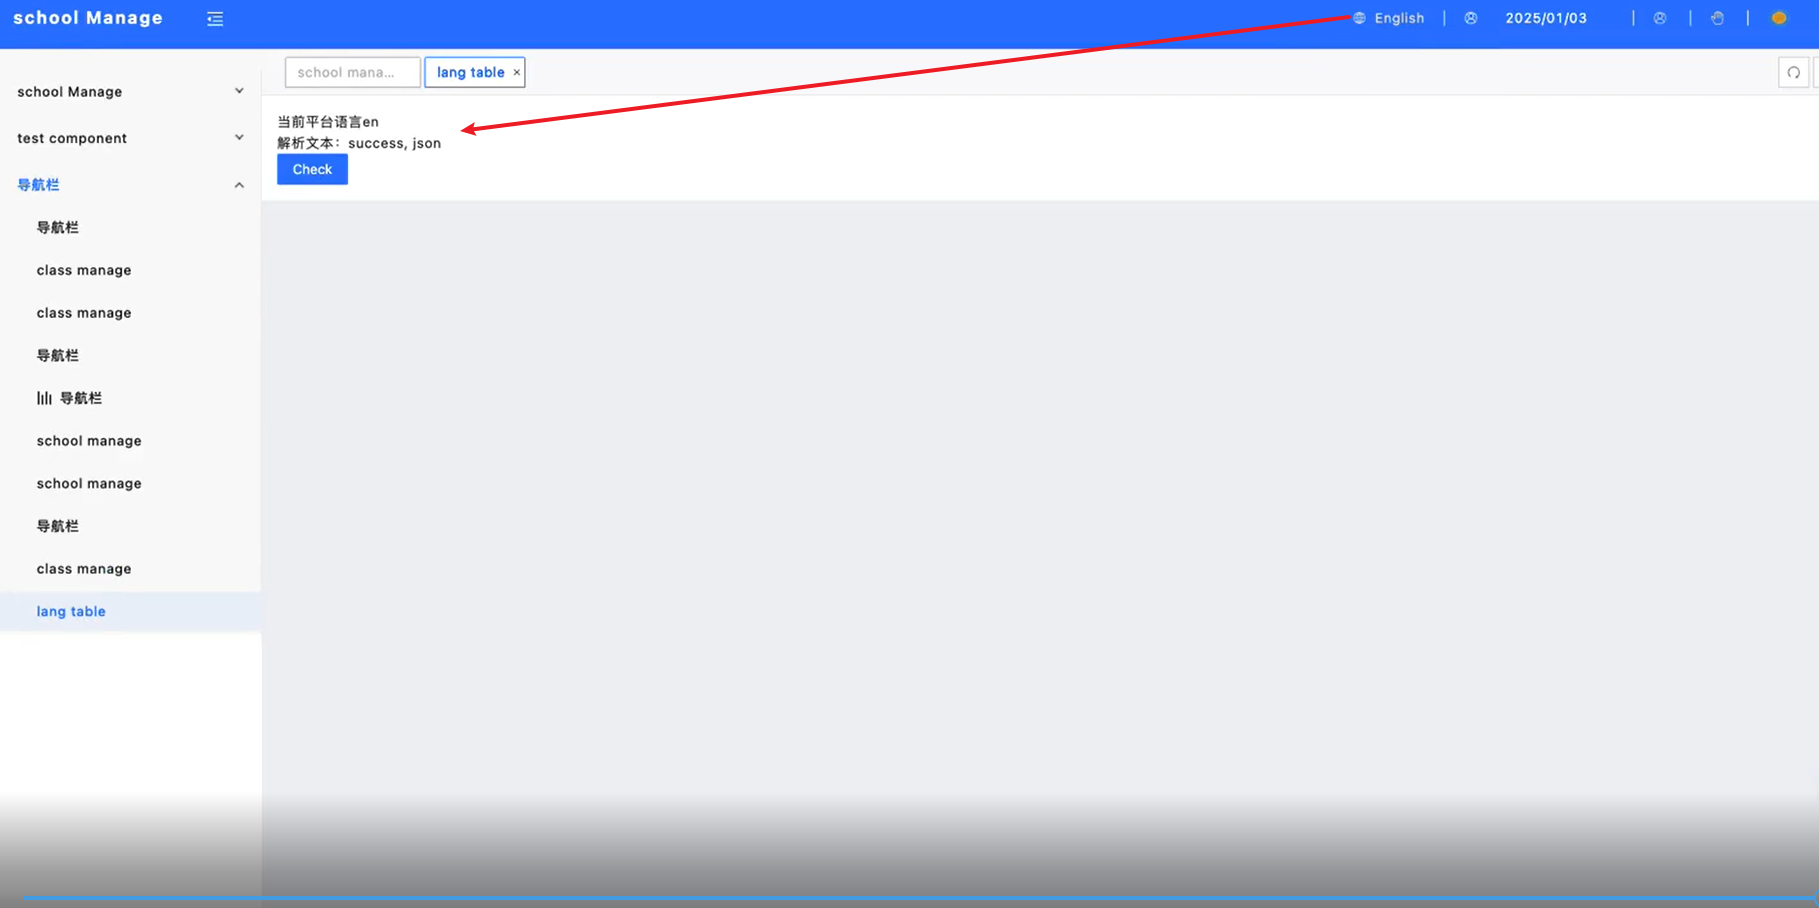
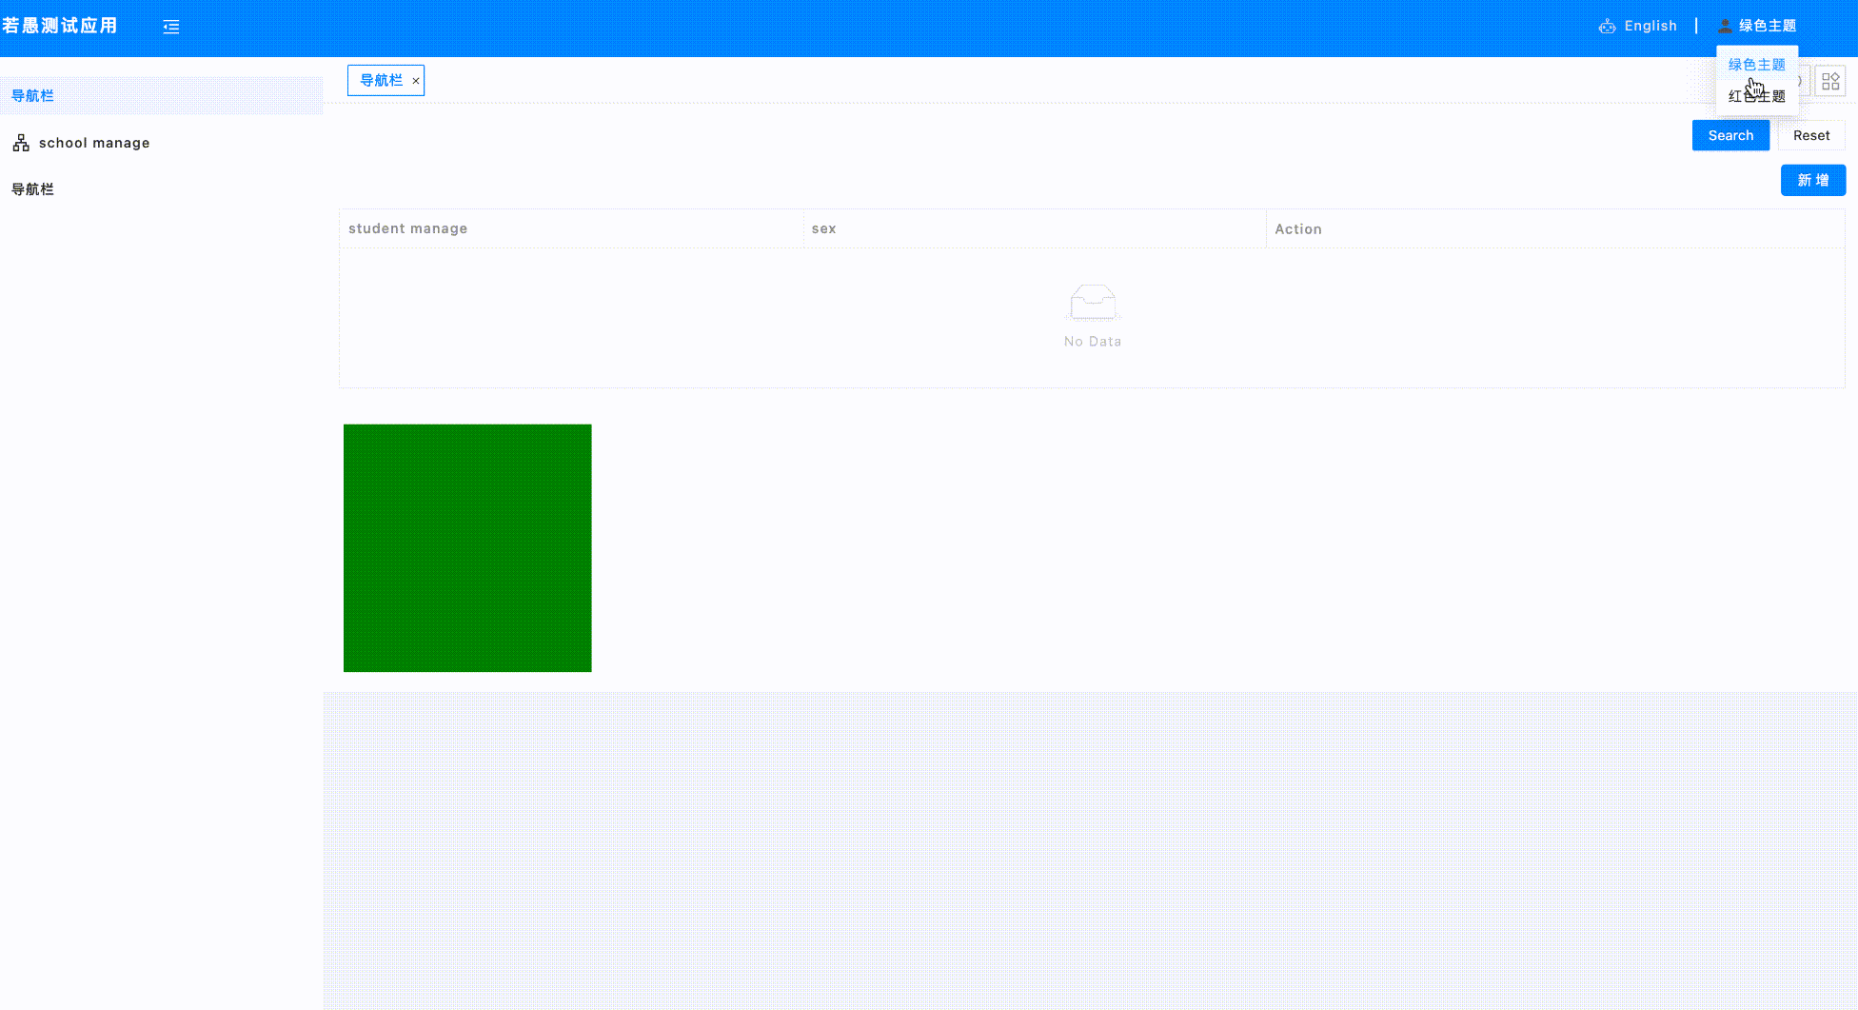
效果如下:
获取多主题信息
- 应用开启多主题模式时,可以在自定义 dom 中使用 extensions 暴露出来的 getCurrentTheme()函数,在自定义 dom 内获取当前主题信息,需要在 vue 代码中使用函数
const currentTheme = $sdk.extensions.getCurrentTheme()
// 获取到的theme类型为object具体字段如下所示
    // {
        // <strong>coverPath</strong>: null
        // <strong>coverUrl</strong>: null
        // <strong>createTime</strong>: "2025-01-03 17:14:43"
        // <strong>creator</strong>: null
        // <strong>id</strong>: 5413114491651520
        // <strong>info</strong>: ":root{\n    --dom-div-color: green\n}\n.test-test {\n    background-color: green;\n    width: 200px;\n    height: 200px\n}"
        // <strong>name</strong>: "绿色主题"
        // <strong>ruleThemeJson</strong>: null
        // <strong>status</strong>: 1
        // <strong>type</strong>: 2
   // }
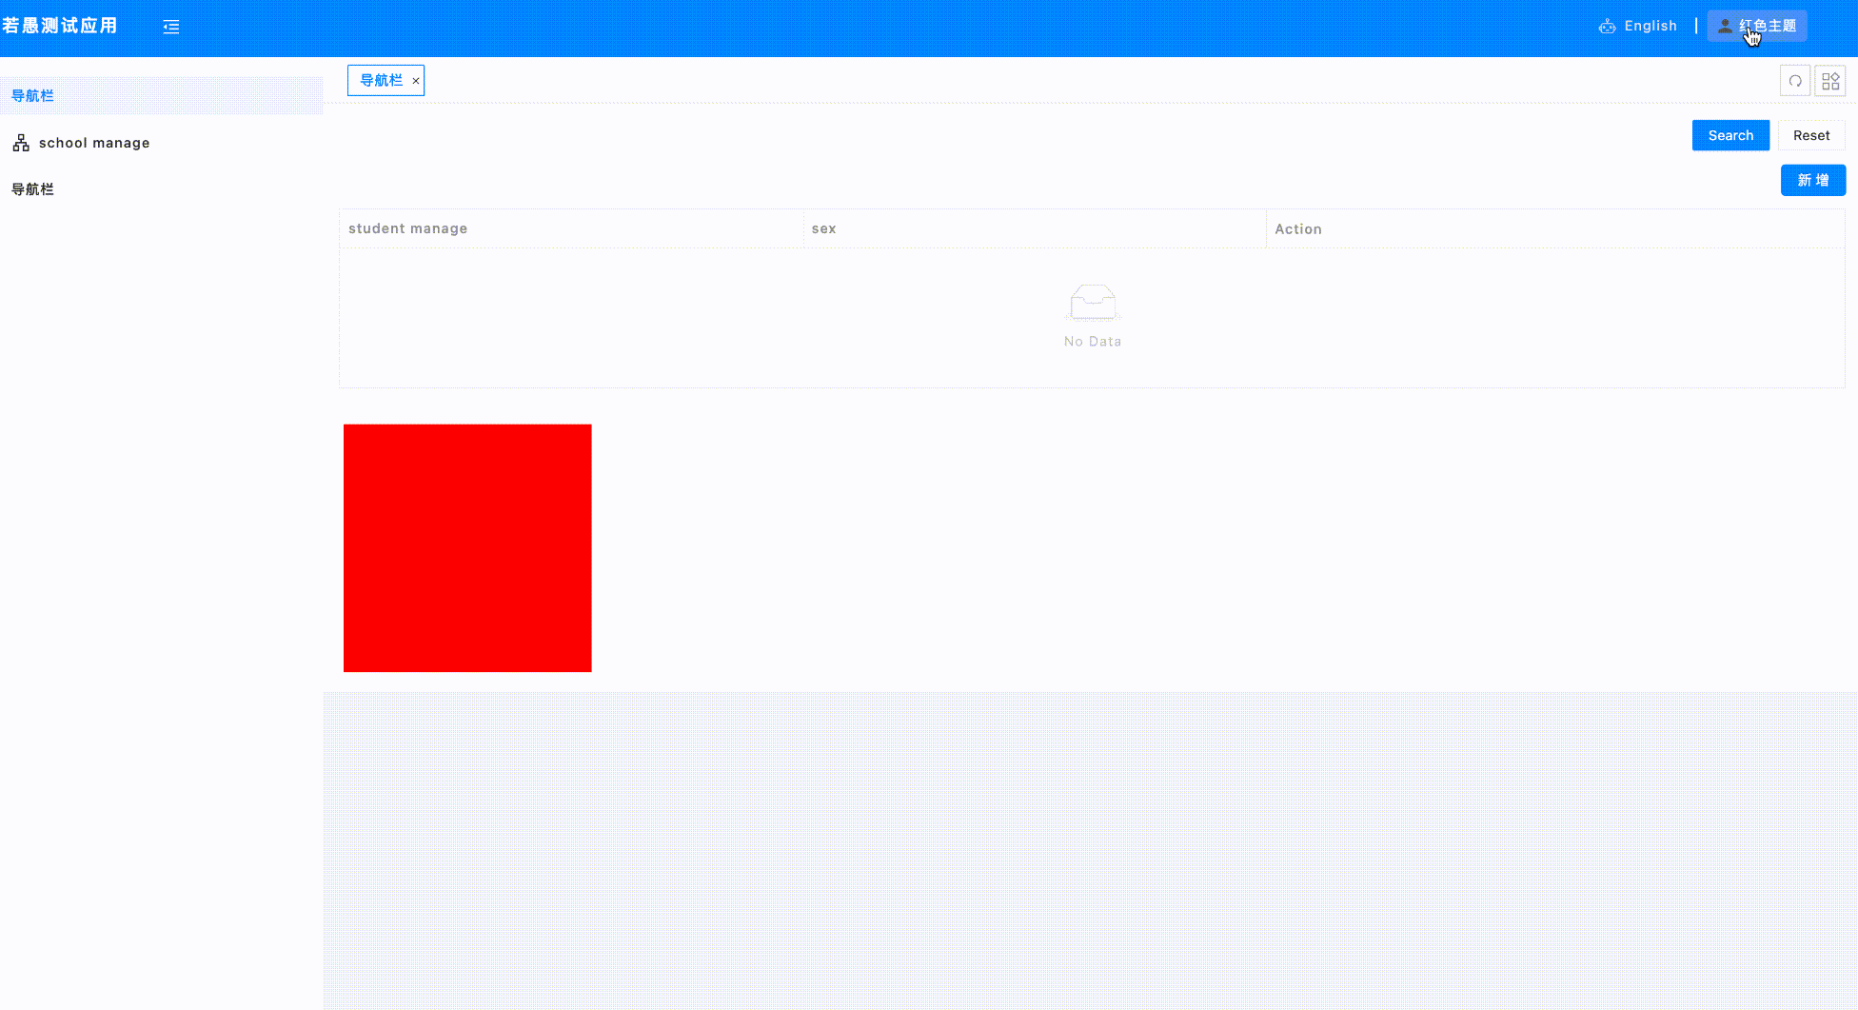
- 需要监听主题切换事件时,参考以下写法:
const applicationName = $sdk.name || 'test';
$sdk.event?.$on(`${applicationName}:themeChange`, (themeInfo) => {
    console.log(themeInfo)
    // themeInfo包含的具体信息, 类型为object具体字段如下所示
    // <strong>coverPath</strong>: null
    // <strong>coverUrl</strong>: null
    // <strong>createTime</strong>: "2025-01-03 17:14:43"
    // <strong>creator</strong>: null
    // <strong>id</strong>: 5413114491651520
    // <strong>info</strong>: ":root{\n    --dom-div-color: green\n}\n.test-test {\n    background-color: green;\n    width: 200px;\n    height: 200px\n}"
    // <strong>name</strong>: "绿色主题"
    // <strong>ruleThemeJson</strong>: null
    // <strong>status</strong>: 1
    // <strong>type</strong>: 2
});
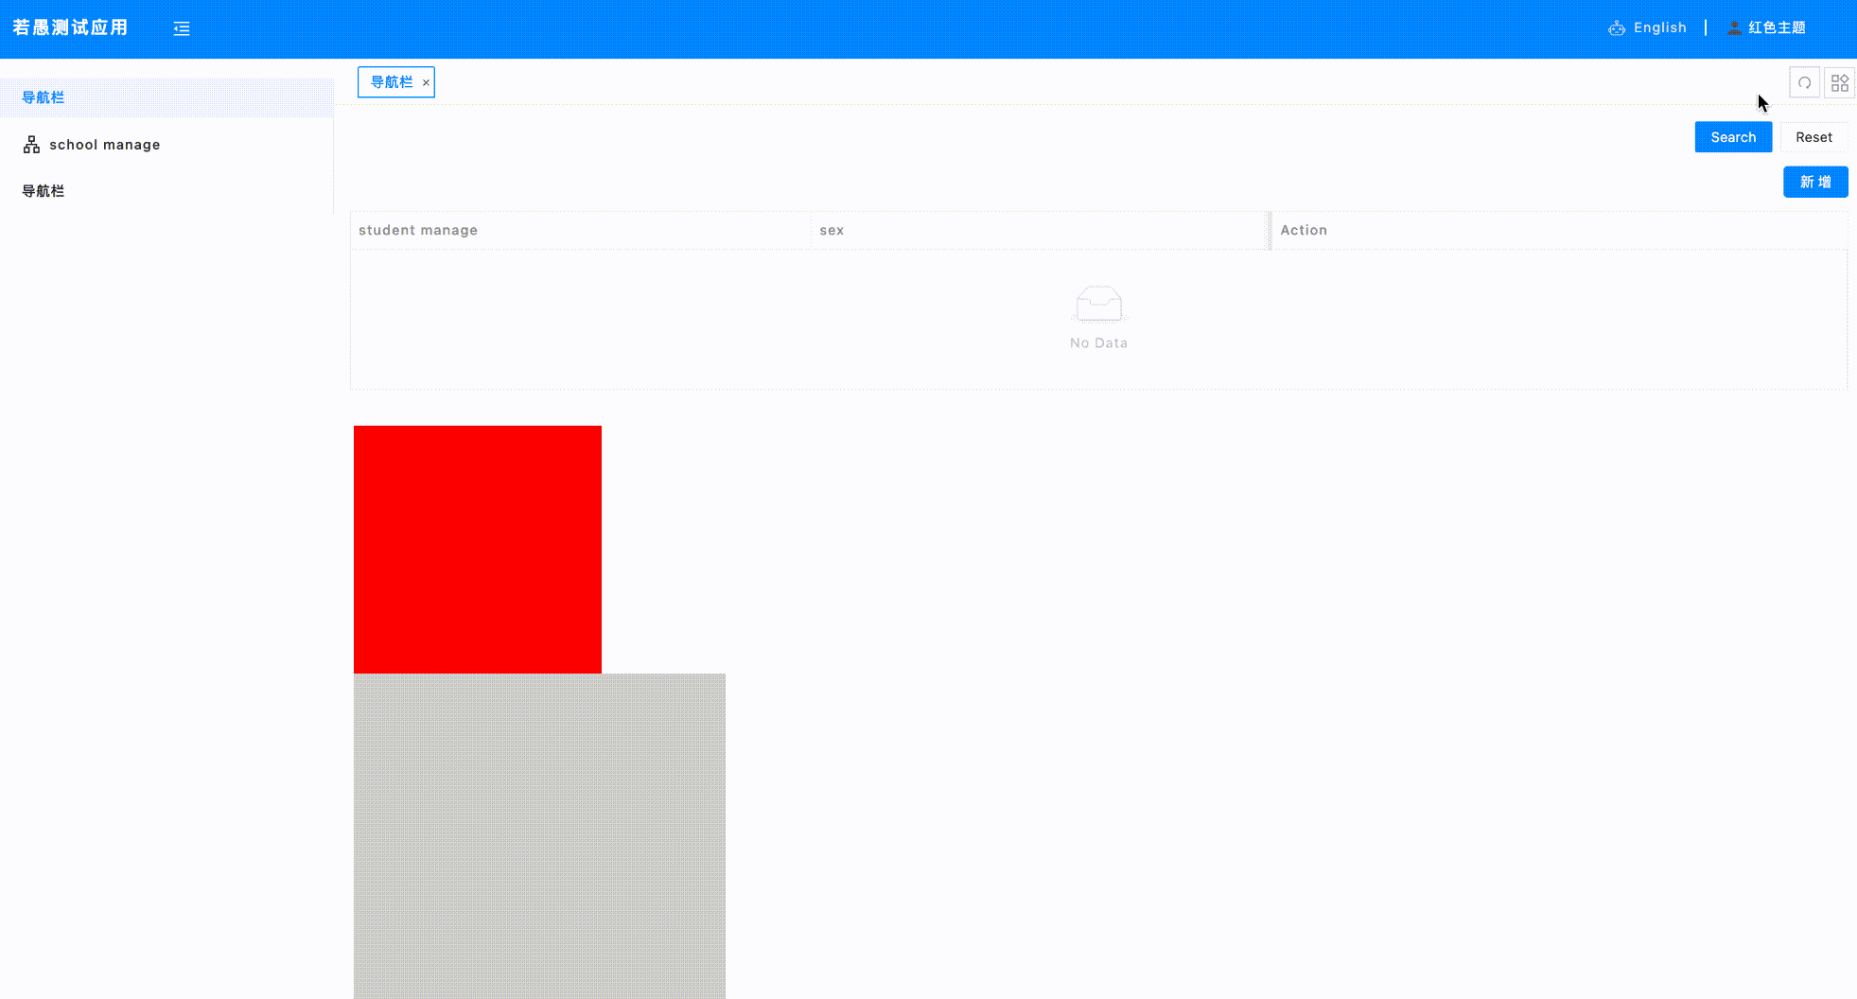
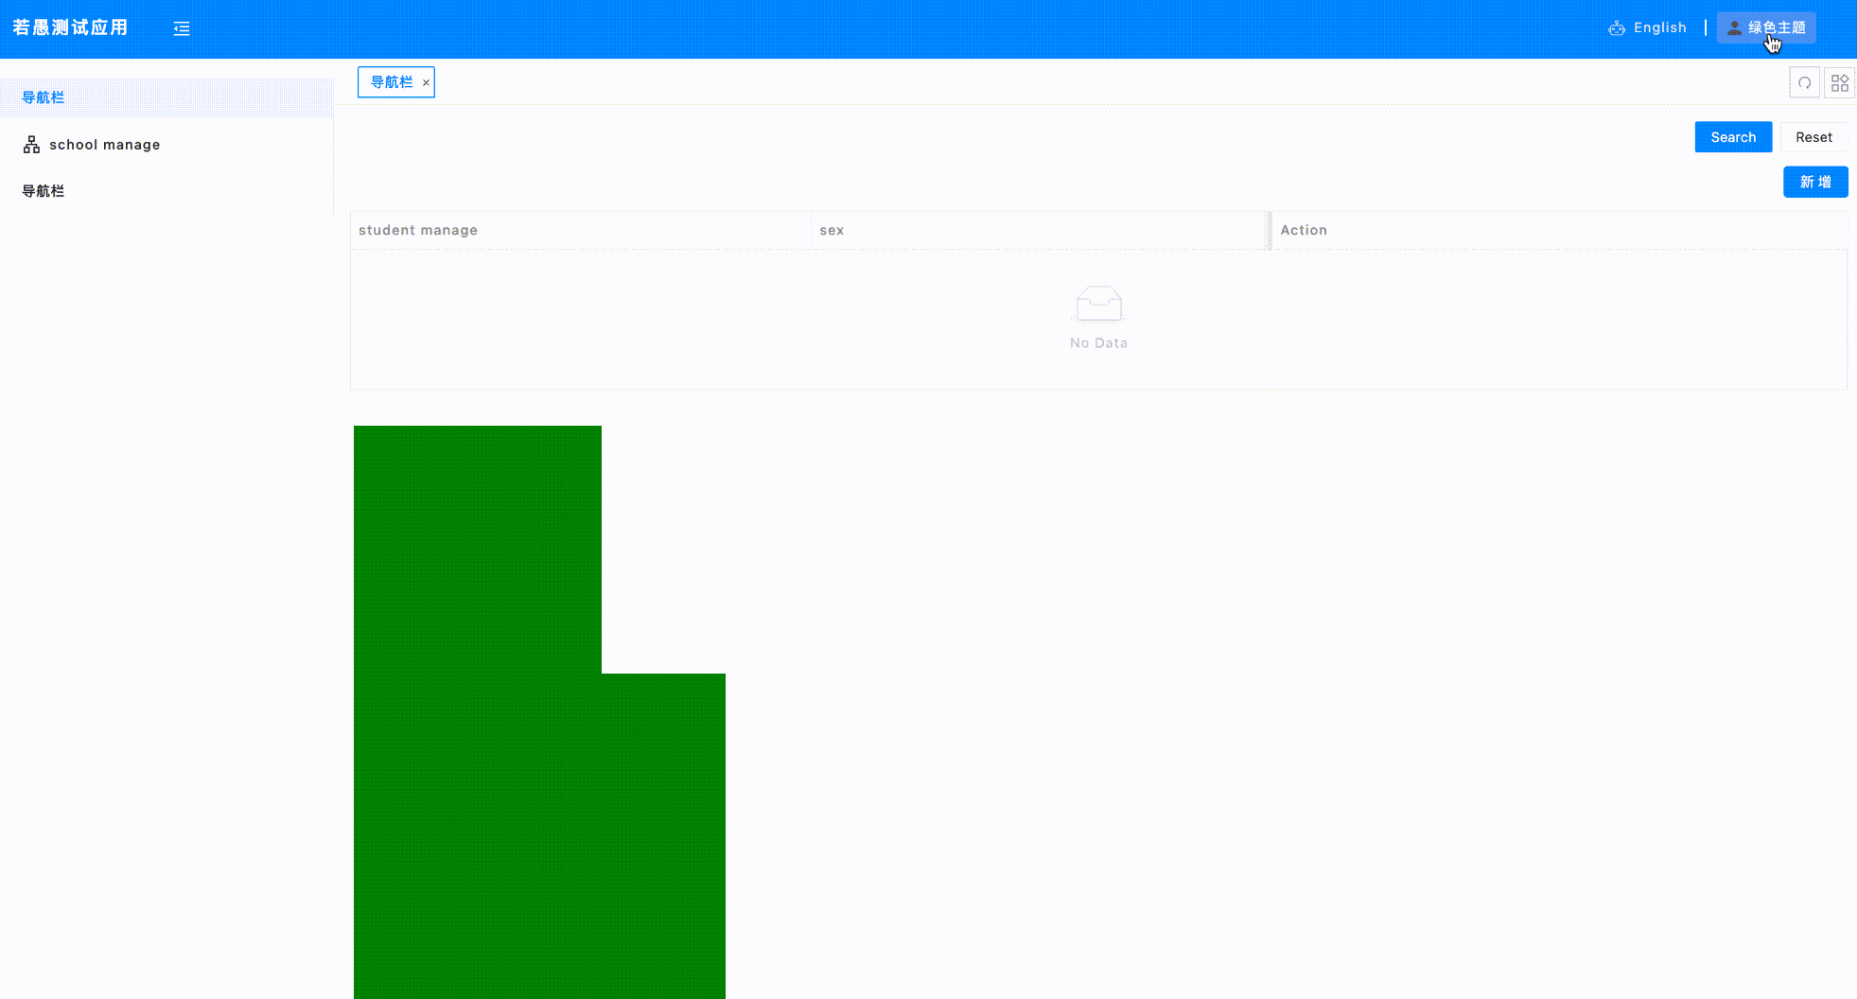
平台渲染方式 css 编写方案
方案一:css 变量的方式(推荐使用)
优点: 变量的方式方便统一维护,在自定义 DOM 内书写一套 css 即可
缺点: 需要自己定义多个主题变量
在主题文件内定义 css 变量
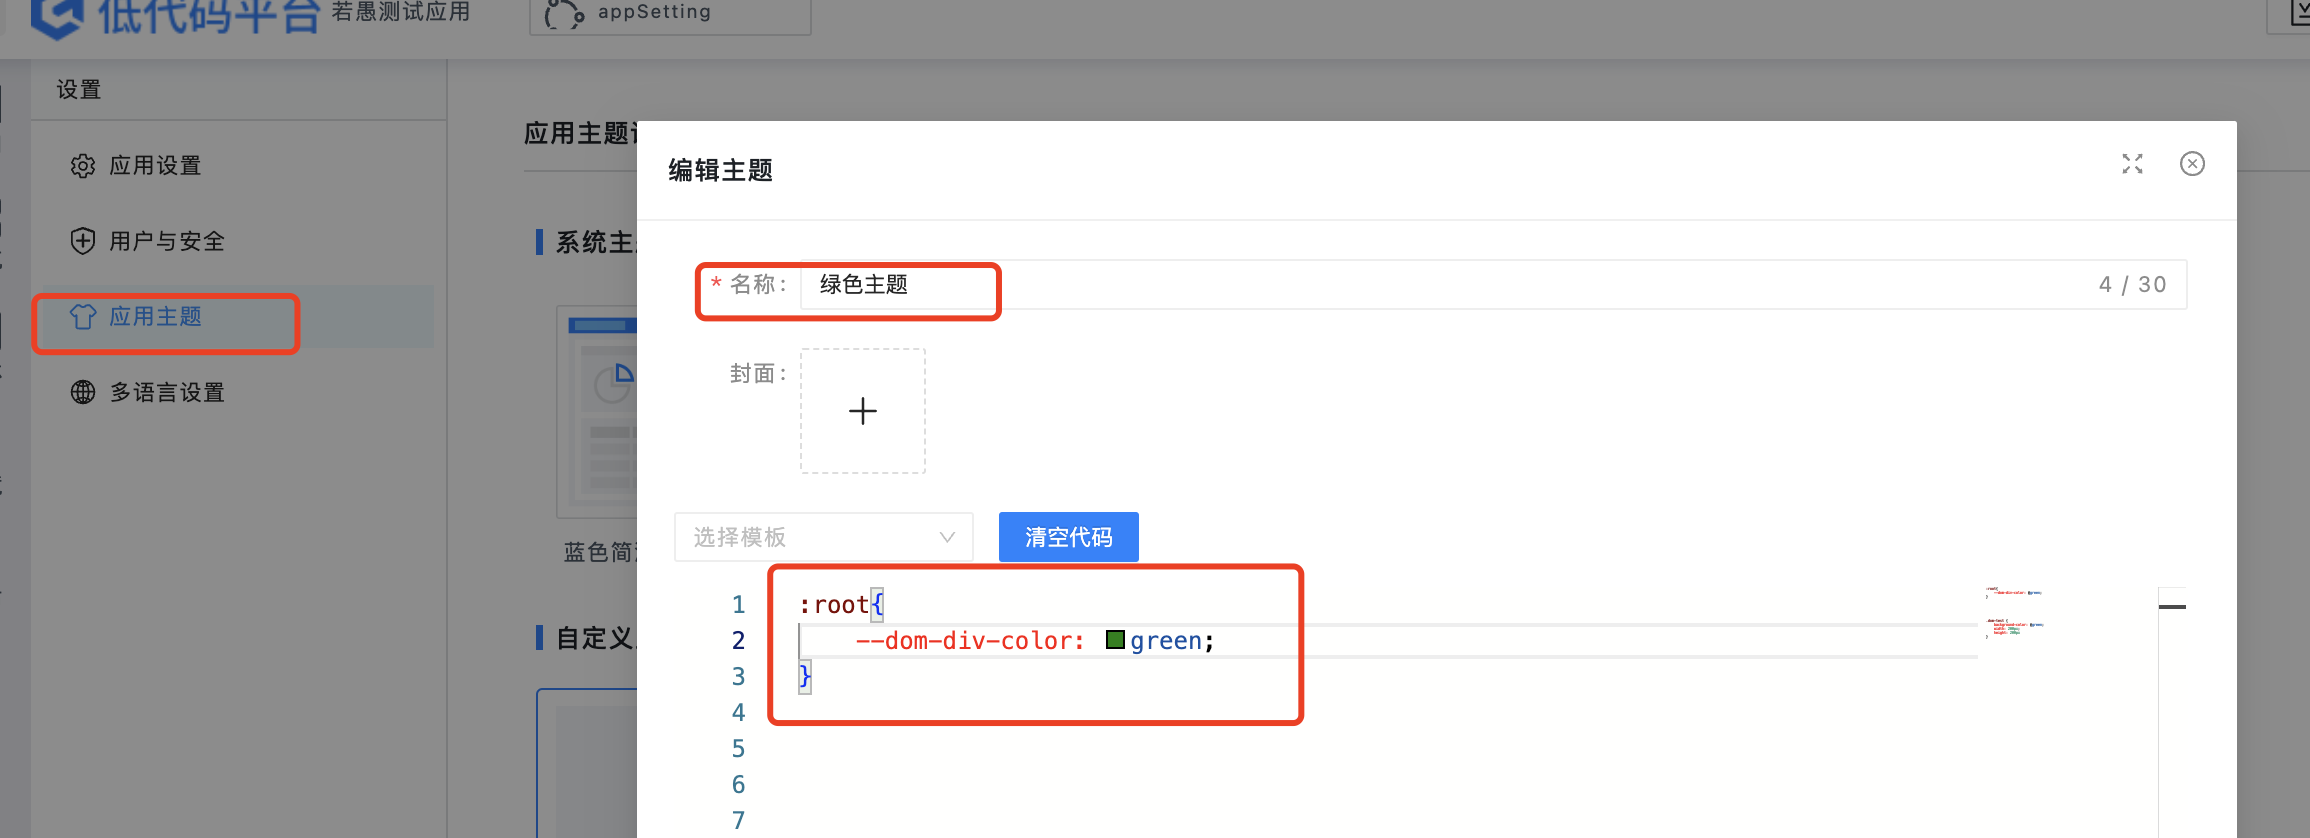
在自定义 DOM 内使用变量
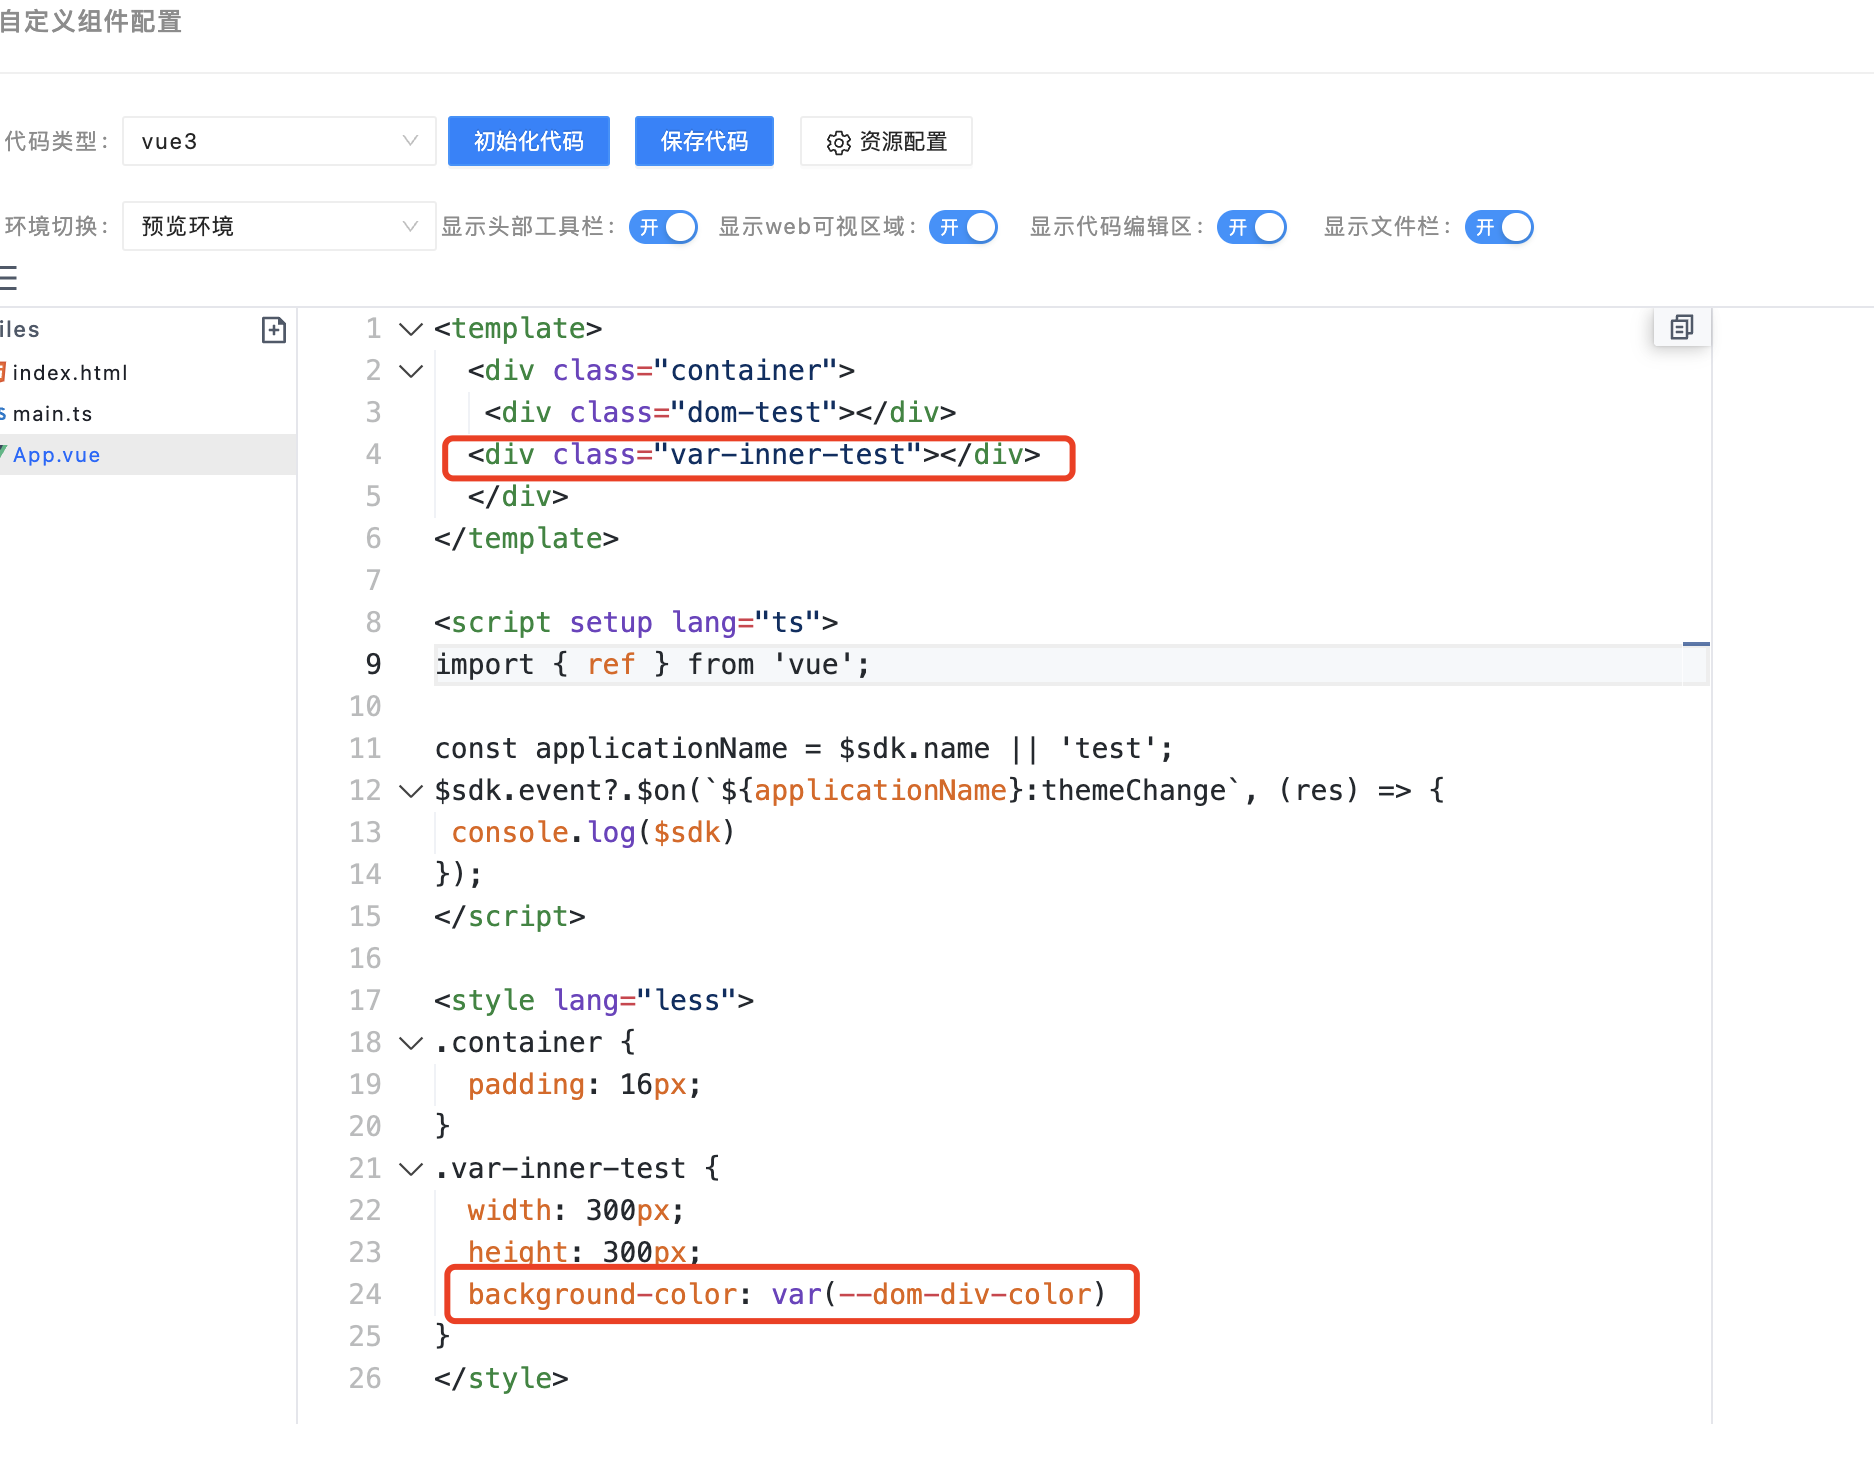
效果展示:
方案二
优点: 所有主题相关的样式都维护在应用配置的主题 css 文件内,方便管理
缺点: 自定义 dom 的样式需要在外层主题设置弹窗内编写
- 在应用设置的主题内定义自定义 dom 相关的主题
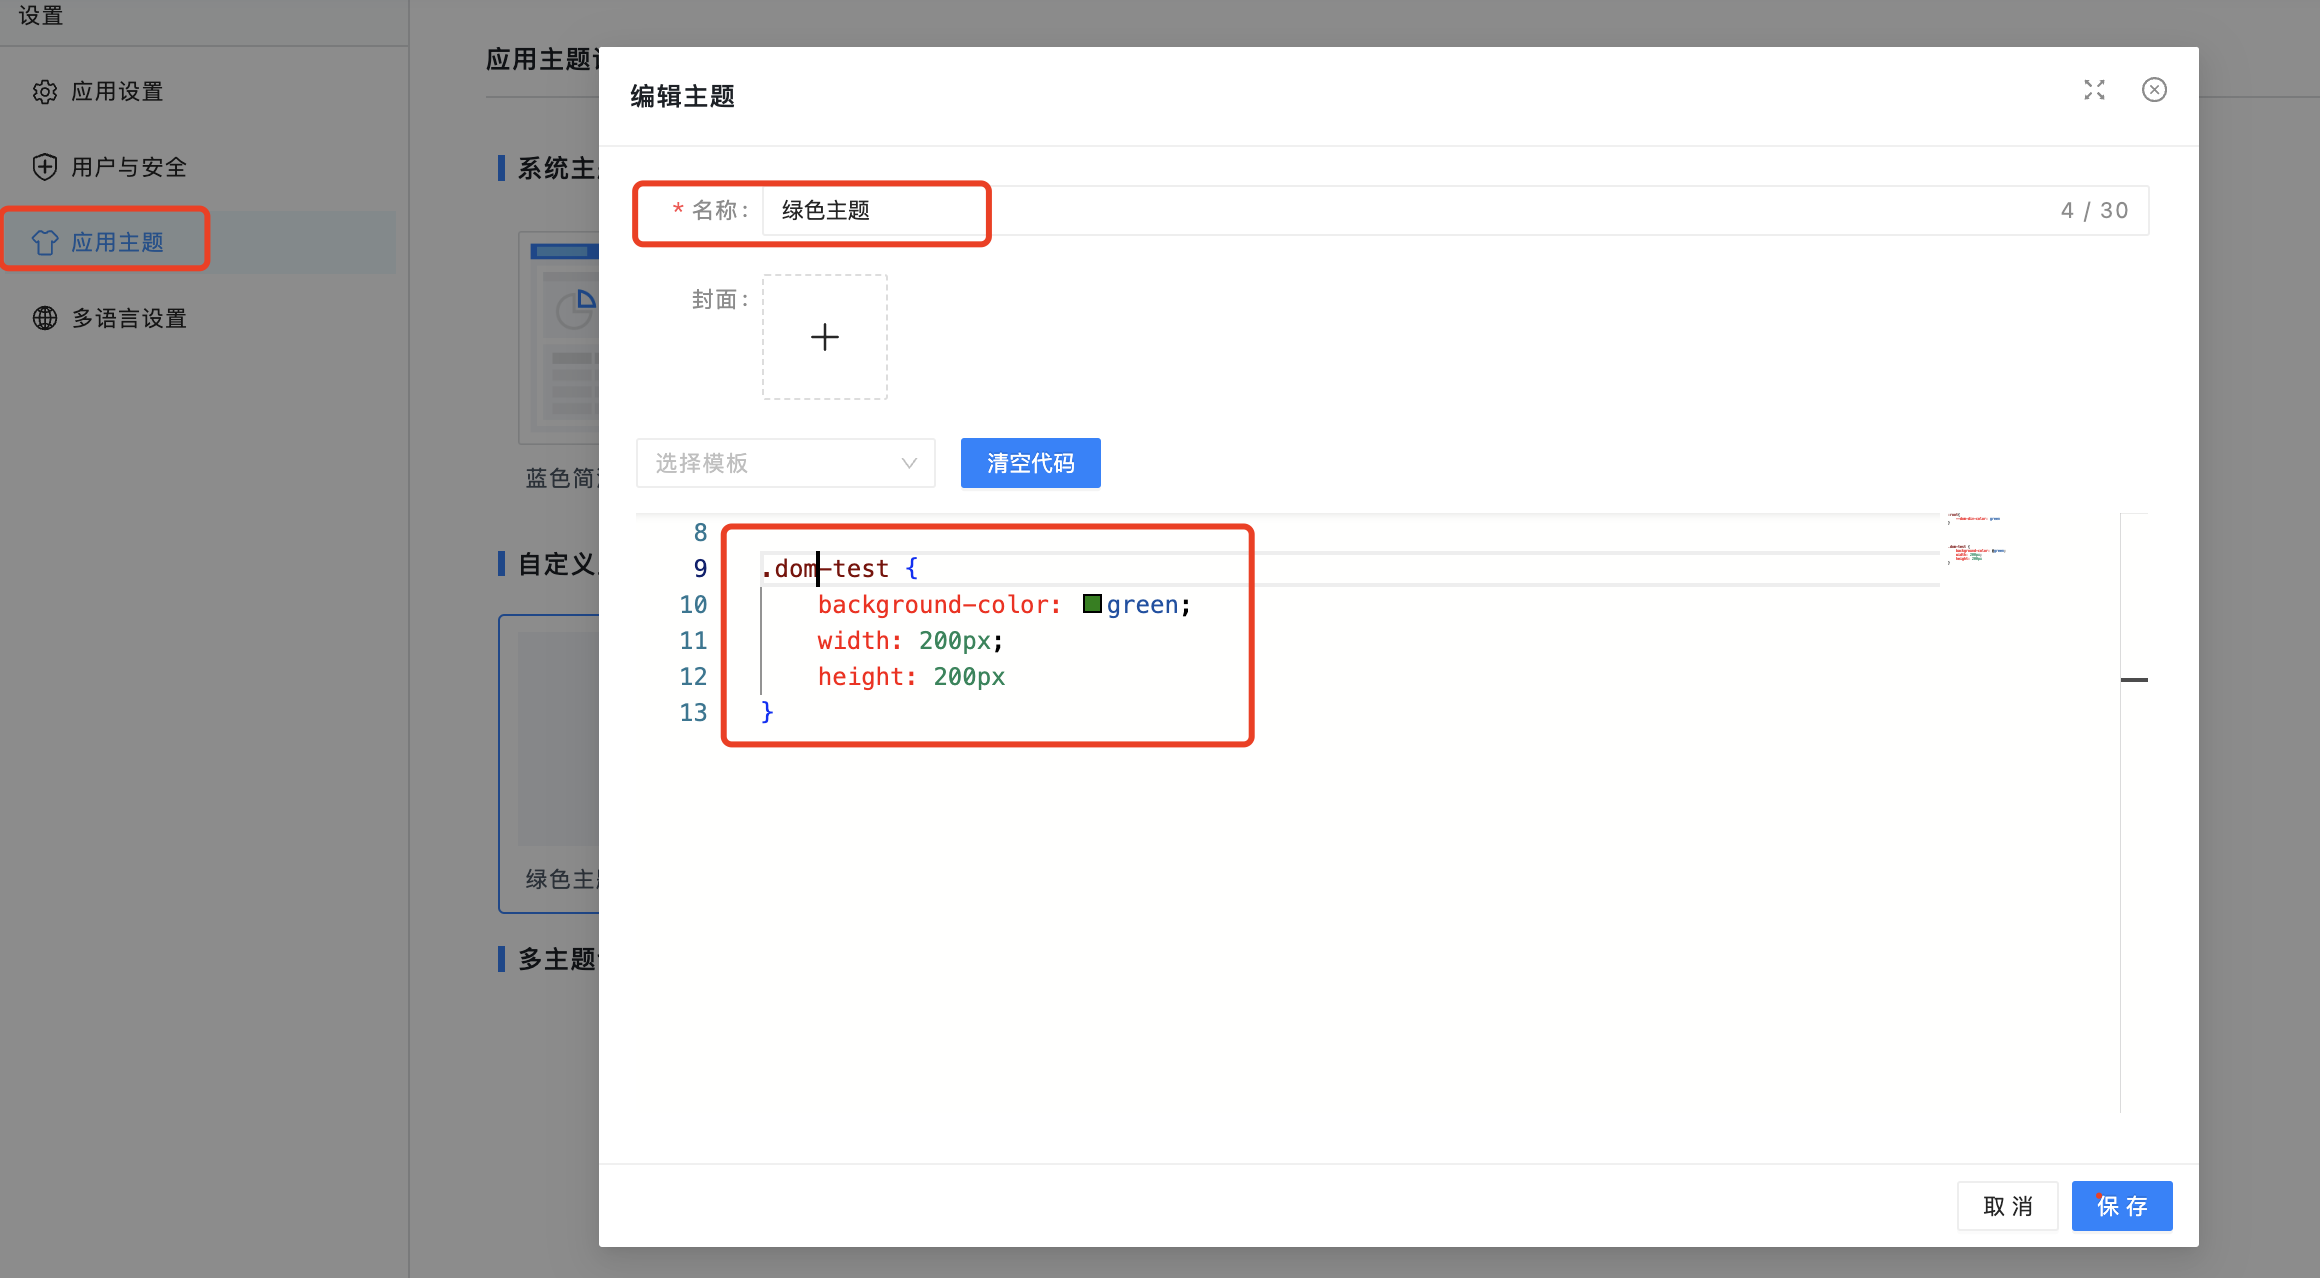
DOM 内样式编写
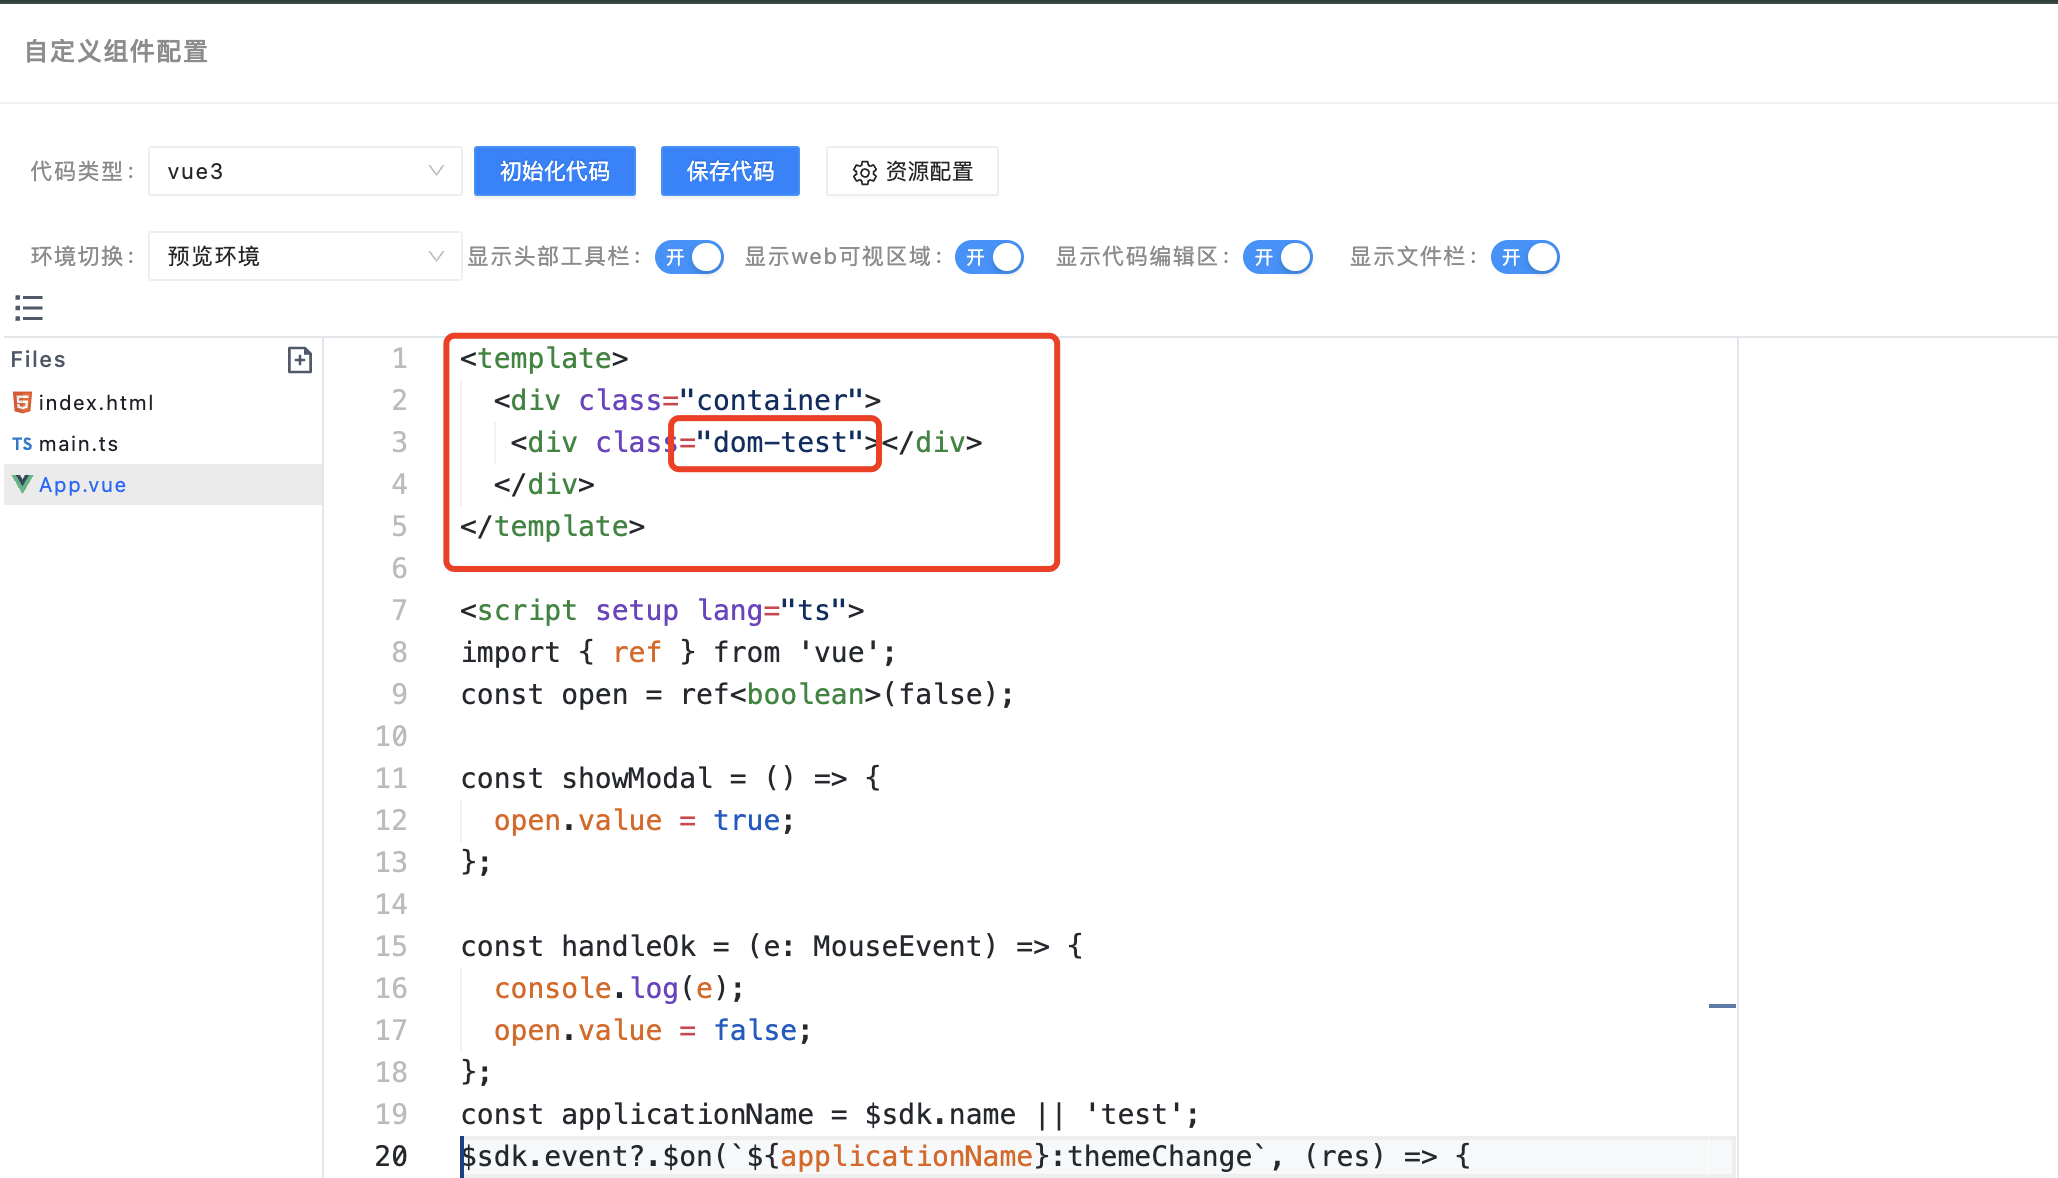
效果展示:
4 常见问题
- 使用自定义 DOM,使用平台渲染方式如何使用 Modal.confrim 和 message.error 提示能力?
使用平台的方式,平台已经注入了资源,请参考上面的介绍
推荐使用下面写法用 Modal 和 messageimport { Modal, message } from 'ant-design-vue';
// 调用方式
Modal.confirm({
title: '删除企业信息',
content: '确认删除吗?',
okText: '确认',
cancelText: '取消',
onOk: () => {
$sdk?.callCmd('CALL_MICROFLOW', {
resourceName: 'delCompanyInfo',
params: {
paramKeyMap: {
id: item.gonggong_id
}
}
},
(res) => {
console.log('del-res', res);
const { err, result } = res;
if(err) {
message.error(err.errmsg || '未知错误');
} else {
message.success('删除成功');
// 刷新列表数据
searchCompany();
}
});
}
});
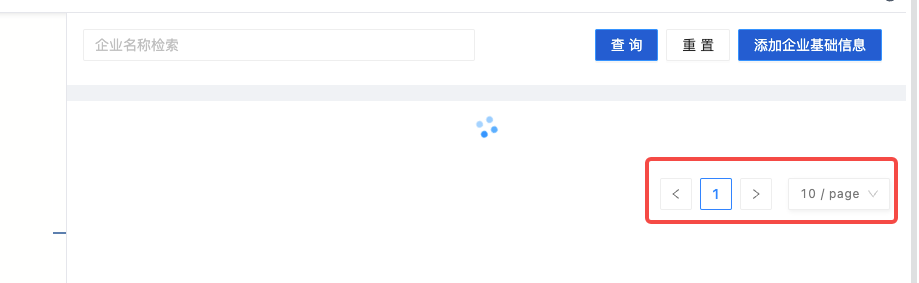
- 使用自定义 DOM 开发组件,使用到分页器的场景,可以发现我们分页器的选择每次展示条数的时候显示的是英文,如何解决?
通常开发一个完整的应用是通过 ConfigProvider 组件传递国际化信息,所以也可以使用这种方式设置想要的语言信息
案例参考如下:
<template>
<a-config-provider <em>:locale="zhCN"></em>
****
</a-config-provider>
</template>
<script lang="ts" setup>
    import zhCN from 'ant-design-vue/es/locale/zh_CN';
</script>
显示效果:

后续如果平台开启了国际化,这里可以通过组件传参的方式获取到国际化信息,或者通过本地缓存直接拿到,进行同步处理
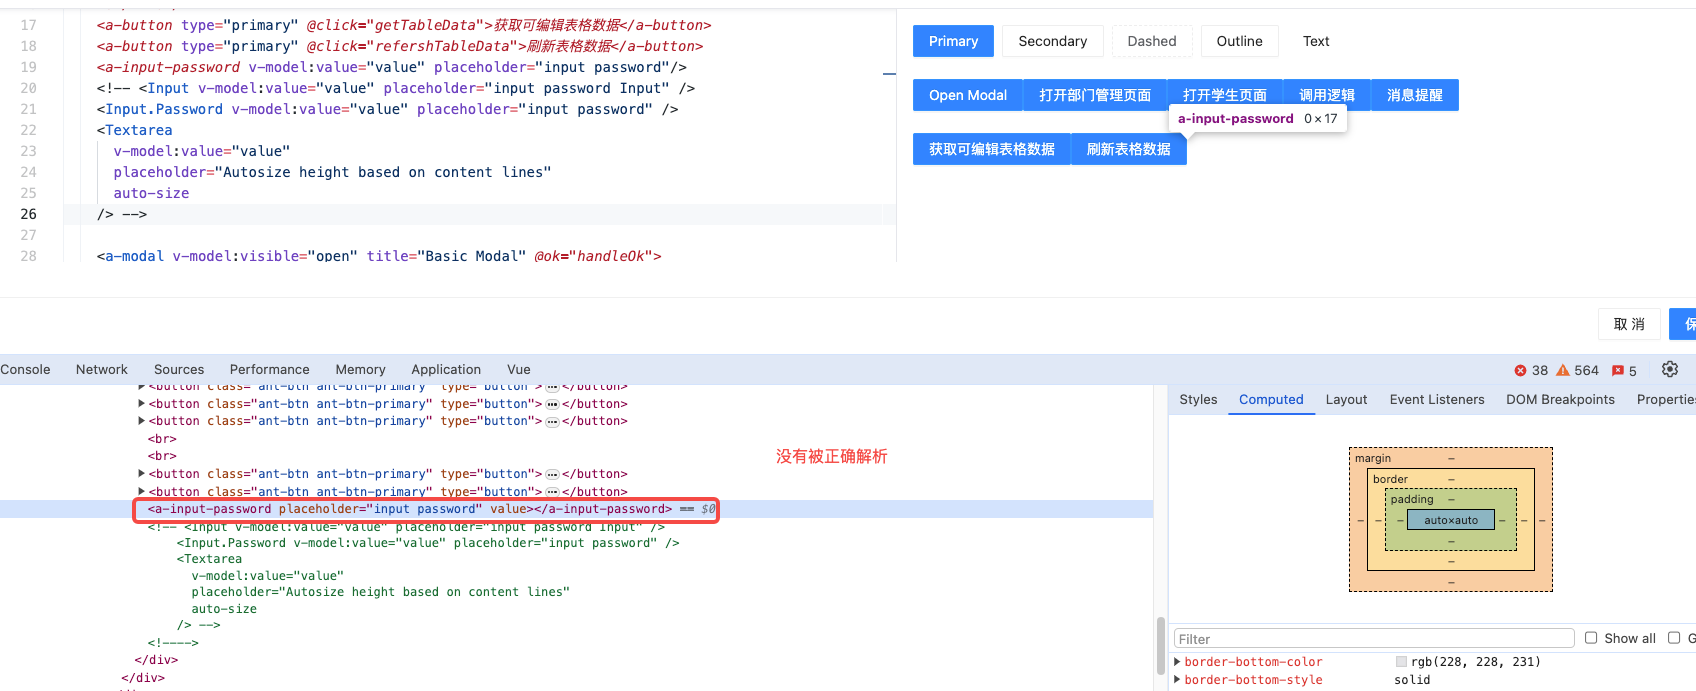
- 使用自定义 DOM,使用平台渲染方式如何使用 InputPassword 和 Textarea 的能力?
// 页面上直接使用
<em><a-input-password</em> v-model:value="value" placeholder="input password"/>
// ts模块
<template>
<em><Input</em> v-model:value="value" placeholder="input password Input" />
<Input.Password v-model:value="value" placeholder="input password" />
<InputPassword v-model:value="value" placeholder="input password1" />
<Textarea
  v-model:value="value"
  placeholder="Autosize height based on content lines"
  auto-size
/>
</template>
<em><script</em> setup lang="ts">
import { ref, onMounted } from 'vue';
import { Input, InputPassword, Textarea } from 'ant-design-vue';
</script>

- 自定义 DOM 想要使用图片、视频等媒体资源怎么支持?
平台本身是支持维护媒体资源的,如下图
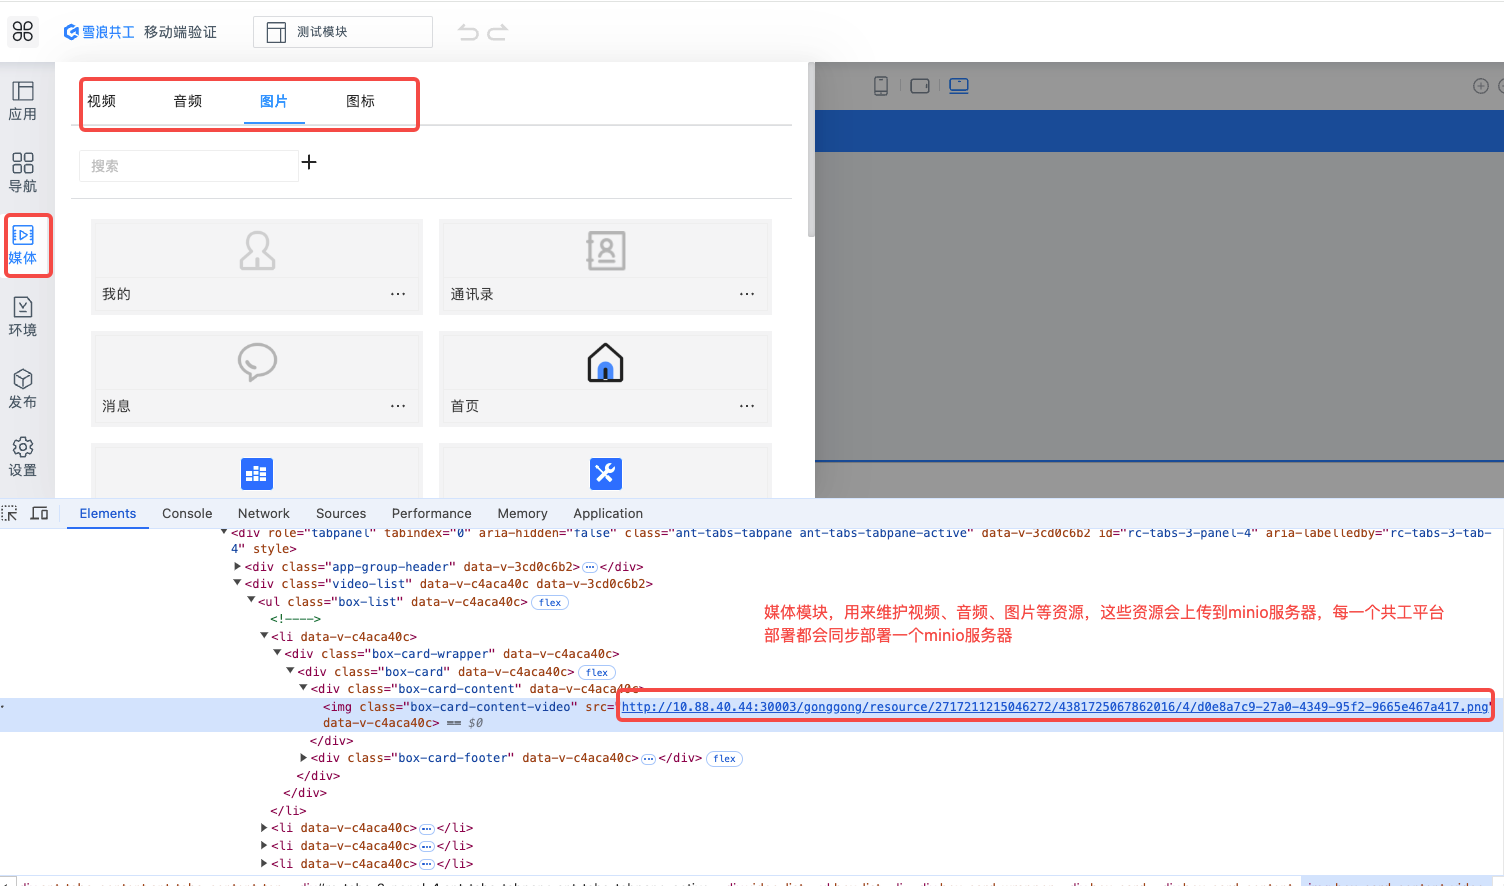
所有的 minio 资源的前缀在平台内部是通过接口获取到的,考虑到应用可能会迁移的情况,文件资源地址可能会变化,自定义 DOM 里面也可以只维护相对地址,通过拼接前缀地址的方式获取实际的资源地址
自定义 DOM 获取平台 minio 资源地址可以参考 2.2.1.5 节调用 SDK 请求平台接口能力
建议用到媒体资源的地方尽量都上传到平台,这样应用迁移的时候不需要手动再调整自定义 DOM 代码。
除了调用接口,也可以通过 $sdk 属性获取到文件前缀,可查看暴露出来的内容:
fileUrlPrefix: string; // minio文件前缀
- 无网环境离线部署的环境想使用自定义 DOM iframe 渲染模式,需要下载三方依赖包如何支持
无网环境想要支持 esm 资源的加载,需要在无网环境部署一套私有化的 esm 环境
- esm 资源如何找到对应版本的资源?
当前平台如果是安装了私有 esm 库,可以尝试下根目录/esm 访问资源是否可以访问,可以访问代表 ngnix 做了代理,可以配置相对地址访问
可以参考 https://cdn.jsdelivr.net/npm/ant-design-vue@4.1.0/ 这样的地址去访问,如下图
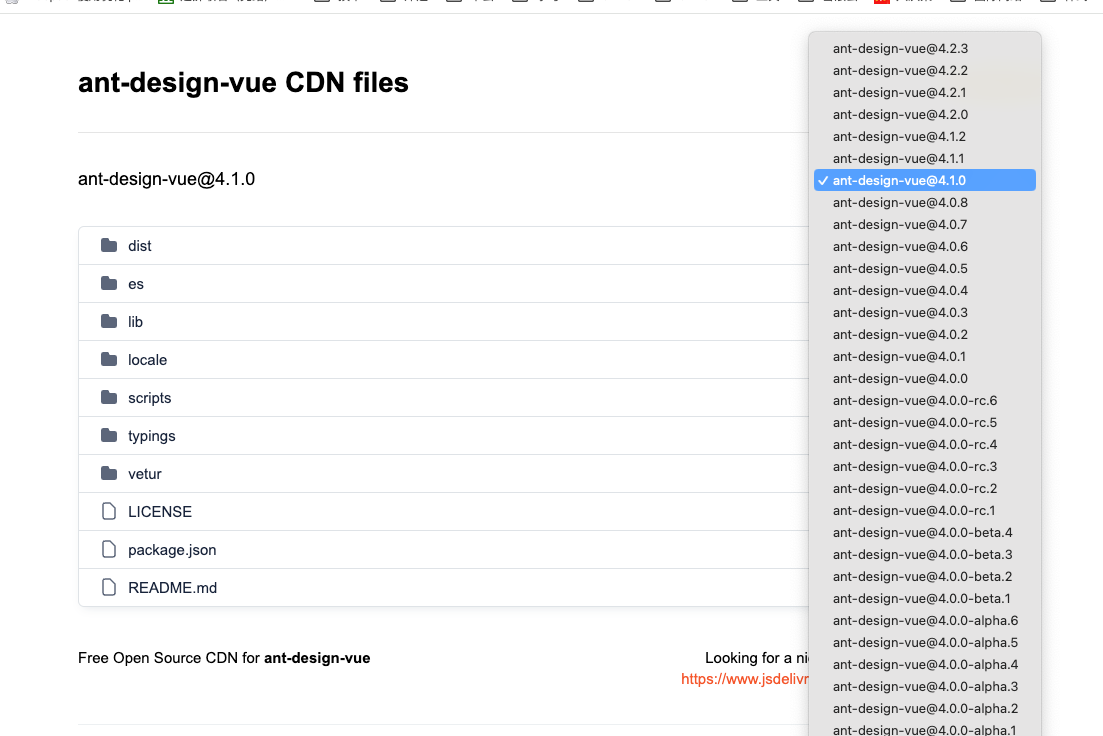
可以看到所有版本的资源,需要选到对应的资源目录去看产出包内容
import-map.json 的配置资源不限于 esm.sh,也可以到 cdn 平台上找到对应的 esm 资源使用
下面是一个 demo 案例:
esm 资源引用:
{
  "imports": {
    "vue": "https://esm.sh/stable/@vue/runtime-dom@3.4.10/es2022/runtime-dom.mjs",
    "ant-design-vue": "https://esm.sh/ant-design-vue@4.1.0"
  }
}
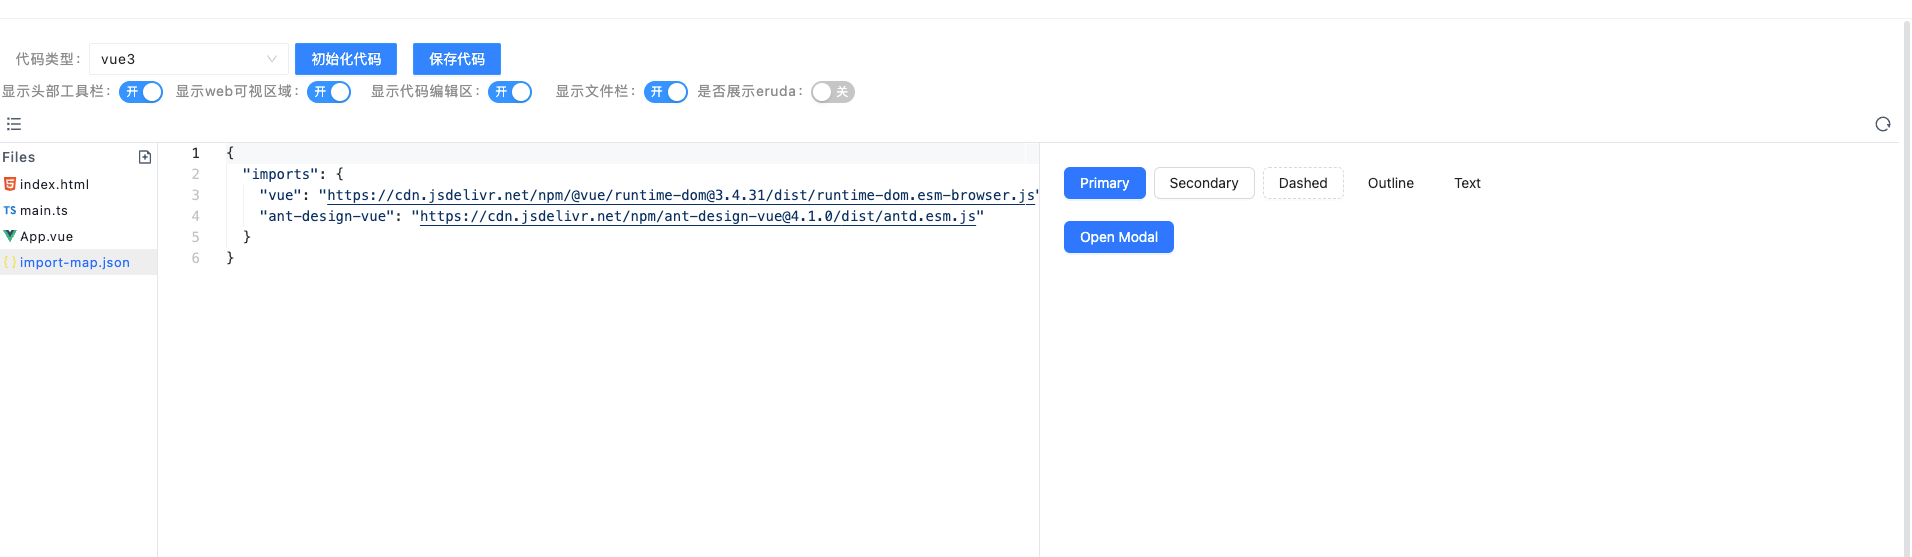
到 cdn.jsdelivr.net cdn 平台上面找,可以找到替代品:
{
  "imports": {
    "vue": "https://cdn.jsdelivr.net/npm/@vue/runtime-dom@3.4.31/dist/runtime-dom.esm-browser.js",
    "ant-design-vue": "https://cdn.jsdelivr.net/npm/ant-design-vue@4.1.0/dist/antd.esm.js"
  }
}
可以看到,效果是相同的